Tutorial: Convert Visualforce to Lightning
Overview
High-Level Transition Steps
After you've installed the latest version of FormBuilder Rx and DXP, there are a few steps you need to take to enable Lightning Experience for FormBuilder. Following is a high-level list of the steps:
- Enable Admin DXP Configuration for FormBuilder Rx
- Create a New Digital Site Build Your Own (BYO) Lightning Template
- Set up a new FormBuilder Environment for Bolt BYO Template
- Set up FormBuilder for DXP:
- New Lightning Templates
- A DXP Permission Set for Users
- Tweak Form Pages for DXP
- Set Up Digital Site BYO (AURA) Workspace Administration
- Set up Login and Registration
- Set up the Homepage
- Activate the Digital Site
- Set up a Guest User for Digital BYO (AURA) Site
- Digital Site BYO (AURA) Builder Settings
- Update FB Env for Registration Url
- Update Call Back Button Script (if exists)
- Homepage Setup
- Publish and Test.
Enable Admin DXP Configuration for FormBuilder Rx
To enable DXP configurations for the FormBuilder Admin Panel, you'll need to update the FormBuilder Rx custom setting using below steps:
- Go to and search for “Custom Setting” in the Quick Find box. Go to the
FormBuilder Setting and click "Manage."
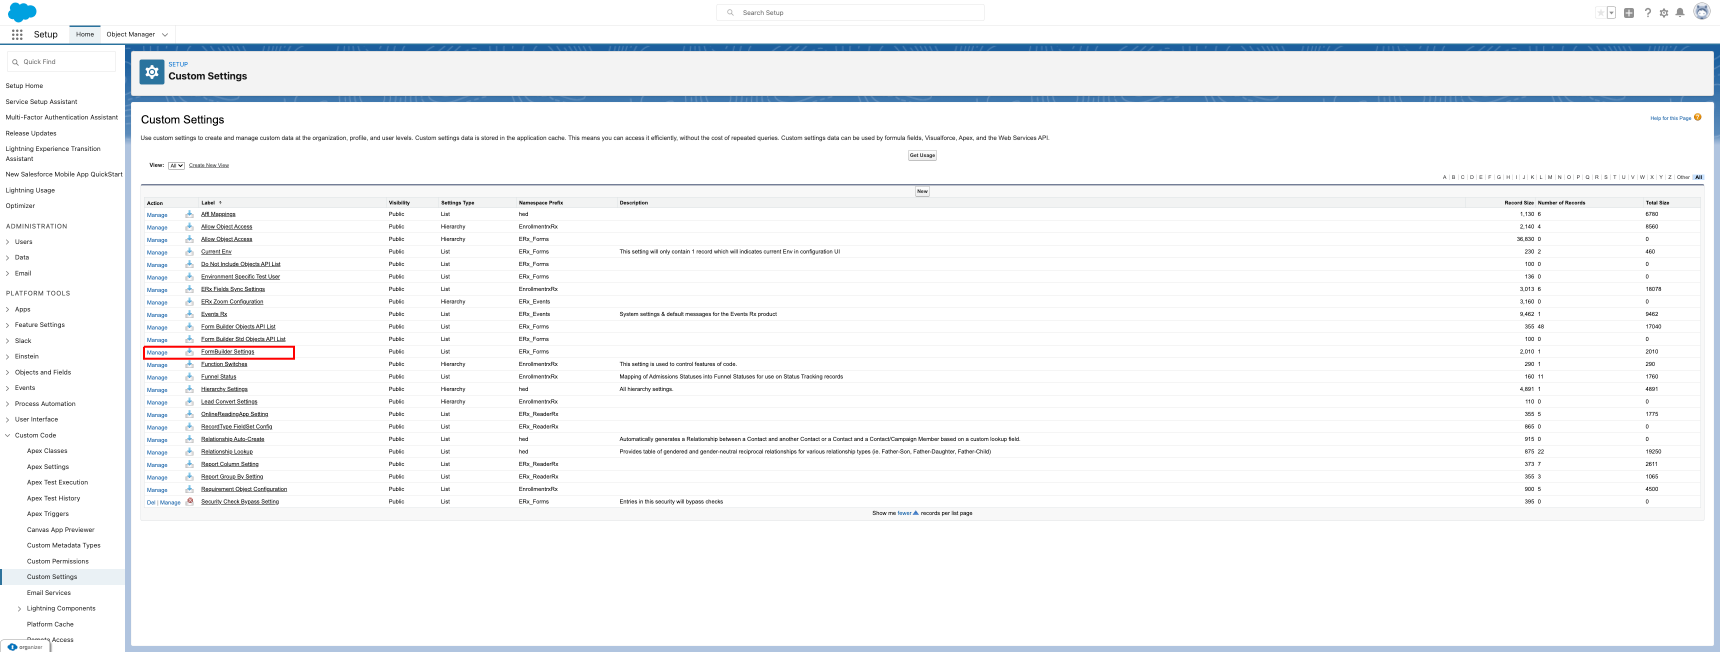
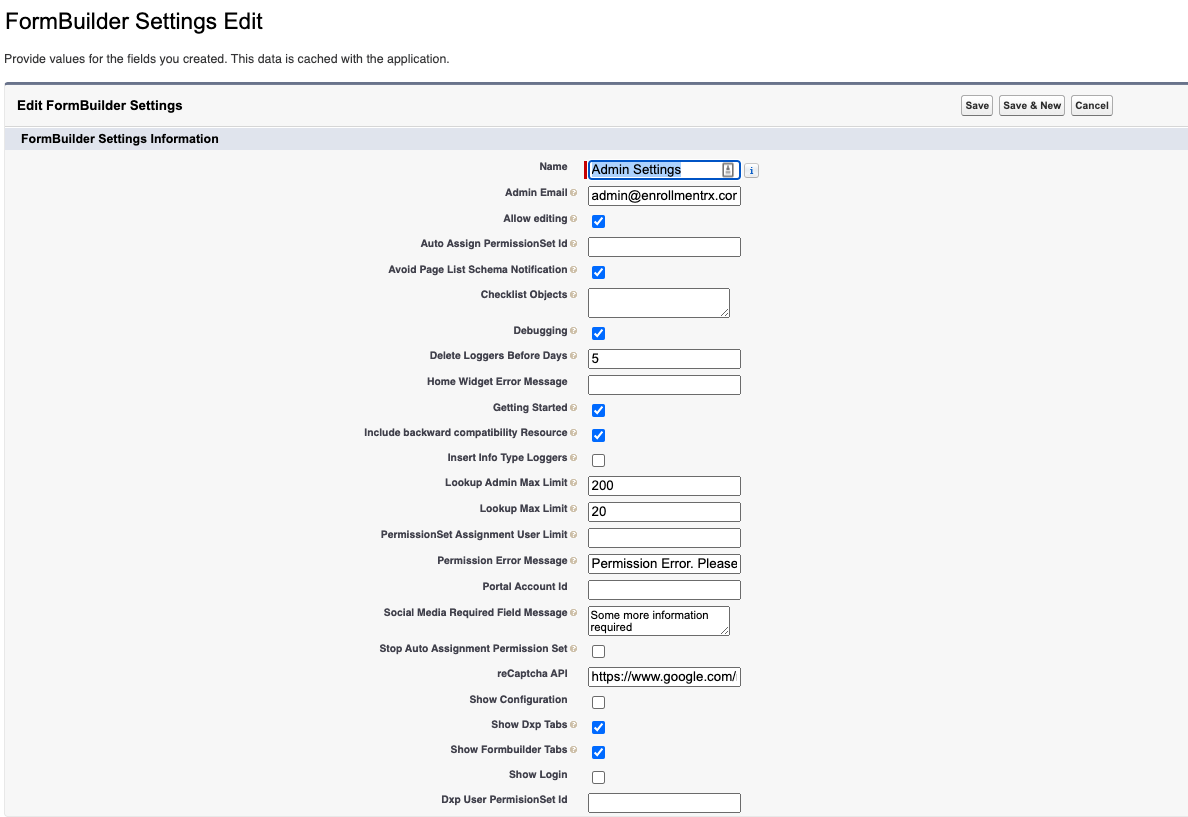
- Click "Edit" for the Admin Settings record and activate Show Dxp Tabs and Show
FormBuilder Tabs, if not active. Then, Save the changes.
- Go to the Formbuilder Rx Admin Panel and verify that DXP tabs named Login
Builder (DXP) and Widget Builder (DXP) are visible as shown below.

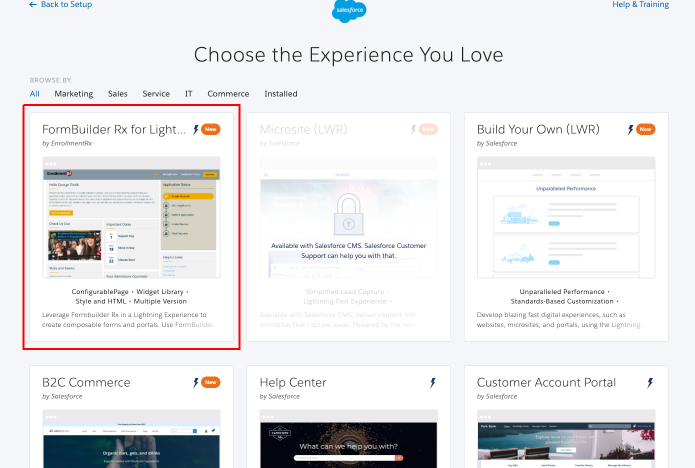
Create a New Digital Site BYO Lightning Template
- Go to Setup and search for

- Choose the Enrollment Rx Bolt Solution Template named "FormBuilder Rx for
Lightning."
- Next, click on the Get Started button.
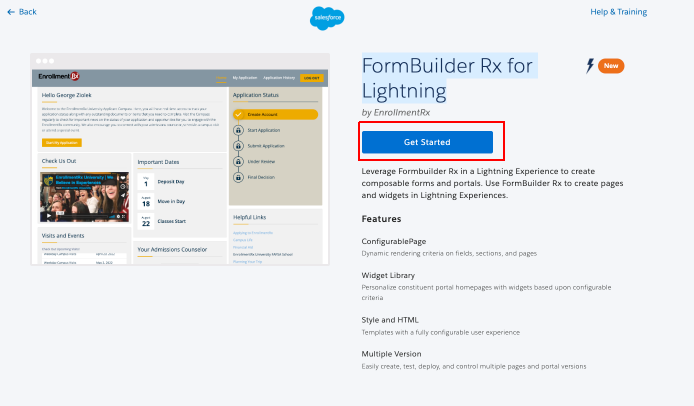
- Enter a Name and URL to create the new digital site.
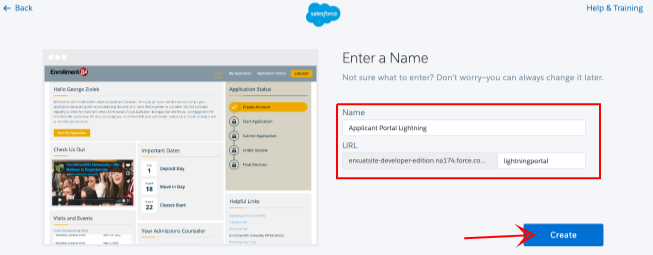
- Wait for Setup to complete.

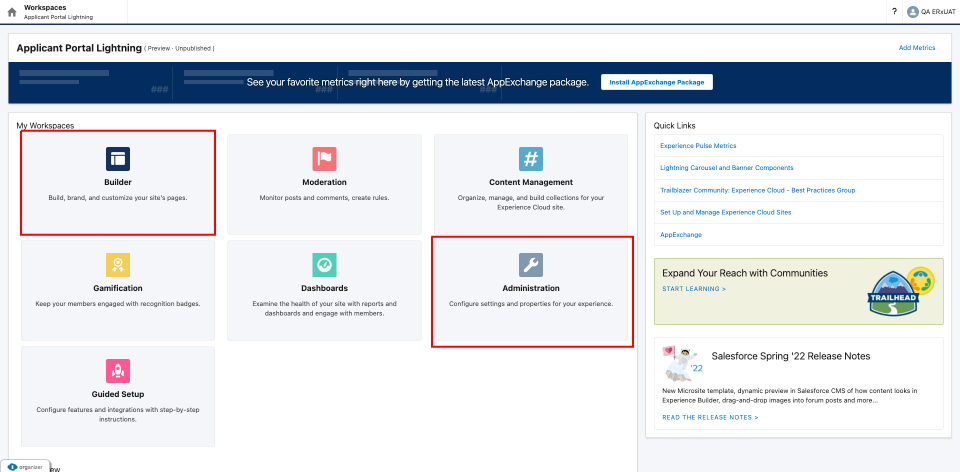
- Once completed, you will see below screen. Two sections, Builder and
Administration, will be used in later steps.
Set up a new FormBuilder Environment for the Bolt BYO Template
- Go to the FormBuilder Admin Panel, create a new Environment for a new BYO
Portal/template/digital site and click Save.

- Select a new FormBuilder Environment.

- Click on the New Version icon and clone the pages, registration messages and
widgets from a working FormBuilder Visualforce portal, as shown below.
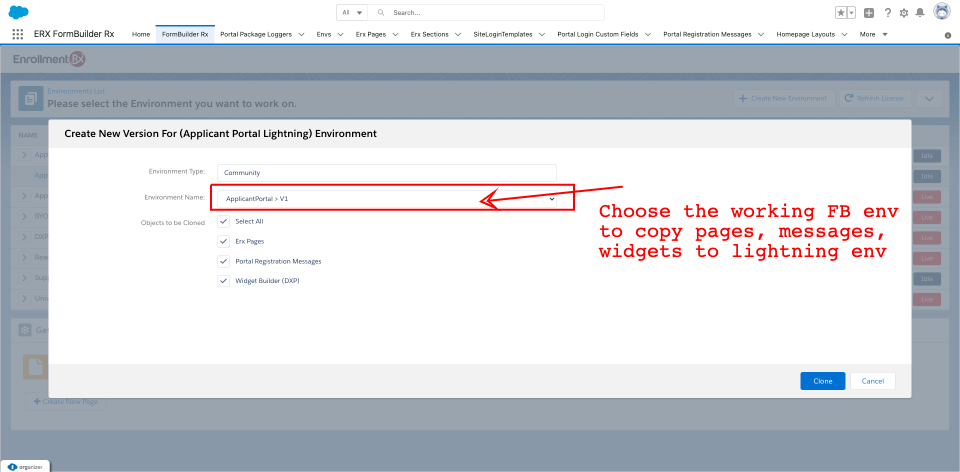
- If this is successful, you'll see the below notification.

- Set the environment to Live mode.
Set up FormBuilder for DXP
You'll need to make some modifications for the Lightning environment in five modules of FormBuilder.
Template Builder Changes (New Template For Lightning)
- Go to the FormBuilder Admin panel, click on Template Builder, and click on New Template.
- Next, select ERX Template, choose the “Lightning” radio button, select the
template and Save.
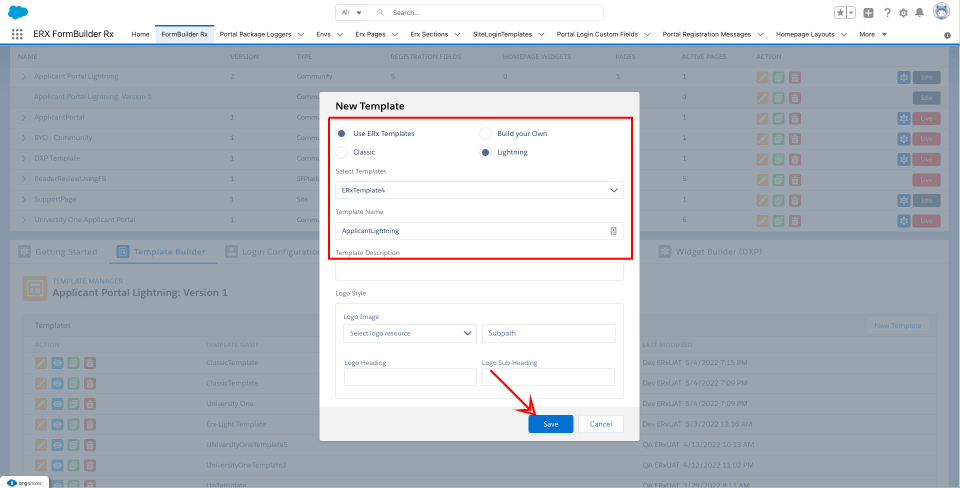
- Edit the newly created template and set as default.
DXP Permission Set for Users
- Go to Login Builder (DXP) and click on the Message button.
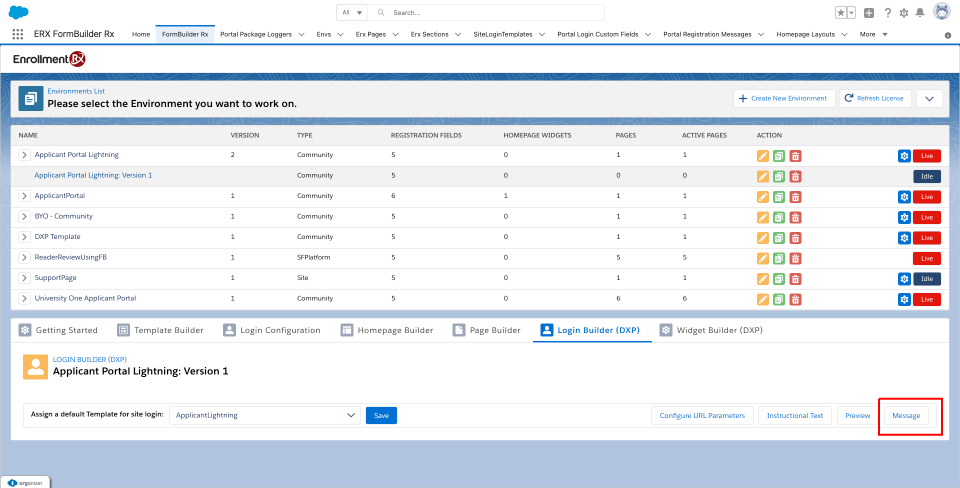
- Select the Dxp_Full_Access permission set and Save.

Tweak Form Pages for DXP
- URL Change: FormBuilder pages will have new URLs
(/page-maker?c__pageid=My Profile) that will need to be updated throughout the
entire Lightning portal.

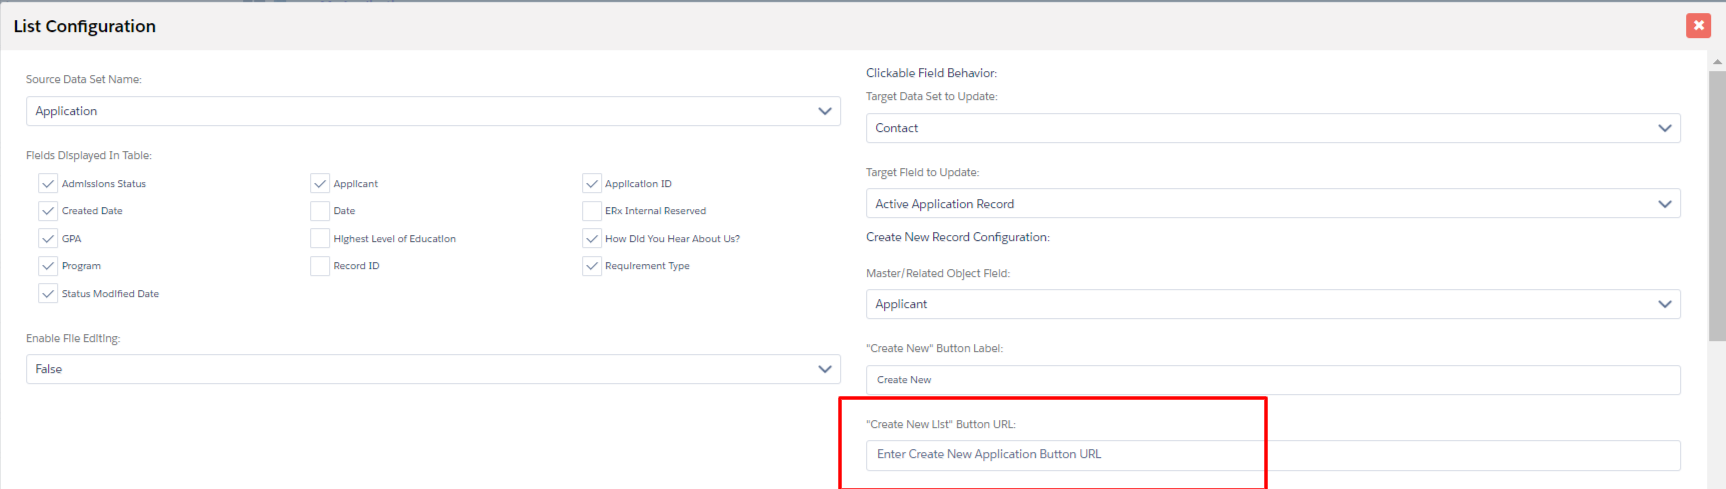
- List Component Change: You'll need to update all the pages that contain
the list component for the “Create New List Button URL” with a new URL.
Digital Site BYO (AURA) Workspace Administration
Set up Login and Registration

- Go to Workspace Administration and click on the Login and Registration tab
- Choose the Experience Builder login page called “Login”
- Choose the Experience Builder "Forgot Password," map the page “Forgot Password,”
and Save.

Set Up the Homepage
Activate Digital Site
Setup Guest User for Digital BYO (AURA) Site
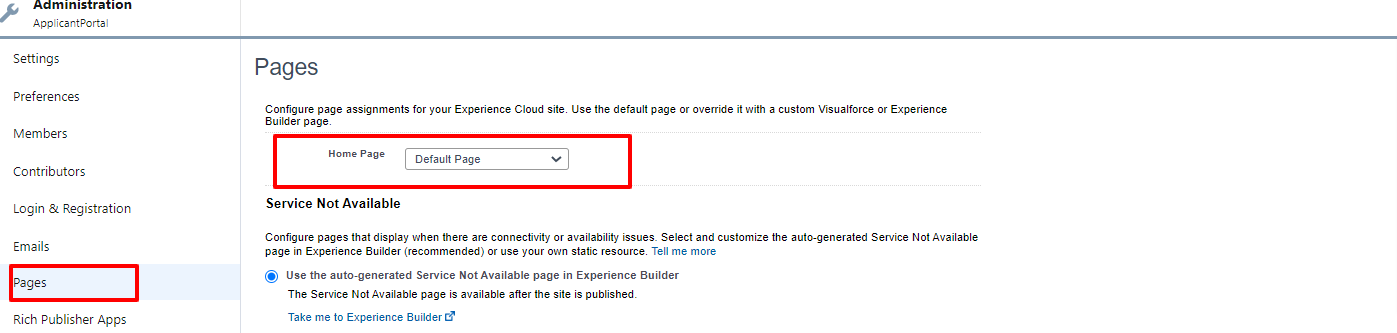
Admin need to change the homepage and assign DXP permission set “DXP FULL ACCESS”
Site Homepage
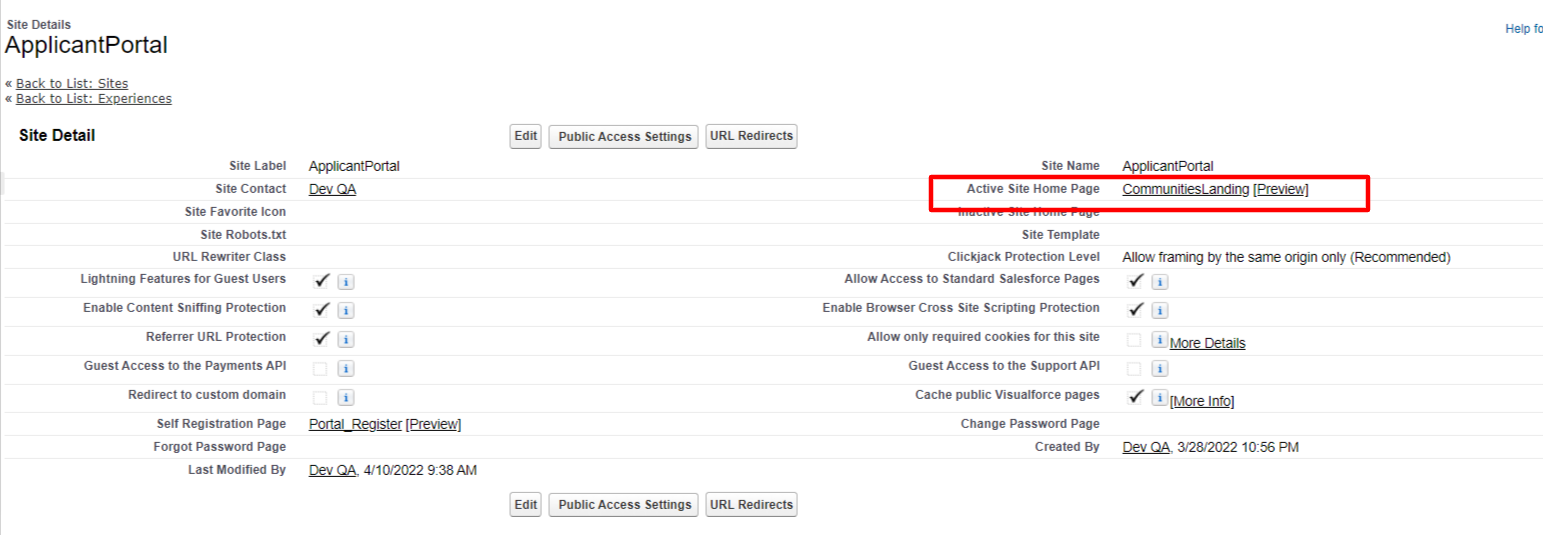
DXP Permission Set
Click on and assign the DXP FULL ACCESS PermissionSet.
Digital Site BYO (AURA) Builder Settings
LOGIN / Pagemaker-Registration/Forgot password page
LOGIN PAGE
Open the URL (this is unique from org to org) in "incognito mode" in the browser. The URL should redirect to the Login Page https://dxpwinter22-developer-edition.na213.force.com/ApplicantPortal/s/login/?
Forgot Password
Page Maker - Registration
After clicking on "New User," the page will redirect to the Page Maker registration page if you map the correct URL on the Environment details page https://dxpwinter22-developer-edition.na213.force.com/ApplicantPortal/s/login/SelfRegister
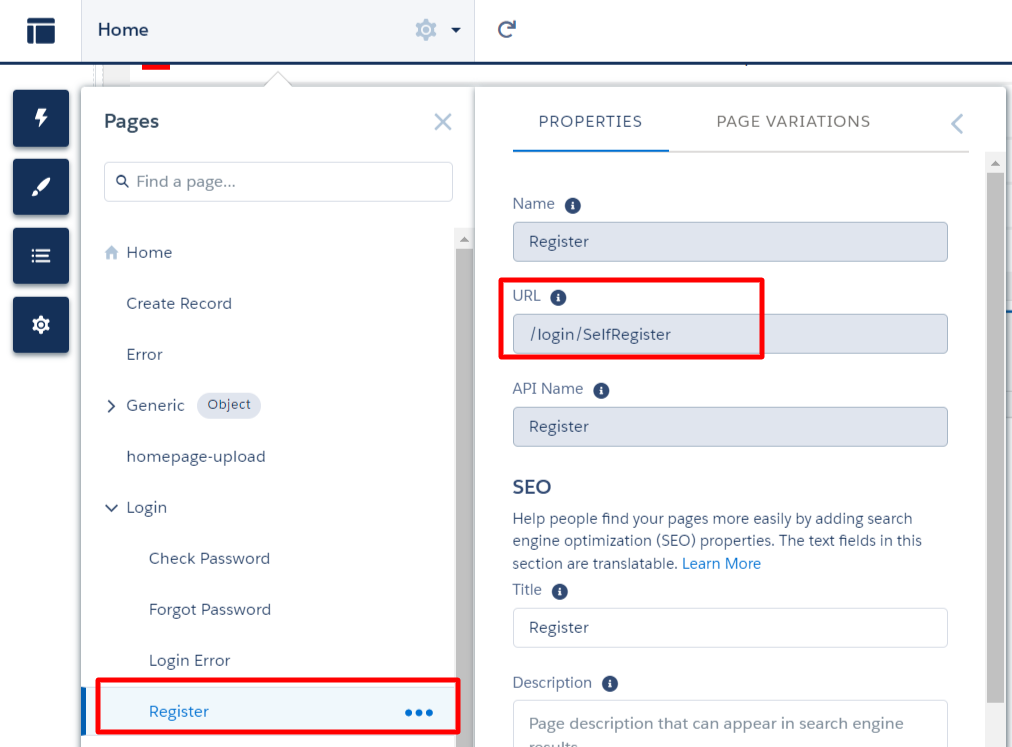
- If the registration page on the Page Maker side is the first page, the registration page can be accessed with the below URL https://dxpwinter22-developer-edition.na213.force.com/ApplicantPortal/s/login/SelfRegister
- If it's not the first page, you'll need to append a Page Maker ID to the above URL https://dxpwinter22-developer-edition.na213.force.com/ApplicantPortal/s/login/SelfRegister?lc__pageid=Registration
Update the FormBuilder Environment for the Registration URL
You'll need to update the above Registration URL in the FormBuilder Environment Self Registration URL by clicking Edit Environment in the FormBuilder Admin Panel.
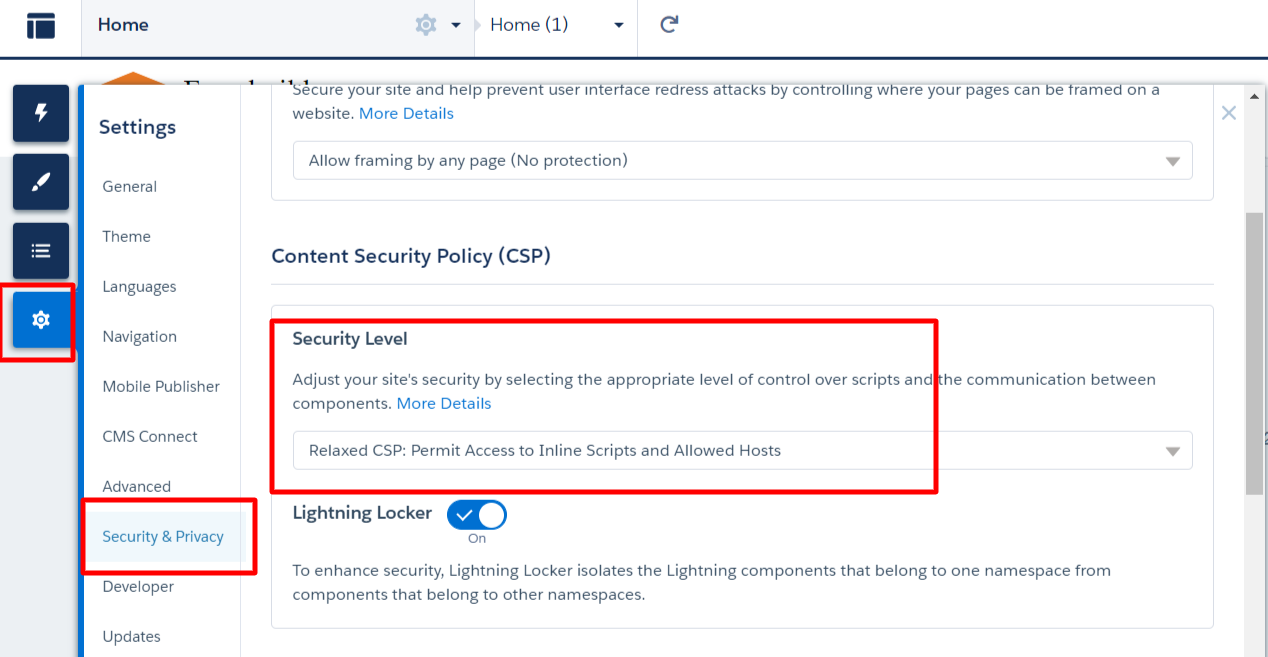
Security and Privacy
- Go to Settings and click on Security and Privacy
- Change the security level to "Relaxed CSP":
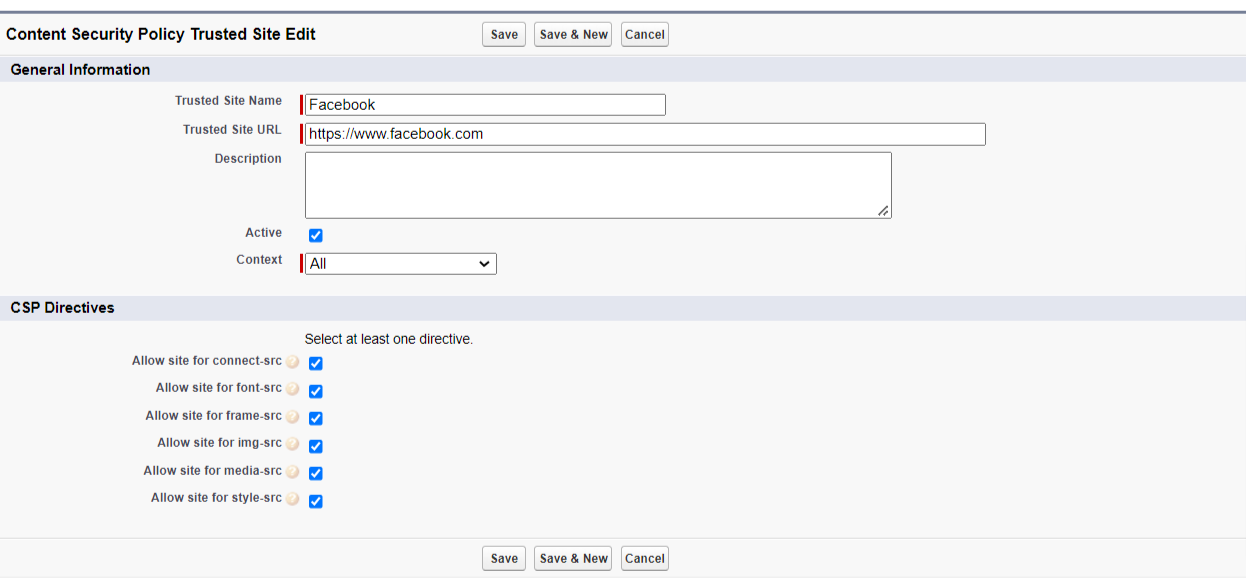
CSP TRUSTED SITE
In Experience Builder, if you use any of the below widgets, you'll need to add the external URL in the CSP trusted site on the Salesforce side:
- Video Link
- iFrame (any external URL)
- Social Feed (Facebook)
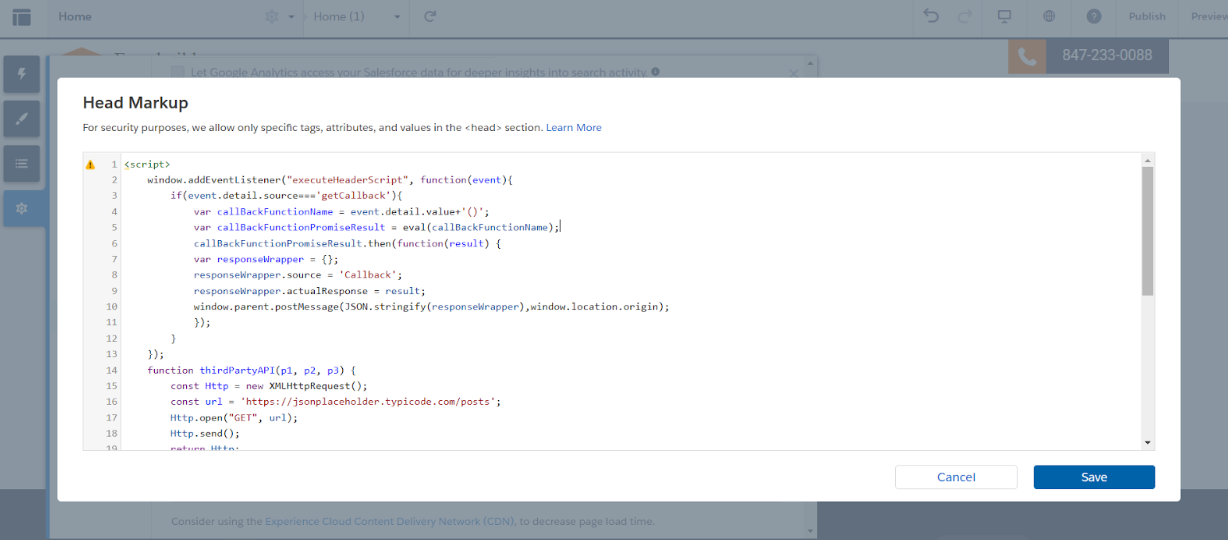
FormBuilder Button Script for the Call Back Method
This step is needed only when any of the FormBuilder pages are using a button call back script. You'll need to put the callback method script in Experience Builder instead of Template Builder using the below steps.
- Go to Experience Builder, click on Settings, click on Advanced, and click the
Edit Head Markup button

- Copy the script code from Template and paste in Experience Head Markup
Homepage Transformation
Widget Record Creation in the FormBuilder Admin Panel (Widget Builder DXP)
In Homepage configuration, you'll need to create all records related to the homepage using a Widget (for example, Application Status, Social Feed, Apply Now, Contact Info, iFrame, VIdeo, Greeting, etc.). Follow these steps:
- Click on the FormBuilder Admin Panel, click on Widget Builder (DXP) and click
New
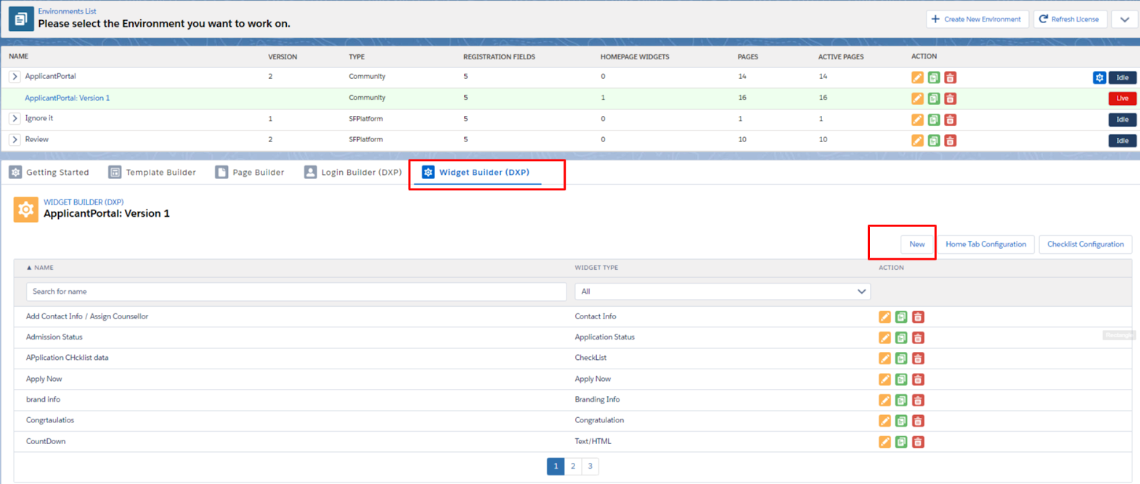
- A popup will be displayed with different types of widgets in a dropdown
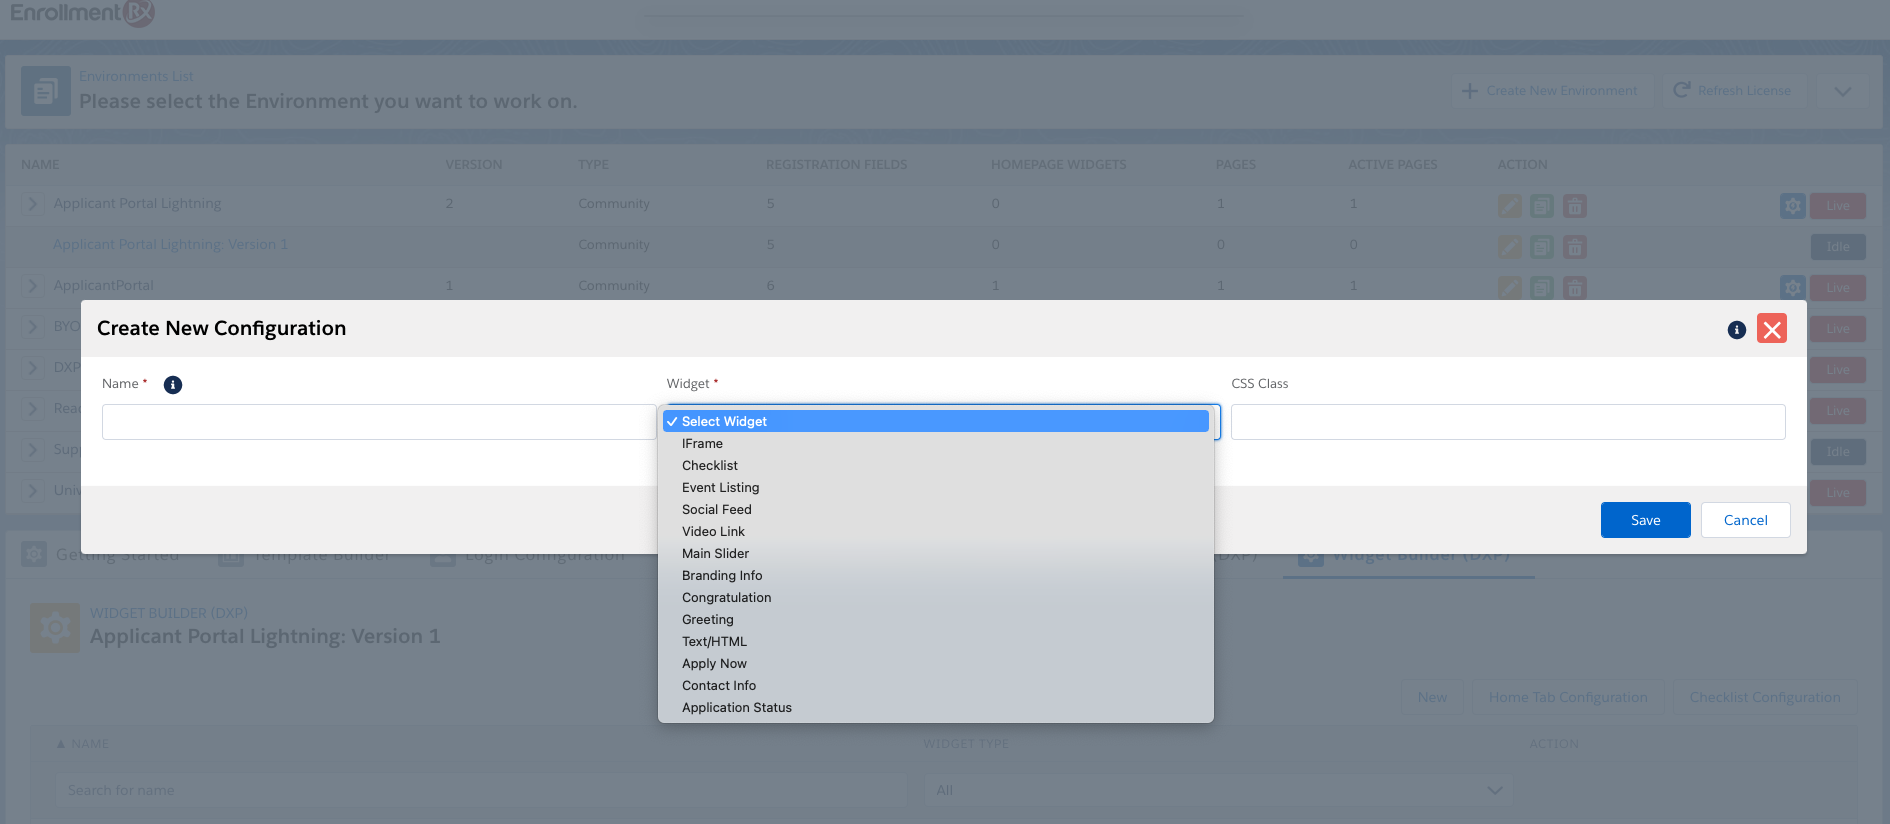
- Select the widget you want to create
- Enter Details (Name, Widget Type), other info and click on the Save button
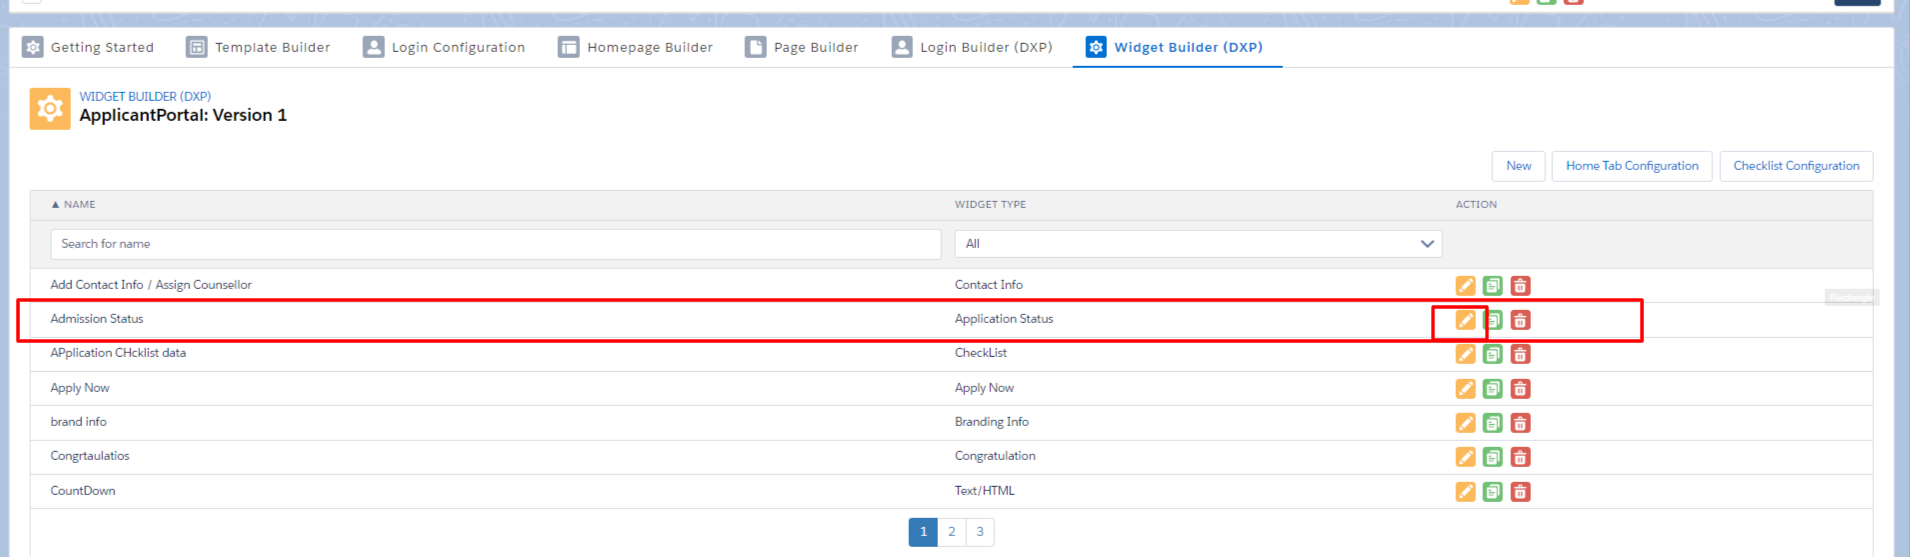
Similarly, you can select and create any widget from the list. These widgets can be edited to change the data that was not possible in the original FormBuilder Widgets.
Homepage setup in Experience Builder (Community Experience Builder)
The Experience Builder has a default template (active in Template Builder) for all six pages (Login/Register/Forgot/Home/Homepage-upload, Page Maker). After the widget creation step, you'll need to set up the widget in Experience Builder. Follow the steps below.
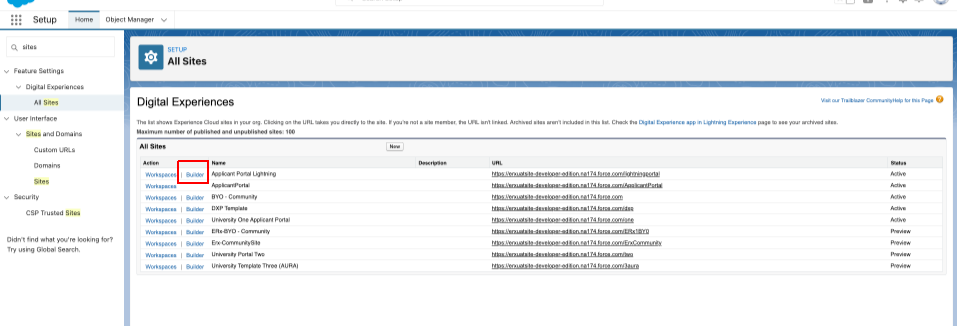
- Go to Setup, search "All Sites" and click on the Builder button on the Community
- In Experience Builder, go to the homepage and change the Column Layout setting
to the desired type (e.g., one column, two column, etc.)

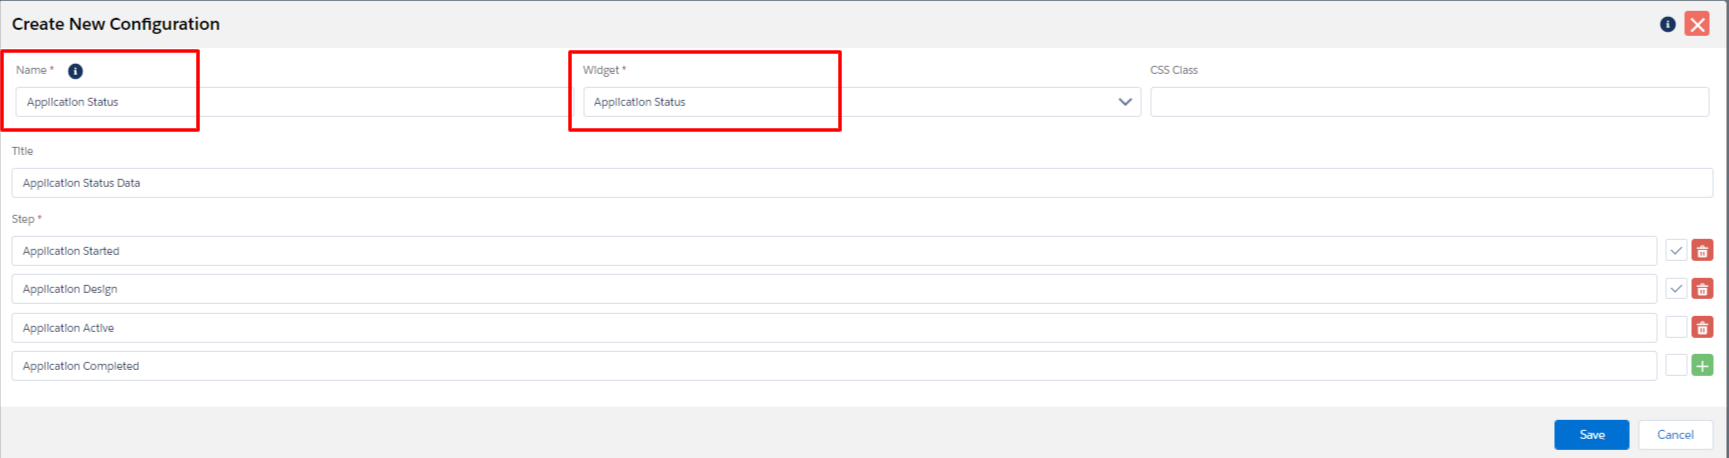
- Click on the Components icon and drag and drop the DXP Application Status
Widget
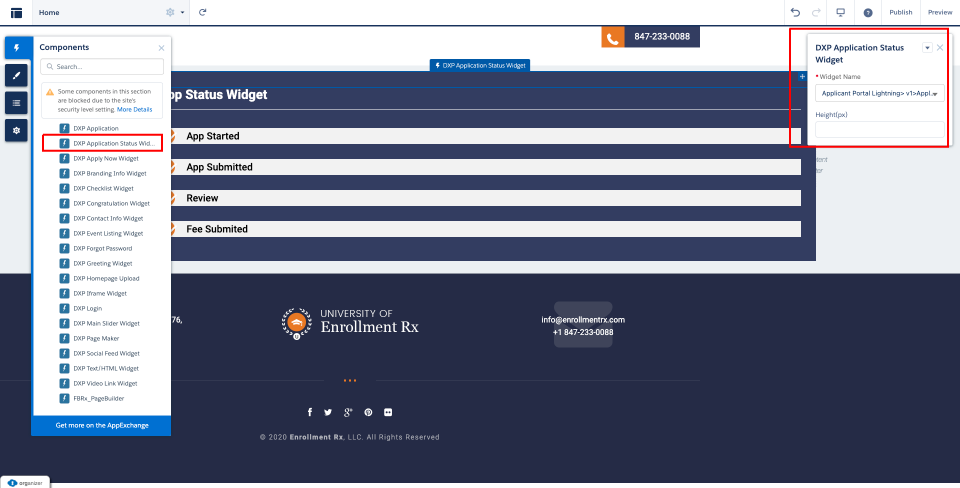
Once the components get placed, you'll need to select the Application Status Widget for the environment. You can also provide a height for the widget for proper column/row alignment with other widgets.
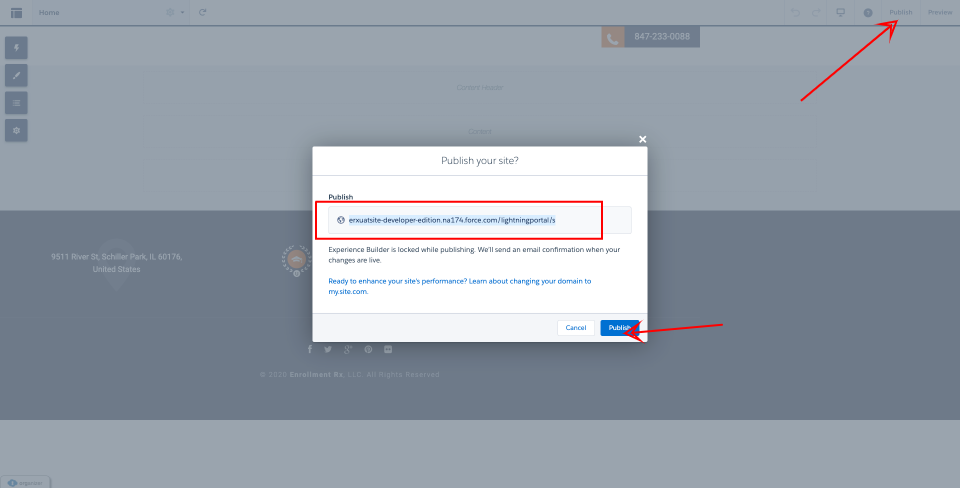
You'll need to create all widgets using the FormBuilder Admin Panel and configure them in Experience Builder. Once all widgets are created, the last step is to test the site. (Publish the changes first to test the site.)