Assignment Manager
Assignment Manager replicates the functionality of Salesforce’s native Lead Assignment Rules, and extends that functionality with the addition of two features:
- It works with all objects rather than merely with Leads
- It provides round-robin assignment among the members of an Assignment Queue
This feature allows you to assign ownership of any object’s records, upon creation or, optionally, update, based on rule entries that are evaluated in sequence until one of them is satisfied. Each rule entry assigns ownership either to a fixed individual or, in round-robin fashion, to individuals in an Assignment Queue.
Requirements for using Assignment Manager
- Chatter must be enabled
- Lighting Experience must be enabled
- My Domain must be configured and deployed to your users
- You must edit the profile of the administrator so that the Custom Tab Setting for “Assignment Manager” is not “Hidden”
Configuring Assignment Rules
- In the Admin Panel, check Assignment Manager’s Activate Feature for Org. checkbox and click the “Save Setting” button.
- Open the Admin Panel again, and click the link that says Click here to configure Assignment Manager. This will open the Assignment Manager UI.
- There are three tabs within the Assignment Manager UI: Assignment Setting, Assignment Rule and Assignment Queue.
- To Activate an object for assignment, in the Assignment Setting tab, find the object
in the Select Object dropdown. It will populate below the dropdown:
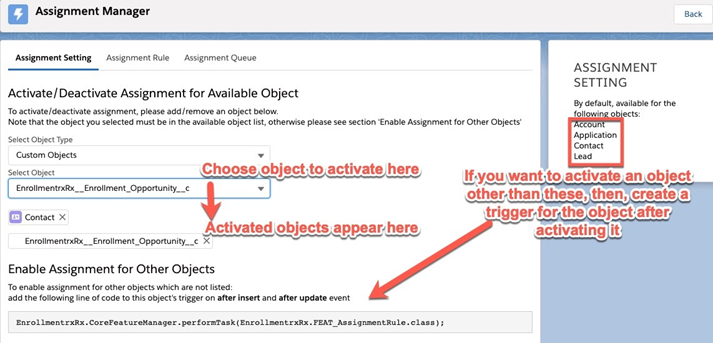
- If you have chosen an object other than Account, Application,
Contact and Lead as referenced in the above image, you will need
to create an Apex trigger and Apex test class to enable Assignment
Manager to function on that object. Following are sample snippets of code you should
use. Note:Be sure to replace the following sample names with the name of your custom trigger, test class, and object where indicated:
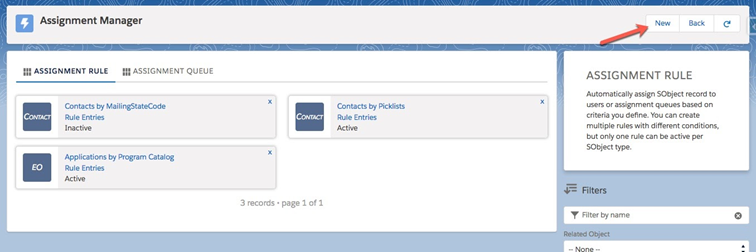
NAME_APEX_TRIGGER_HERE,ADD_OBJECT_API_HERE__candNAME_TEST_CLASS_HERE.Sample Apex Trigger:trigger NAME_APEX_TRIGGER_HERE on ADD_OBJECT_API_HERE__c (after insert, after update) { EnrollmentrxRx.CoreFeatureManager.performTask(EnrollmentrxRx.FEAT_AssignmentRule.class; }Sample Apex Test Class:@isTest public class NAME_TEST_CLASS_HERE { static testMethod void unitTestMethod(){ try{ //Initiate Object //sobjectName variablename = new SobjectName(); ADD_OBJECT_API_HERE__c customObj = new ADD_OBJECT_API_HERE__c(); //insert statement insert customObj; //exception to handle any issue that occurs during insertion as we are not providing all values required }catch(exception e){} } } - To create a new Assignment Rule, click the New button while on the
Assignment Rule subtab:
- Give your rule a good, descriptive name and choose which Related Object it will
update. You can choose to have the rule fire only on record creation (the default)
or, in addition, on update, by checking the Fire on Update checkbox. Click
Save.
- If the Related Object is the Contact, then you are offered the option to “Sync Application Owner”. You may use this option to keep the owner of the Contact’s Active Application in sync with the owner of the Contact. HOWEVER, if you choose “Synch Application Owner” then you should NOT define a separate Assignment rule for the Application (EnrollmentrxRx__Enrollment_Opportunity__c) object.
- If the Related Object is the Application (EnrollmentrxRx__Enrollment_Opportunity__c), then you are offered the option to “Sync Contact Owner”. You may use this option to keep the owner of the Contact record in sync with the owner of the Application. HOWEVER, if you choose “Sync Contact Owner” then you should NOT define a separate Assignment rule for the Contact object.
- Now you are ready to add rule entries to your rule. Click Rule Entries on the card displayed for your rule. Now click the New button to create a new rule entry.
- Give your rule entry a good, descriptive name and set the order in which it is to be evaluated. Rule entries are evaluated in order and when the criteria for one are satisfied, that rule entry is used to make the owner assignment for that record. Subsequently ordered rule entries are then ignored for that record.
- Each rule entry assigns to either a user or to a queue. If to a queue, then the assignment will be in round robin order within the queue. Choose either the user or queue and click Save.
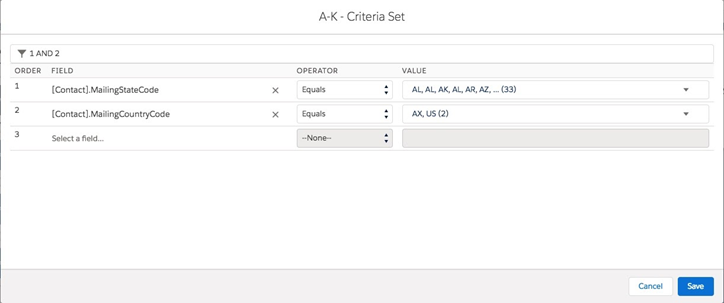
- Now, click the Criteria Set link on your rule entry and configure the criteria that will trigger this rule entry to assign the record owner. You can configure as many criteria as you need and join them in a logical expression at the top of the screen like this:
Configuring Assignment Queues
Click the ASSIGNMENT QUEUE subtab to create and manage Assignment Queues.
- Click the “New” button to create a new Assignment Queue and give it a good, descriptive name, and click “Save”
- Click “Queue Members” on your queue’s card to add members. Click “New” to add a new member.
- The “Last Assignment” and “Millisecond” fields will be populated each time the queue member is assigned a record, thus putting them in the last position within the queue. The queue member who least recently was assigned a record occupies the first position in the queue -- they are “next in line” to receive an assignment and their member record is displayed with a green square. Orange squares represent members who are not in first place in the queue. And red squares are for inactive queue members who will not be assigned any records until they are activated.