Checklist Items
Checklist is a feature that auto generates admission requirement documents (i.e., Test Score, Education History, Recommendation and Admission Document records) based on any change of value in the Requirement Type field on the application. Requirement Type field should be equal to the name of an Application Requirement Set record. Setting this field to such a value will automatically generate documents described in the related list of Application Requirement Items on the Application Requirement Set record.
For example:
Step 1. Create an Application Requirement Set Record
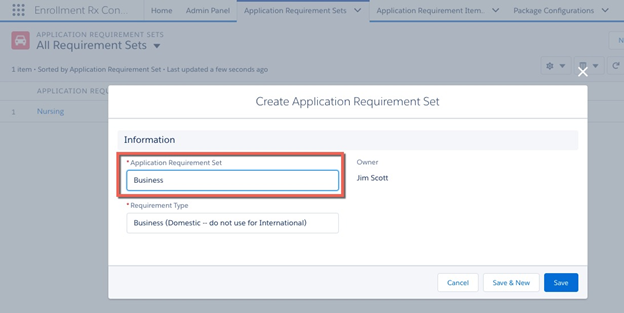
The Application Requirement Set field controls creation of requirements: when this value is put into the Application’s field called Requirement Type (this is usually done via a workflow rule or business process), then the set of items will be created.
The Requirement Type field is for the Administrator’s use in organizing/classifying the Set records and has no effect on creation of items.
Step 2. Create Requirement Items
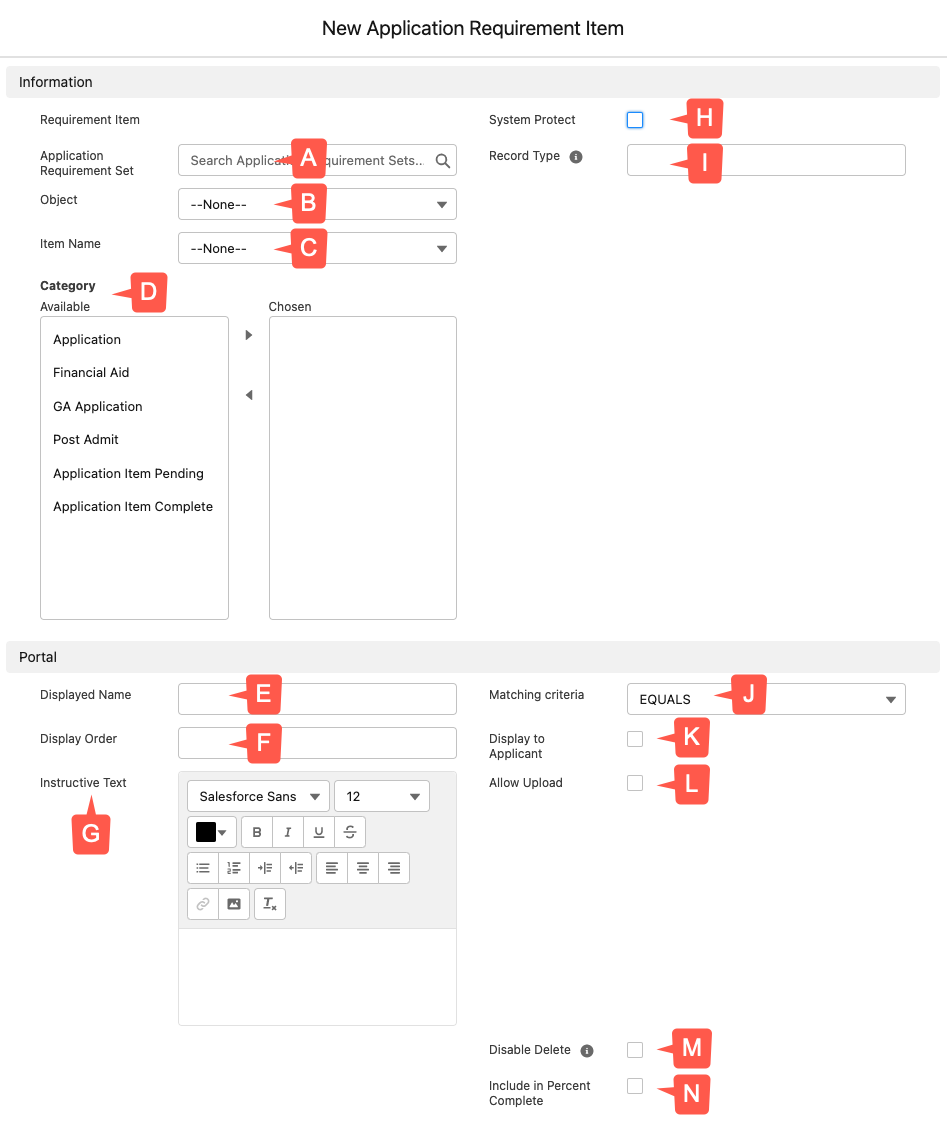
- Application Requirement Set: Choose from among the sets you have created.
- Object: Choose which of the four requirement item objects (Admissions Document, Education History, Recommendation, Test Score) you wish to have created.
- Item Name: This picklist can be modified to meet your needs. This will be the “internal” name of the created item.
- Category: This is used within the Checklist Widget Item in FormBuilder to define which categories of items to display. For example, if you are using two different checklist widgets, one to control in-progress items and one to control completed items, you could configure the category field to have values of “Application Item Pending” and “Application Item Complete” to define which items will display in which checklist. If you have FormBuilder Rx, for further reference, visit the Checklist Widget Library Item in the FormBuilder Rx user guide.
- Displayed Name: This will become the Displayed Name on the created item. The resulting item’s displayed name will appear on the Application’s Quick Access Panel. Once the item is created, you may want to use workflow to update the displayed name, for example to incorporate the Education History’s Institution name into the displayed name of the item.
- Display Order: This is for use on a FormBuilder online application where it determines the order of items in the Requirements Checklist widget.
- Instructive Text: Also see I, below. If either Instructive Text is populated or Allow Upload is checked, then the checkilst item in the checklist widget on the portal page will become clickable.
- System Protect: This protects the item from deletion when a second set
of Requirement Items is created as a result of a change in the Application’s
Requirement Type field. This works as follows:
- Populating the Application’s Requirement Type with the value from a Requirement Set’s Application Requirement Set field triggers the automatic creation of a set of items.
- If the “Requirement Type” field on the application is subsequently updated
with the value from another Requirement Set, then a different set of items
will be created and each of the existing items will be deleted
unless:
- The item’s “System Protect” field is checked, or
- All of the populated fields on a new item exactly match the corresponding fields on an existing item. In this case the existing record (which may have been in the meantime updated in fields—such as Document Status or Date Received—that are not populated from the Requirement Item record) will be left untouched and no duplicate record will be created.
- If a File is attached to the record, then the System Protect checkbox will be automatically checked, to ensure that no documents are lost.
- Record Type: For ERX Core Winter '21 and
earlier, this field is a picklist, and you can choose from the available
Record Types on the selected object. Starting in Summer '21 it is
a text field and will require some additional setup and configuration:
- Add the Requirement Type text field to the Application Requirement
Item Field Set.
- Go to
- Click the Application Requirement Item object and click Page Layouts in the left column. Click the Application Requirement Item Layout.
- At the top of this page, you'll see two Record Type fields in the field palette. Hover over them for details, and select the field with the "text" type
- Drag and drop the field onto the page layout (e.g., under System Protect). If necessary, remove the Record Type field with the "picklist" type from the page layout.
- Save the layout
- Now create a record type on the RIO object. Go to , click on the object, click "Record Types" from the left column
- On the Record Types page, click New, fill out the required fields and Save
- Navigate back to the Application Requirement Sets tab in ERX Core and click New
- Create a new requirement set, fill in the required fields, and Save
- On the new requirement set, navigate to the Related tab
- Click New to create New Application Requirement Items
- Fill out the fields and type the name of the record type you created in the Record Type text field, then Save
- Go to an Application Record and fill in your Requirement Type, then Save. The QAP component will populate with the record type.
Note:If there is no record type available for a RIO, it will not affect the functionality.If there is no record type available in the Application Requirement Item Record Type field and the object has a default record type, then the record will be populated with the default.
If the record type is valid, it will be created successfully. If it is not a valid record type, you'll see the following error: “Requirement item {Requirement Item ID} has invalid record type”
- Add the Requirement Type text field to the Application Requirement
Item Field Set.
- Matching Criteria: New as of 2022 Release 1, this picklist is connected to
the Display Name field. It prevents the creation of a new record from the
Requirement Item if a record matching or containing the same name already
exists. For example, if you set a Display Name as "Teacher Recommendation" and
there is already a recommendation containing "Teacher Recommendation: Helene
Tiernnan" attached to the Application, you can set this picklist to
STARTS WITHto prevent the creation of a new recommendation record named "Teacher Recommendation." The four available criteria are:STARTS WITH,ENDS WITH,CONTAINS, andEQUALS(the default setting). - Display to Applicant: For use by FormBuilder’s Requirements Checklist widget; displays the item on the applicant portal.
- Allow Upload: For use by FormBuilder’s Requirements Checklist widget; makes the item name a clickable link to a page containing an upload widget and instructive text, which may include URLs.
- Disable Delete: Check this box to hide the garbage can on the Checklist Widget of your FormBuilder Portal (if you have one), when the user clicks the checklist item to upload a file.
- Include in Percent Complete: Every RIO (requirement item object) record has a checkbox "Include in Percent Complete." This is discussed in detail in Selective Percent Complete
Step 3. Add Requirement Set Name to Requirement Type Field
Open an application record and populate its Requirement Type field with the name (e.g., “Application Requirement Set”) field of your Requirement Set.
Step 4. Save and Generate Checklist Requirement Items
Save the Application, and the list of checklist requirement items will be generated for the application.