Object and Field Mapping
As of Summer '20, the Mapping Page tab, which is the starting point for configuring imports, has been streamlined with a completely new UI (Fig. 1.3, below). From this page field mappings, transformations, and duplicate matching rules are configured.
Select Data Source Control

- Select Data Source: a picklist with all Data Sources created from the Data Sources tab
- View Details Button: takes the user to the Data Source record (Fig. 1.2)
Big Table Fields Panel
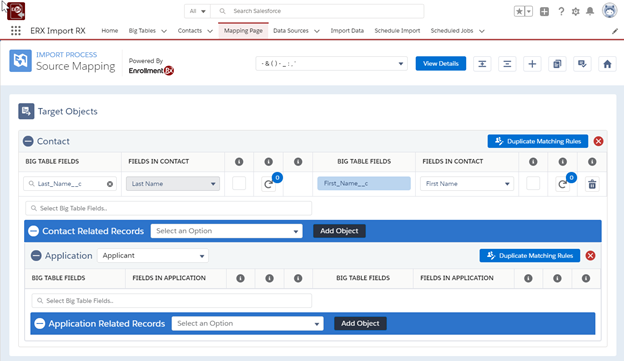
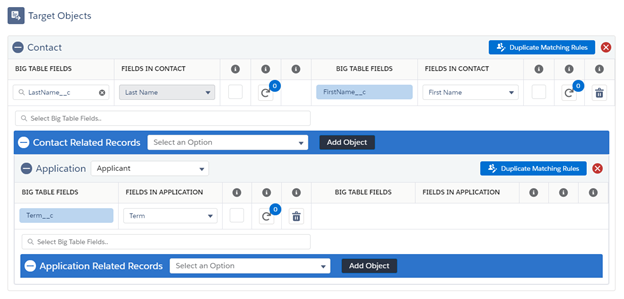
In the center of the page (Fig. 1.5), you’ll find the Target Objects section, where you can add Objects and Big Table Fields, create Duplicate Matching rules, and set transformations. The first target object is always the Contact object.

Target Objects Panel
Mapping Big Table Fields to Target Fields
Each object’s required fields are always displayed and cannot be removed. In the new UI, there is no longer a need to map required fields because they are already set (Fig. 1.6a). To map additional fields, start typing in the Select Big Table Fields lookup.
In order to map to a child object, at least one field must be mapped for its parent object. For example, in order to import to a Test Score object that looks up to the Application object, at least one Application object field must be mapped.

- Transformations: These are now configured in a dialog window by clicking the button in Fig. 1.7.
- Duplicate Matching Rules: See Duplicate Review Screen. Mapping must be saved before this button can function.

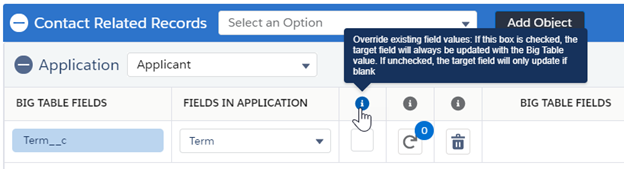
- Overwrite existing field values: check box to the right of each field mapping. By default, Import Rx populates fields on matching target records only if they are null. If you check the box, you override the default behavior so that an already-populated field on the target record will be overwritten with the incoming value. Leave the box unchecked if you want only to populate target fields that are null.