Summer '19 Post Upgrade Instructions
Detailed instructions follow below.
Create entries in the Allow Object Access Custom Setting
As of Summer '19, Core Rx now enforces security for object access when unauthenticated sites trigger Core Rx to update the Contact and other objects accessed by Site Guest Users. These users cannot natively in Salesforce update Contact, Lead, and other Salesforce object records, but Core Rx must sometimes update these records when a site form is submitted. Formerly, we made these updates without your expressly configuring it, but now we give you control over which Sites get access to specific objects.
For any Site page that updates the Contact (directly or indirectly), you must create entries in the custom setting called “Allow Object Access”. Such pages include:
- Portal Registration pages
- Event and Visit Registration pages
- Recommendation submission pages
- Request for Information forms
- Any unauthenticated web page that displays or updates data stored in Salesforce
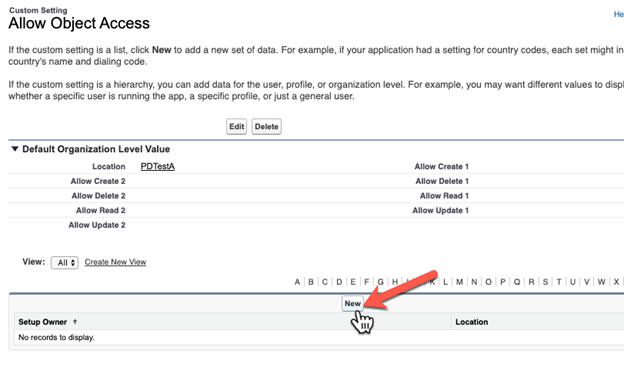
Preliminary Work: Create a Default Organization Level Value in the Custom Setting Allow Object Access
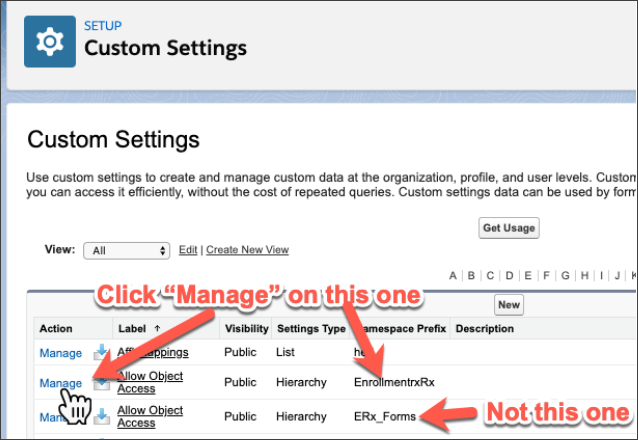
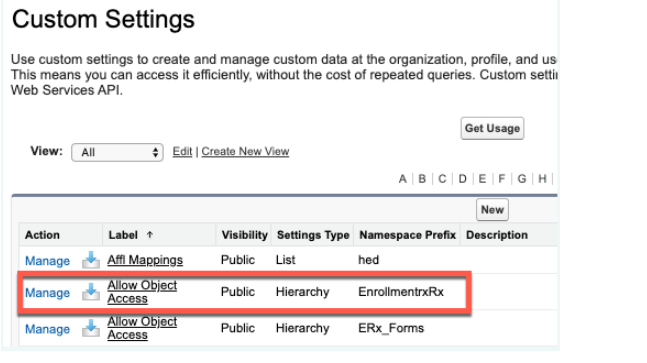
Go to and click Manage next to the Custom Setting label "Allow Object Access" whose Namespace Prefix is "EnrollmentRx" not "ERx_Forms."
If there is no “Default Organization Level Value," follow these steps:
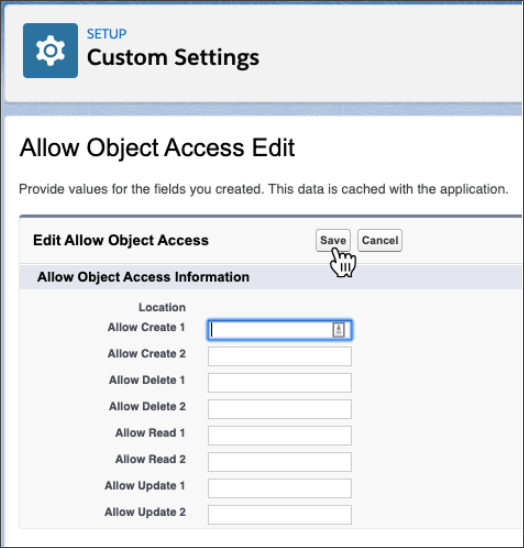
- If there is no entry underneath the heading Default Organization Level Value, then you must create one. To do so, click the topmost New button (there are two in this circumstance):

- Click the Save button to save a blank Default Organizational Level Value:
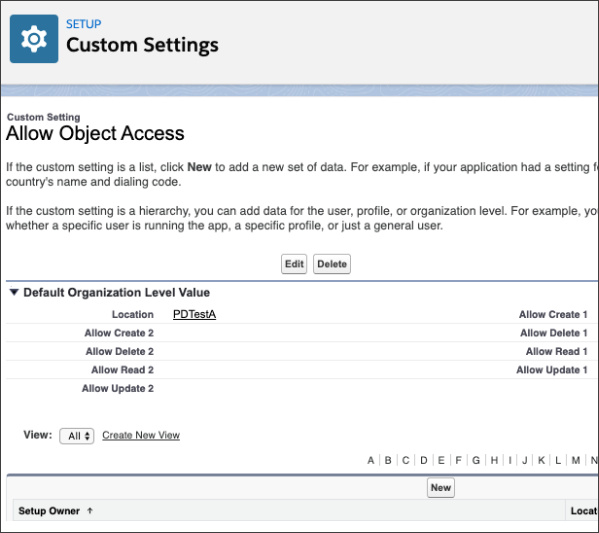
Now you should see a blank Default Organization Level Value like this:
Main Work: For each Site, follow these steps
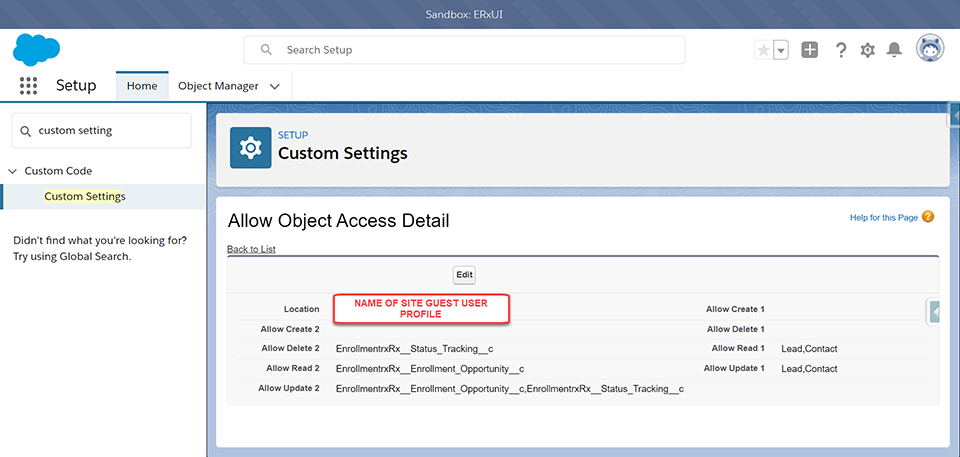
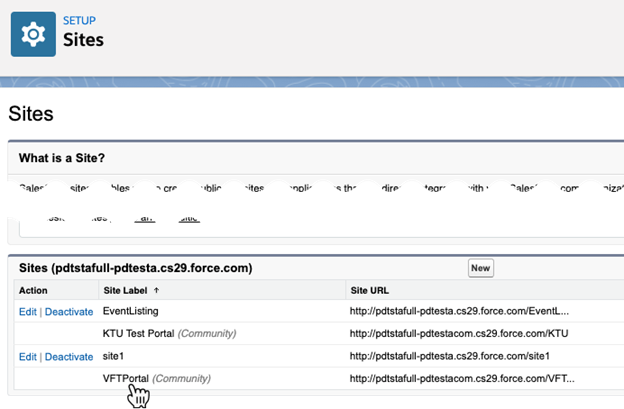
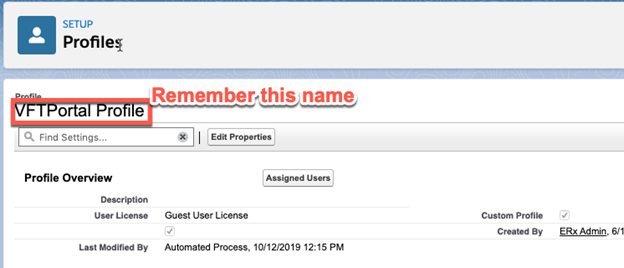
- Get the name of the Site Guest User profile by going to and click the site label:
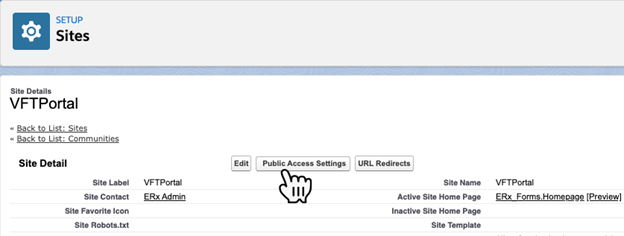
- Next, click the Public Access Settings button to open the Profile of the Site Guest User:
- Go to the Custom Setting: and click the Manage link next to the Custom Setting Label "Allow Object Access," whose Namespace Prefix is EnrollmentRx (not ERx_Forms):
- Click the New button (below the alphabet) to create an entry in the Custom Setting for the profile you just wrote down:
- Click the magnifying glass to look up the name of the profile you wrote down in Step 1 like this:
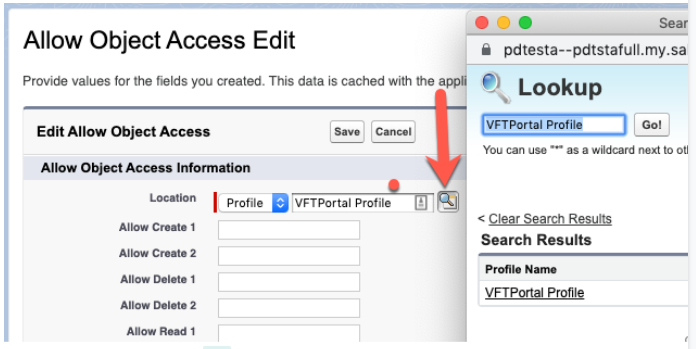
- To complete the entry, put the API names of objects into the fields, according to the below table. We follow a convention (optional) of putting the names of Standard objects into field "1" and Custom objects into field "2", but this is not necessary.
Configuration Examples
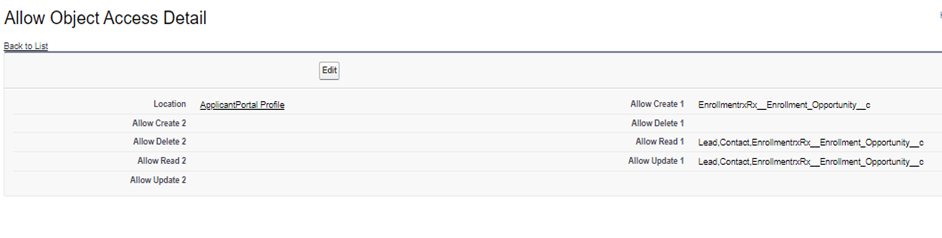
Applicant Portal Site Guest User Allow Object Access (Namespace: EnrollmentrxRx Custom Settings)
| Read | EnrollmentrxRx__Enrollment_Opportunity__c,Lead,Contact |
| Create | EnrollmentrxRx__Enrollment_Opportunity__c |
| Update | EnrollmentrxRx__Enrollment_Opportunity__c,Lead,Contact |
| Delete | (leave blank) |
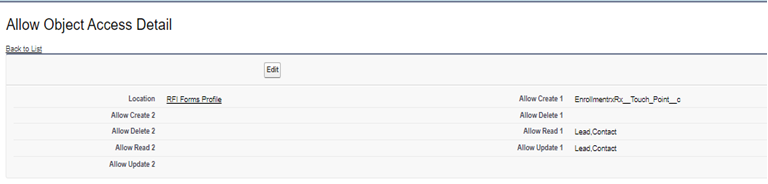
RFI Form Site Guest User Allow Object Access (Namespace: EnrollmentrxRx Custom Settings)
| Read | Lead,Contact |
| Create | EnrollmentrxRx__Touch_Point__c |
| Update | Lead,Contact |
| Delete | (leave blank) |
| Fields | (leave blank) |
Recommendation Form Site Guest User Allow Object Access (Namespace: EnrollmentrxRx Custom Settings)
| Read | (leave blank) |
| Create | (leave blank) |
| Update | EnrollmentrxRx__Recommendation__c,EnrollmentrxRx__Enrollment_Opportunity__c |
| Delete | (leave blank) |
| Fields | (leave blank) |
Events Site Calendar and Registration Form Site Guest User Allow Object Access (Namespace: EnrollmentrxRx Custom Settings)
| Read | Lead,Contact,EnrollmentrxRx__Enrollment_Opportunity__c |
| Create | EnrollmentrxRx__Enrollment_Opportunity__c,EnrollmentrxRx__Status_Tracking__c,EnrollmentrxRx__Touch_Point__c |
| Update | Lead,Contact,EnrollmentrxRx__Enrollment_Opportunity__c |
| Delete | (leave blank) |
| Fields | (leave blank) |

General Configuration for Other Sites
| Custom Setting Field Name | Values |
| Allow Create 1* | (leave blank) |
| Allow Create 2 | (leave blank) |
| Allow Delete 1 | (leave blank) |
| Allow Delete 2* | EnrollmentrxRx__Status_Tracking__c |
| Allow Read 1 | Lead,Contact |
| Allow Read 2† | EnrollmentrxRx__Enrollment_Opportunity__c |
| Allow Update 1* | Lead,Contact |
| Allow Update 2‡ | EnrollmentrxRx__Enrollment_Opportunity__c, EnrollmentrxRx__Status_Tracking__c |
TABLE NOTES
* For the EventListing site of Events Rx, add “CampaignMember” to the field “Allow Create 1” and “Allow Update 1”.
** If your site updates the “Requirement Type” (EnrollmentrxRx__Application_Type__c) field on the Application, thereby triggering creation and possible deletion of checklist item records (e.g. Admissions Documents, Education History, Recommendations, Test Scores), then you should enter those checklist item object API names, in one of the “Allow Delete” fields.
† If your site triggers Assignment Manager or Touch Point Creation, then you should add in one of the “Allow Read” fields the API names of the objects whose owners are being assigned or the objects triggering Touch Point creation.
‡ If your site allows uploading documents, add to one of the “Allow Update” fields the API names of the objects to which the uploaded documents are attached.