Post-Installation Instructions
Overview
The behavior described throughout the Events Rx user guide depends upon the Post-Installation steps having been executed. If the Post-Installation steps are not completed, then the application will not behave (or appear) as described in this manual.
Important:
The Custom Setting () called “Events Rx” must be fully configured; otherwise errors will
occur. Make sure you populate every field. See Events Rx Custom Setting.
Configuring the Site and Its Permissions
EventListing Site Configuration
- Create a New Site: Go to . Select "Guest User License" when prompted, and set the Active Site Home Page to "ErxCampusComposition."
- Enter a Path: Enter a label such as "EventListing" into the Default Web
Address field and check the boxes related to security.
Figure 1. Steps 1-2 
- Navigate to the Custom Setting "Events Rx": In the
Setup "Quick Find" box, type "Custom Settings." Click
the "Manage" link next to Events Rx.
Figure 2. Step 3 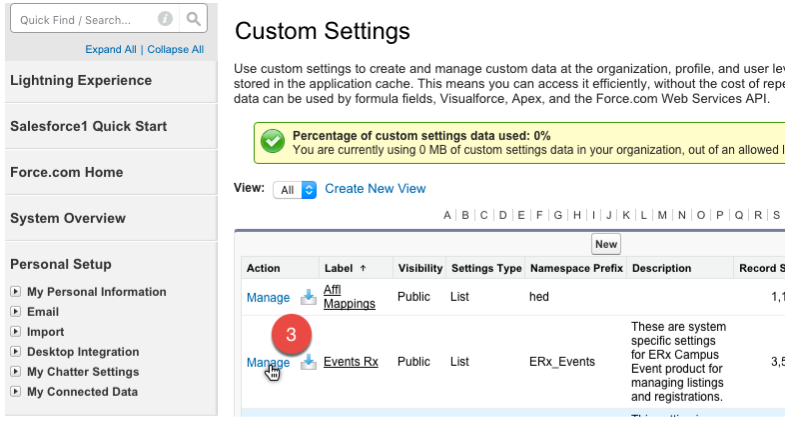
- Edit or Create the DEFAULTS Custom Setting Record: And (a) paste into the
“Site Path” field the value you put into the “Default Web Address: field on the
Site Edit screen in step 2 and (b) paste into the “Site Base URL” field the
non-editable portion of the Default Web Address from step 2: Note:The “Site Path” should not begin with a slash “/” and the “Site Base URL” should not end with a slash”/”
Figure 3. Step 4 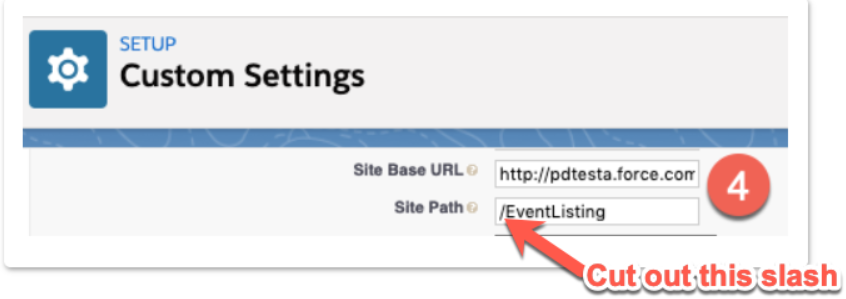
- Configure the Site Profile: Go to and click on the Site Label of your site.
Figure 4. Step 5 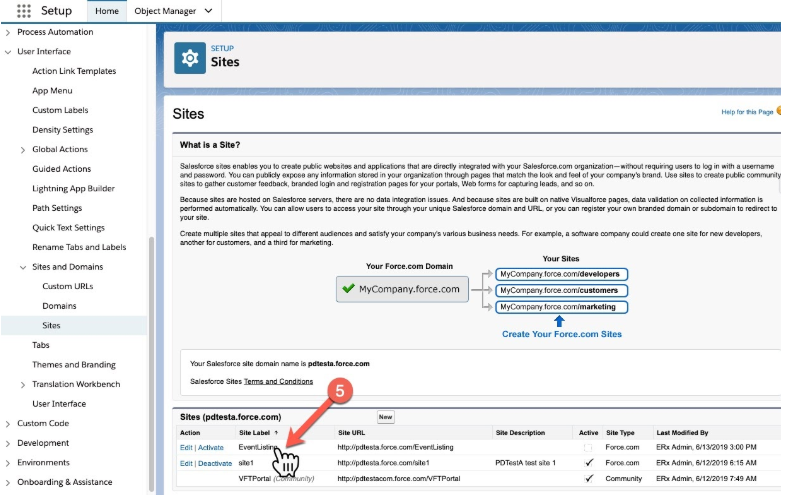
- Grant Object, Field, and Record Type Permissions to the Profile: Under
Object Settings grant Object Permissions, Field
Permissions (Field Level Security), and access to Record Types as
follows. (Note these are all objects or fields that do not belong to Events Rx
managed package; permissions for Events Rx objects and fields are contained n
the permission set ERxEvent_SiteGuest, which you will assign to the Event Site
Guest User in the next step).
Object Object Permissions Field Permissions Record Types Account Read, Create (none) All (default should be "Administrative") Application Read, Create Read and Edit on all fields All (if any) Contact Read, Create Read and Edit on all fields ERx Prospect/Applicant* Campaign Member -- Read and Edit on all fields Campus Campaign Member Campaign Read Read on all fields Campus Campaign Package Configuration (if ERX Core is installed) Read Read on all fields N/A Visit These permissions are included in the permission set ERxEvent_SiteGuest which should be assigned to the underlying Site Guest User Read and Edit on all custom fields created N/A - Edit the Events Site Guest User:
- Assign the ErxEvents__SiteGuest permission set, which includes
permissions on all Events Rx objects, fields, and components. It will be
kept up to date so that in future releases you will not need to grant
permissions on new objects or fields.
- Click the “Assigned Users” button
- Click the name of the User (there should only be one user)
- Click “Permissions Set Assignments” in the upper left
- Click “Edit Assignments”
- Move the two permission sets “ERxEvents_SiteGuest” and (if you
have FormBuilder Rx installed) “ERxFB_Sites” to the right
column:
Figure 5. Step 7a 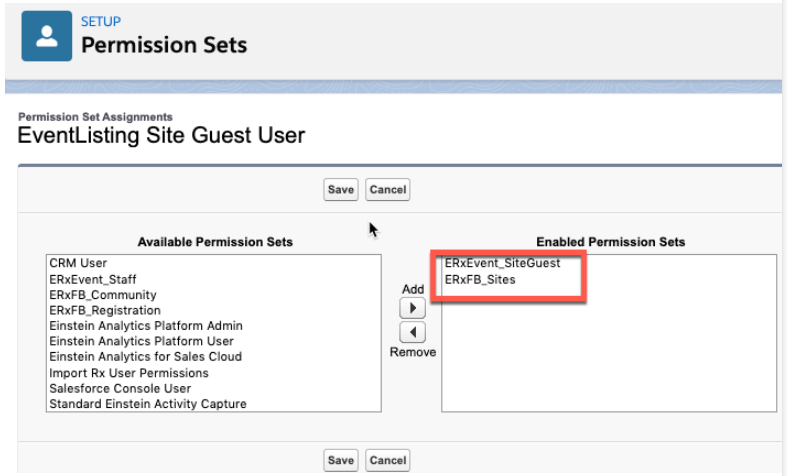
- Click "Save"
- Assign Time Zone, Locale and Language settings to the Site Guest User
Figure 6. Step 7b 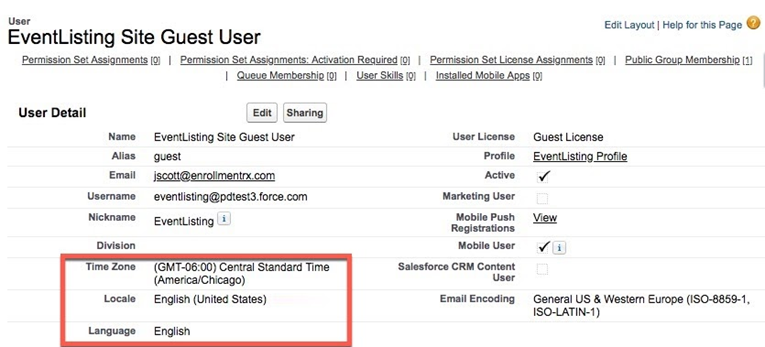
- Assign the ErxEvents__SiteGuest permission set, which includes
permissions on all Events Rx objects, fields, and components. It will be
kept up to date so that in future releases you will not need to grant
permissions on new objects or fields.
- If you have Erx Core installed, then update the Allow Object Access custom
setting:
- Go to (part of ERX Core). Click under the feature name "Allow Object Access" where it says "Click here to configure Allow Object Access custom setting."
- Create a new record by clicking the
 button
and selecting the profile for the Events Site Guest user.
button
and selecting the profile for the Events Site Guest user. - Configure it like this:
Figure 7. Step 8c 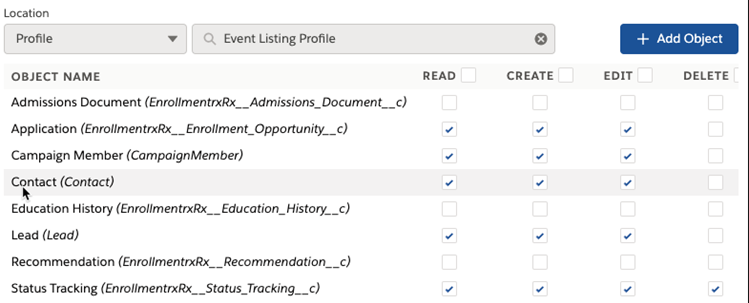
- Edit the Campaign Object’s “New” button:
- Go to
Figure 8. Step 9a 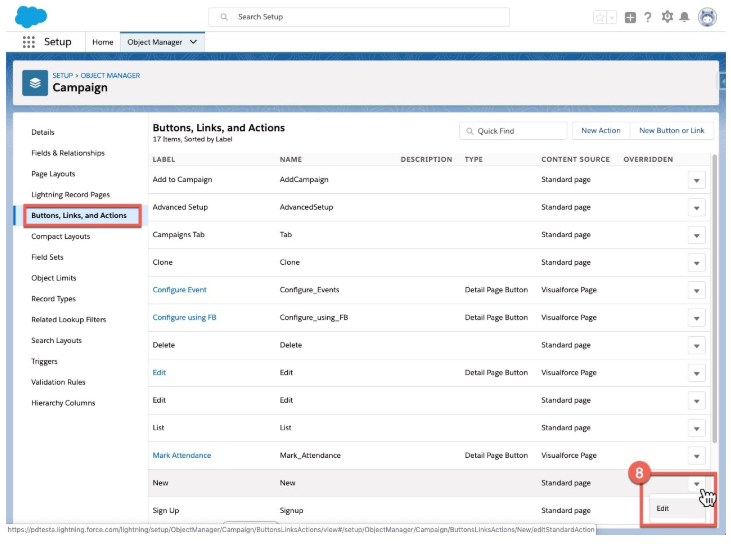
- ...and override the button with the CampusCampaignRecordTypeSelect
Visualforce page and check the check-box to skip the record type page:
Figure 9. Step 9b 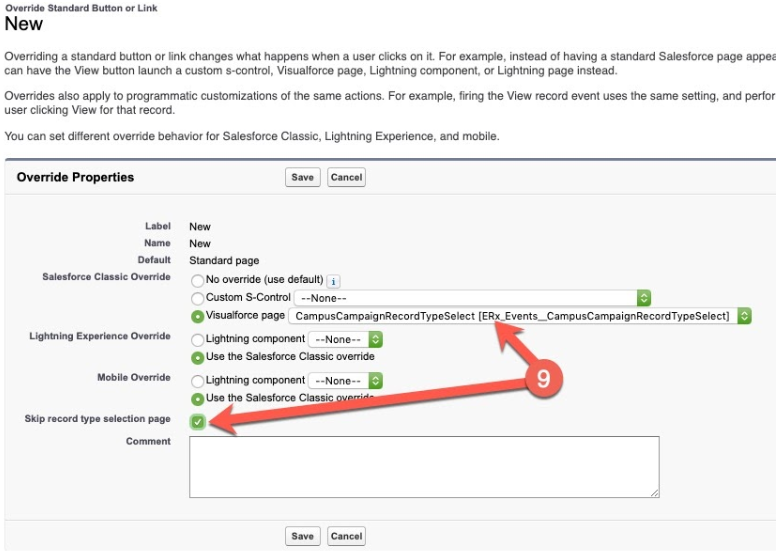
- Go to
- Put the related list of Visits onto the Contact page layout: Go to and select the “Related Lists” palette on the left, then drag the
Visits related list into the layout like this:
Figure 10. Step 10 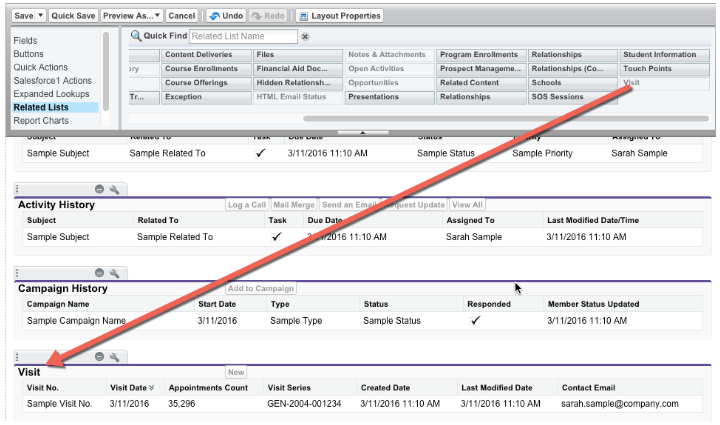
- Complete the fields in the Custom Setting described in Events Rx Custom Setting.
- Enable the Campaign “Clone” functionality as follows:
- For the Salesforce Classic environment:
Override the standard Campaign “Clone” button with the custom Visualforce page called “CampusCampaignClone” like this:
Figure 11. Step 12a - Salesforce Classic 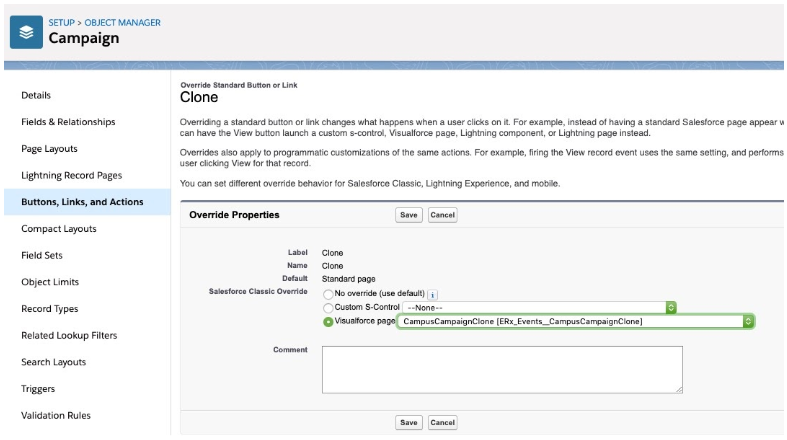
- For the Salesforce Lightning Experience:
Create a new Campaign Button with these settings, as shown in the screenshot below:
- Label: "Clone"
- Display Type: "Detail Page Button"
- Behavior: “Display in existing window without sidebar”
- Content Source: "Visualforce Page"
- Content: “CampusCampaignClone
[ERx_Events__CampusCampaignClone]”
Figure 12. Step 12b - Salesforce Lightning Experience 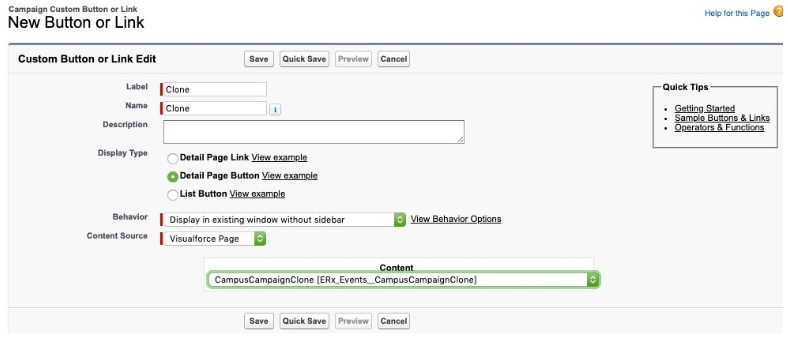
- For the Salesforce Classic environment:
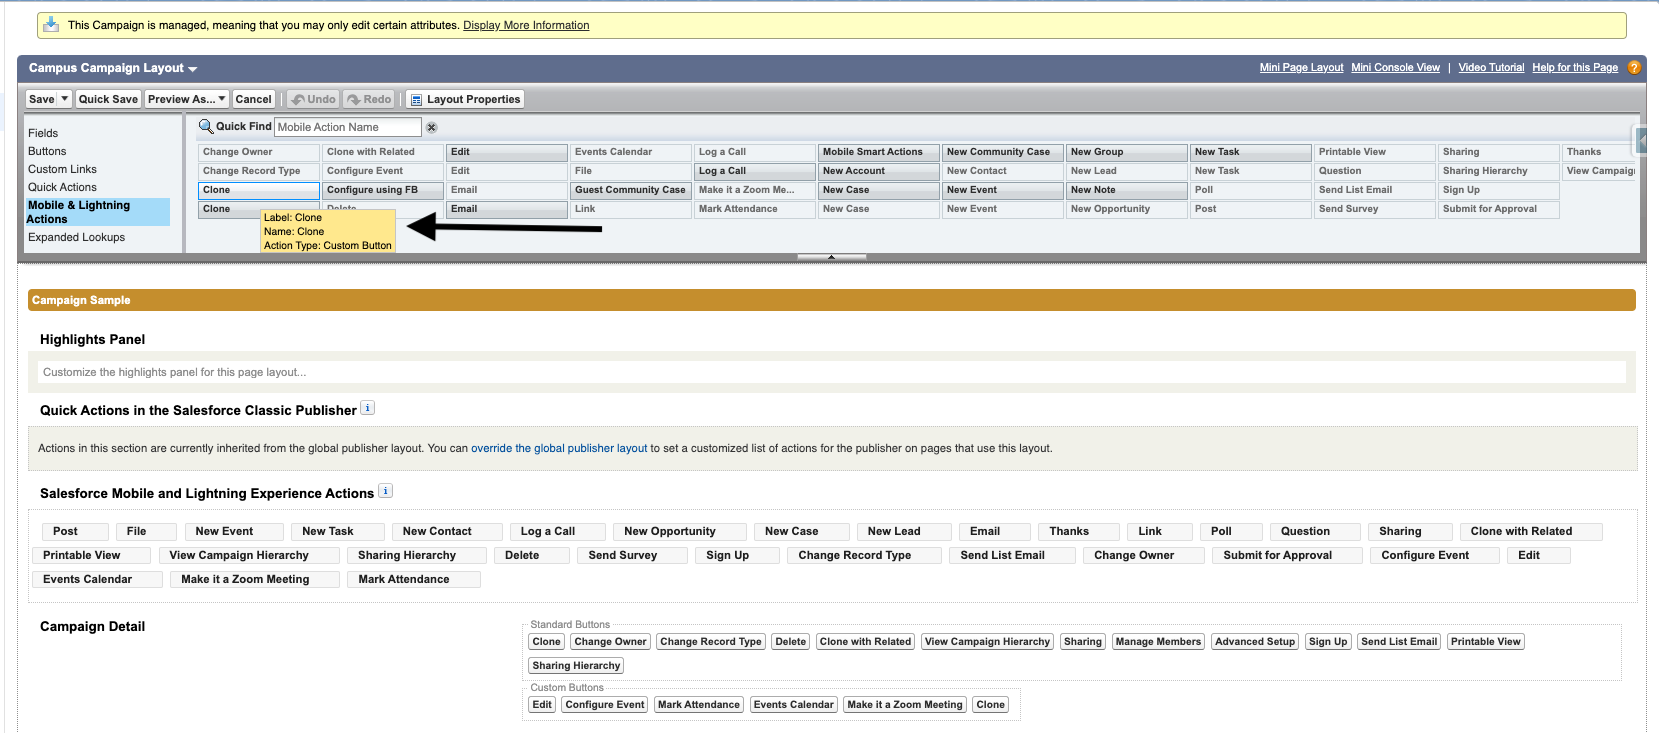
- Edit the Campaign Page Layout called “Campus Campaign Layout” and drag your new
button from the palette section “Mobile & Lighting Actions” into the the
page layout section “Salesforce Mobile and Lighting Experience Actions” as shown
below. To ensure you are dragging the correct “Clone” button, hover with your
mouse and choose the one indicated as a “Custom Button.”
Figure 13. Step 13