Bulk Clone
Overview
Bulk Clone is an enhancement to the existing Super Clone functionality. This enhancement extends the capability to support cloning multiple Application records directly from the Application list view. A new List Button has been introduced on the Application object list view to initiate the cloning process for selected applications.
Bulk Clone Button Setup Instructions
To make the Bulk Clone button available on the Application list view, configure the following:
-
Go to the Application Object Manager.
-
Click on Button Links and Actions.
-
Click the New Button or Link button.
-
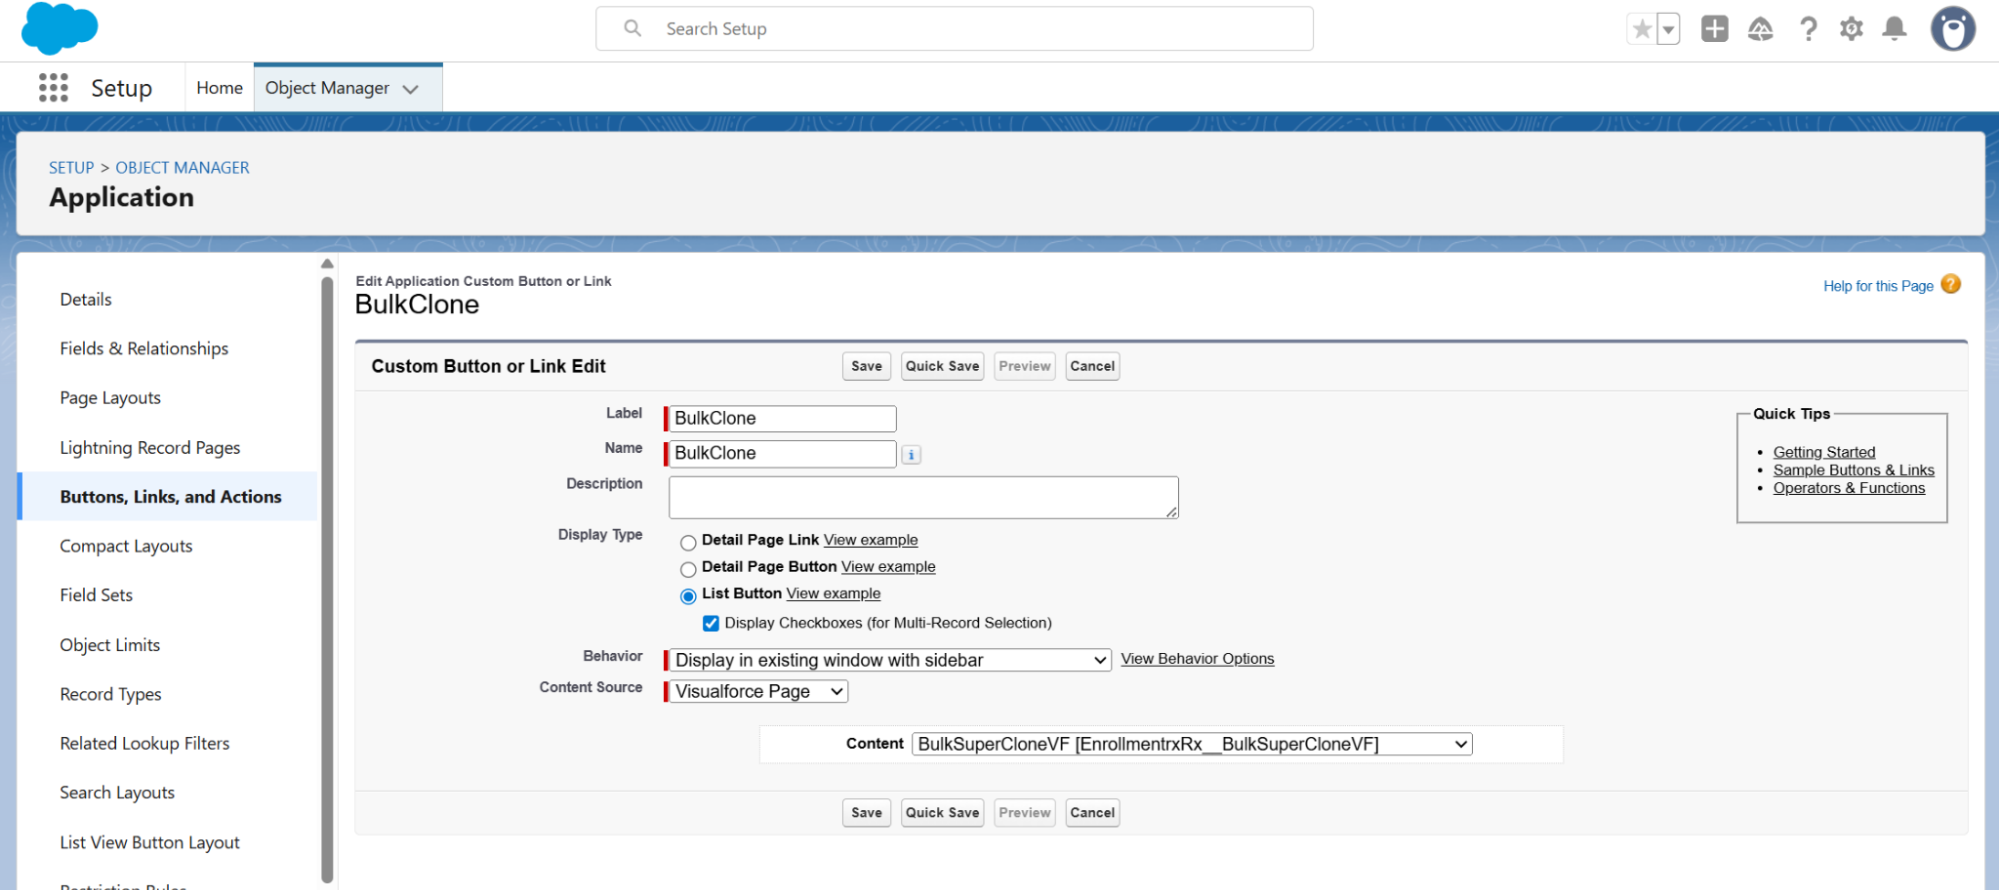
Fill in the details as follows:
-
Label: BulkClone
-
Name: BulkClone
-
Display Type: List button
-
Behavior: Display in existing window with side bar
-
Content Source: Visualforce page
-
Content: BulkSuperCloneVF [EnrollmentRx__BulkSuperCloneVF]
-
-
Click Save.
-
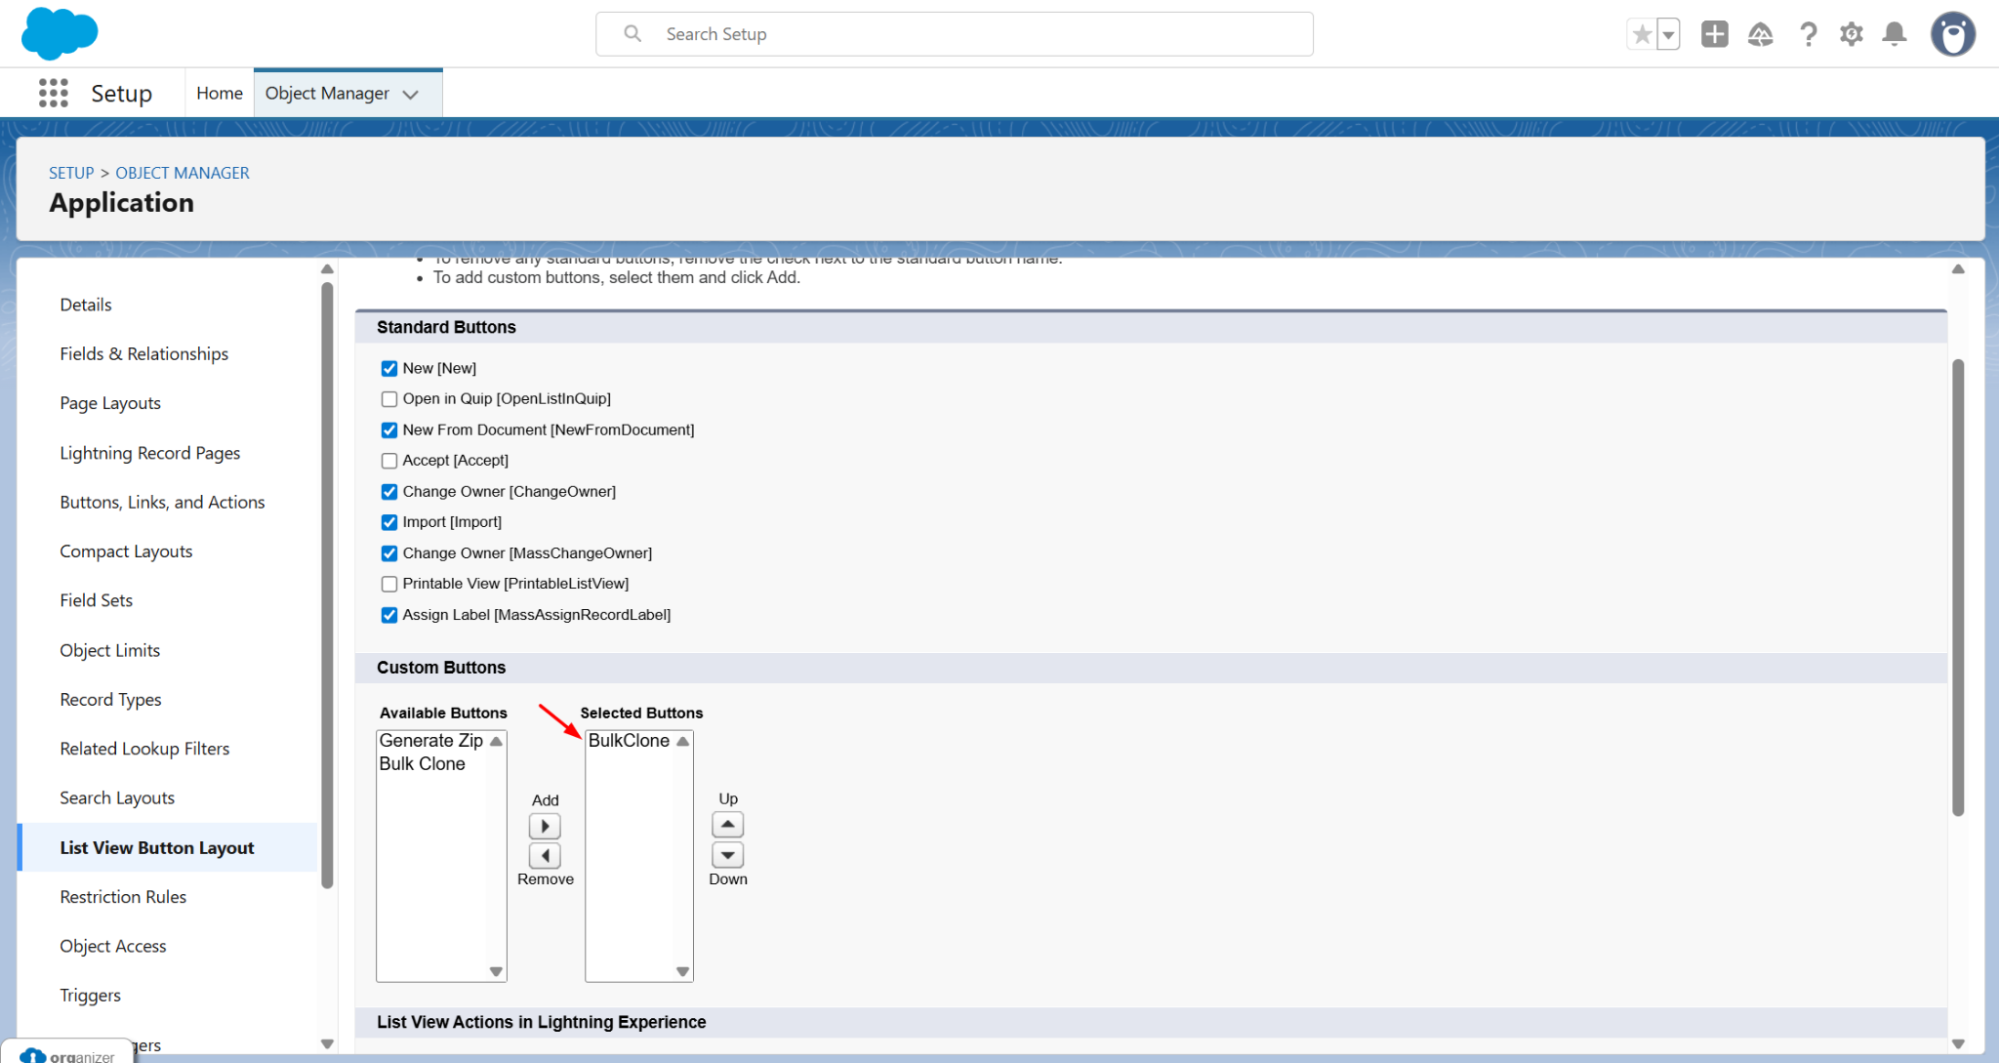
Navigate to the List View Button Layout.
-
In the Available Buttons, move the BulkClone button to the Selected Buttons.
-
Click Save.
Bulk Clone Functionality
-
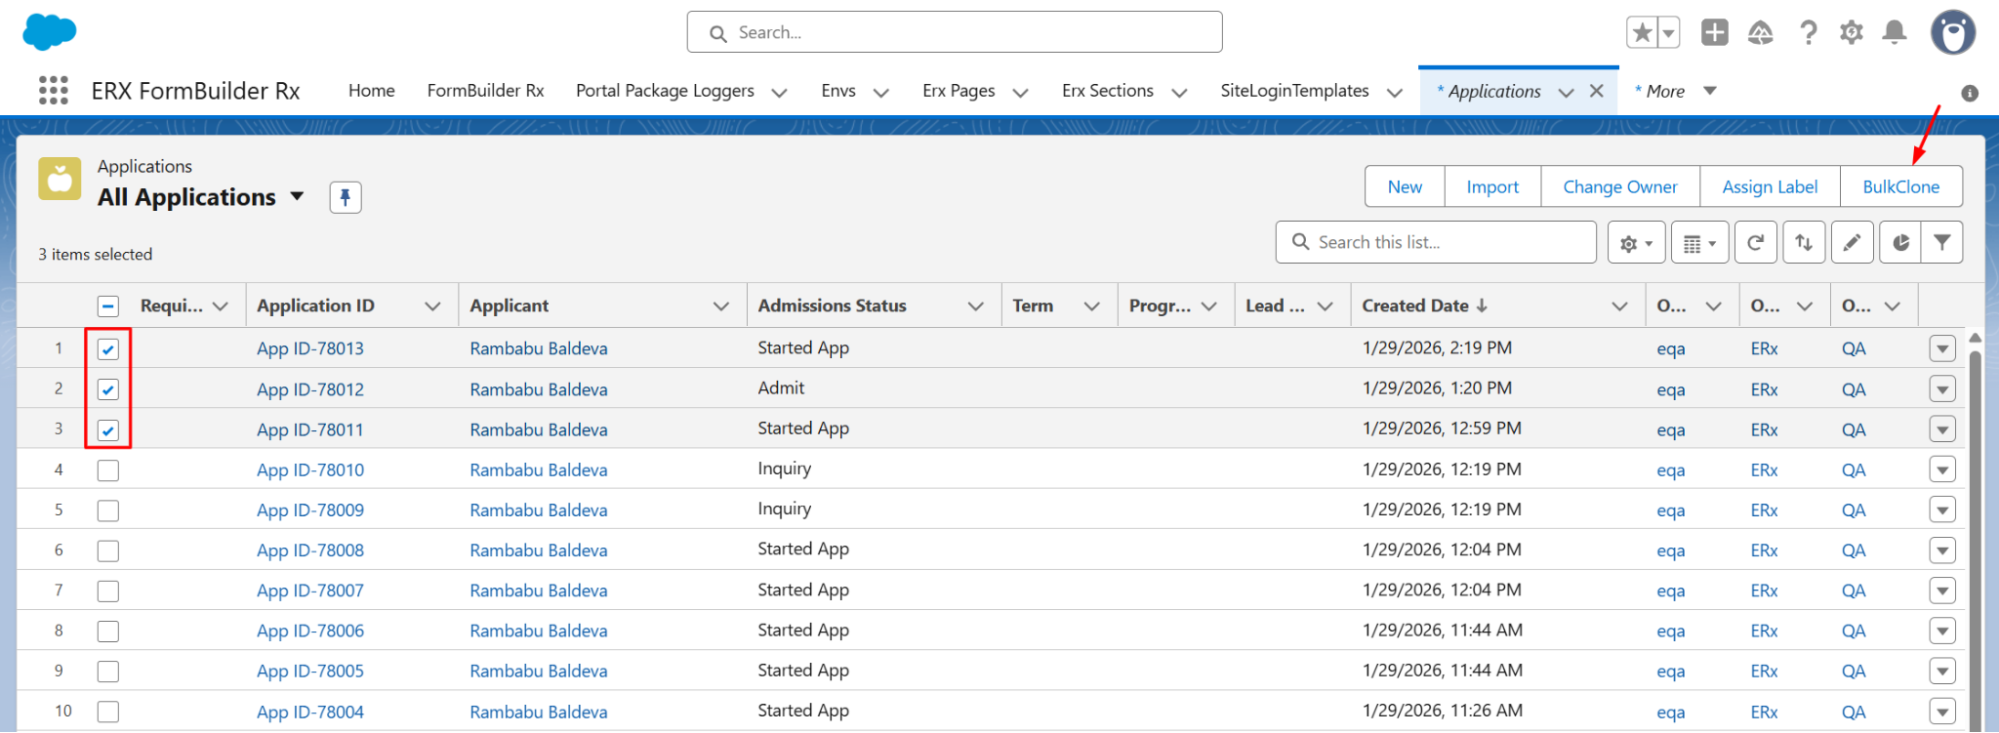
Navigate to the Application List View page. The Bulk Clone button will be displayed in the layout.
-
Select multiple applications from the list view.
-
Click the BulkClone button.
-
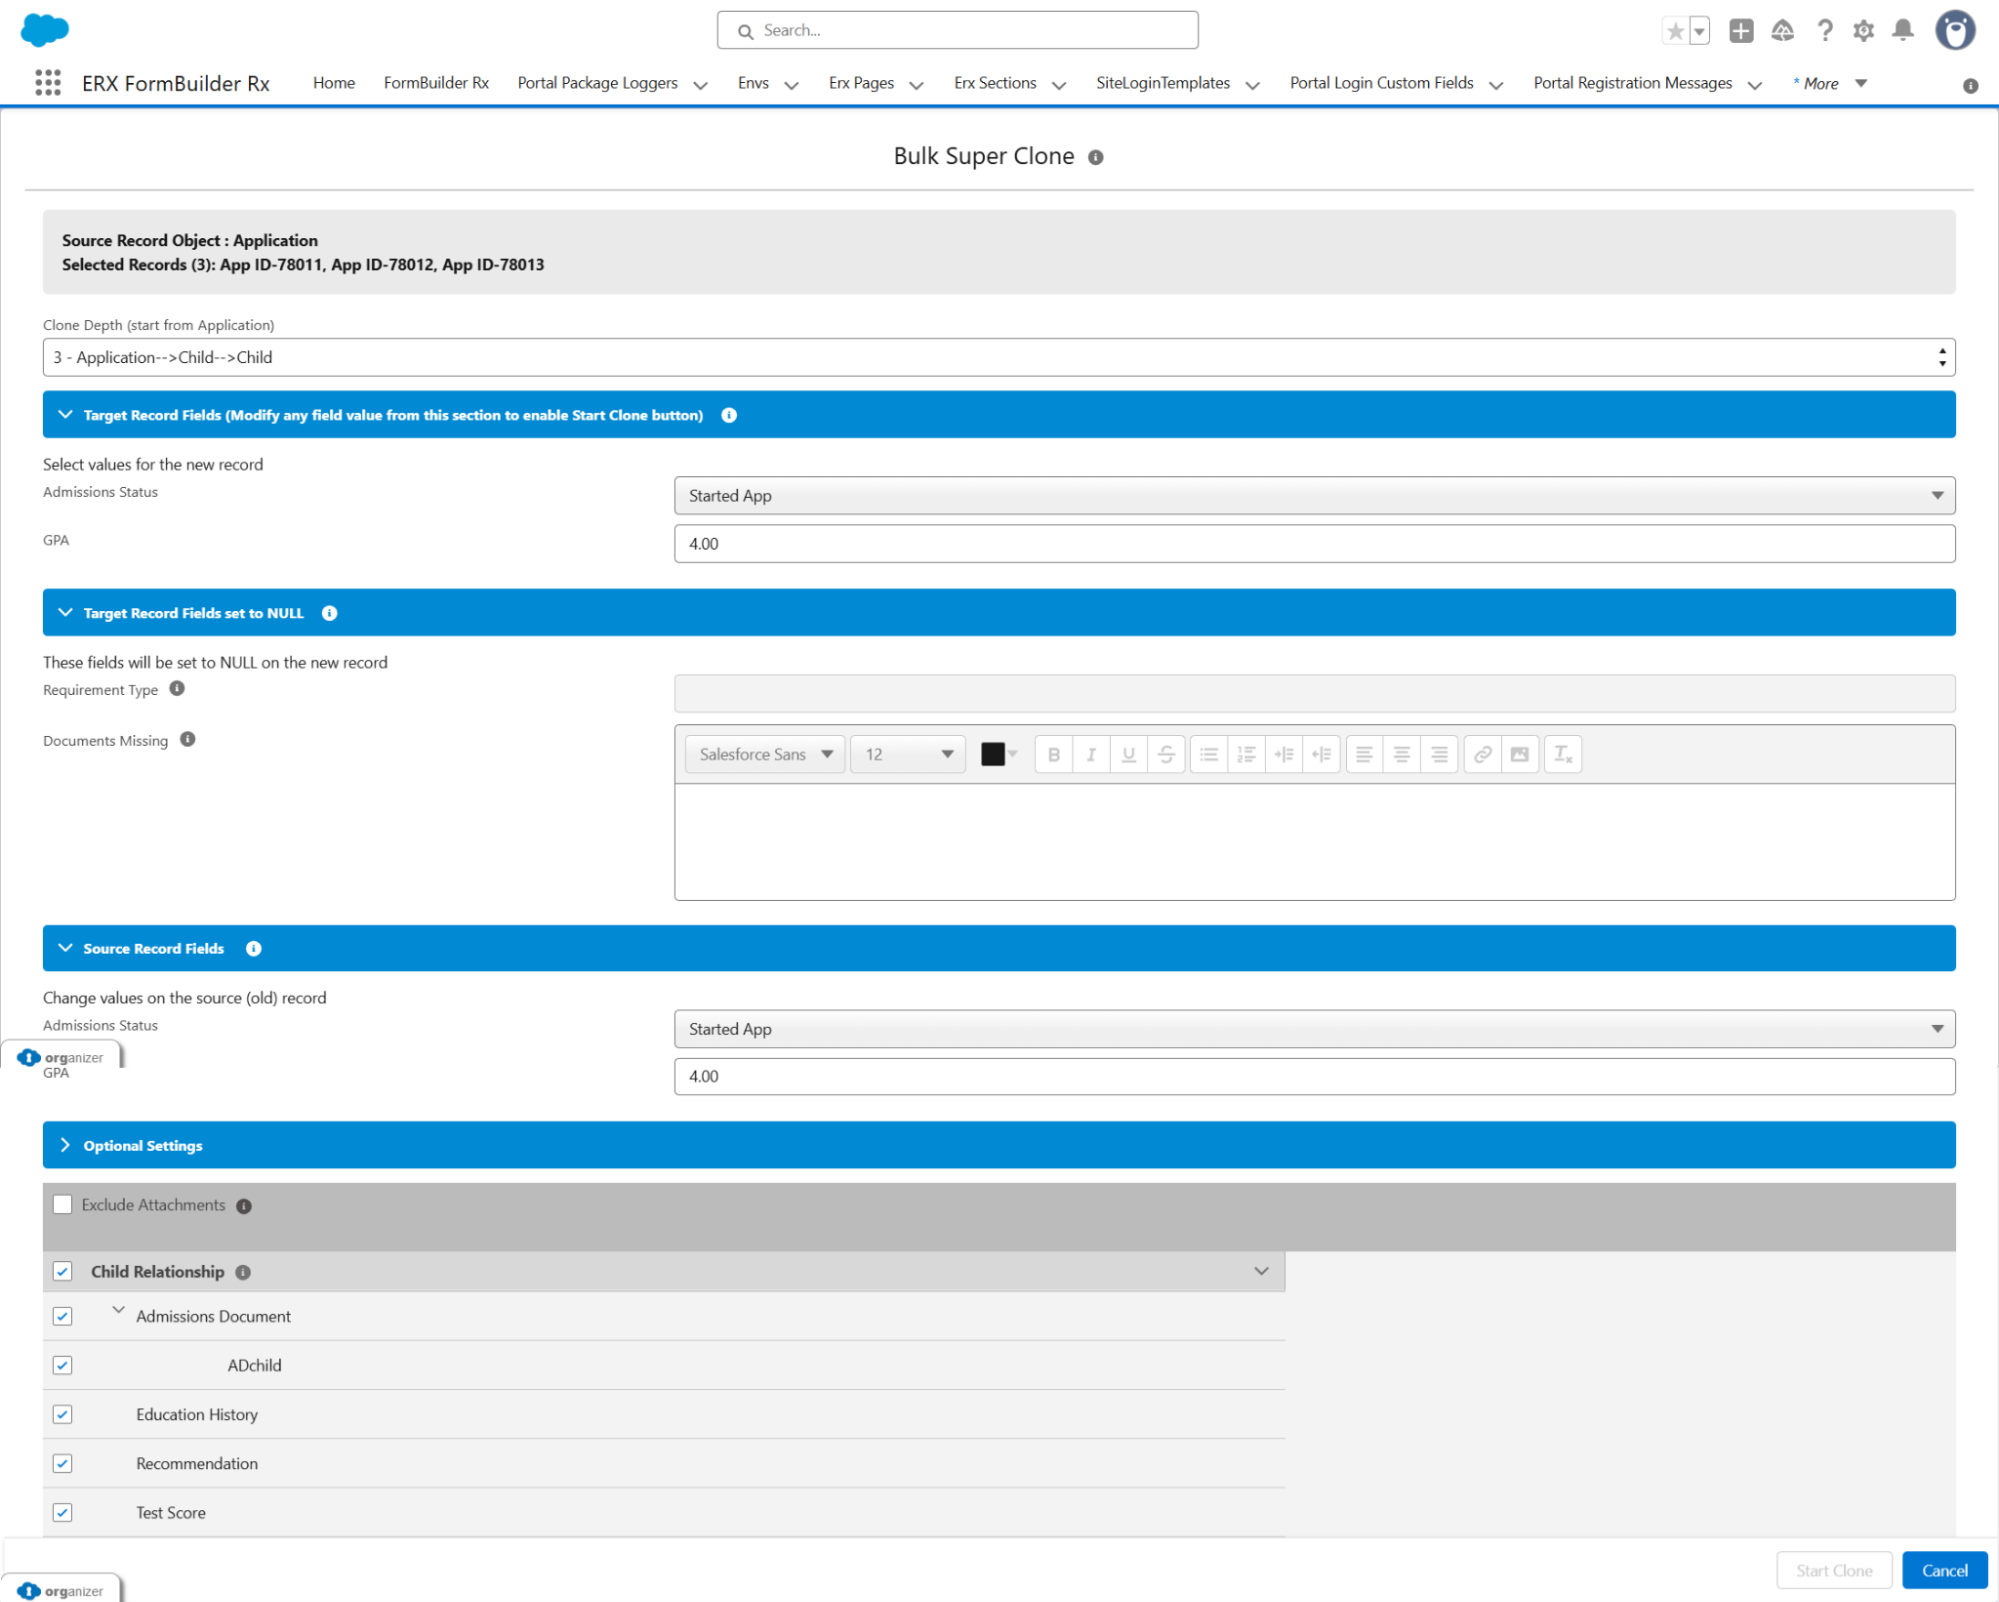
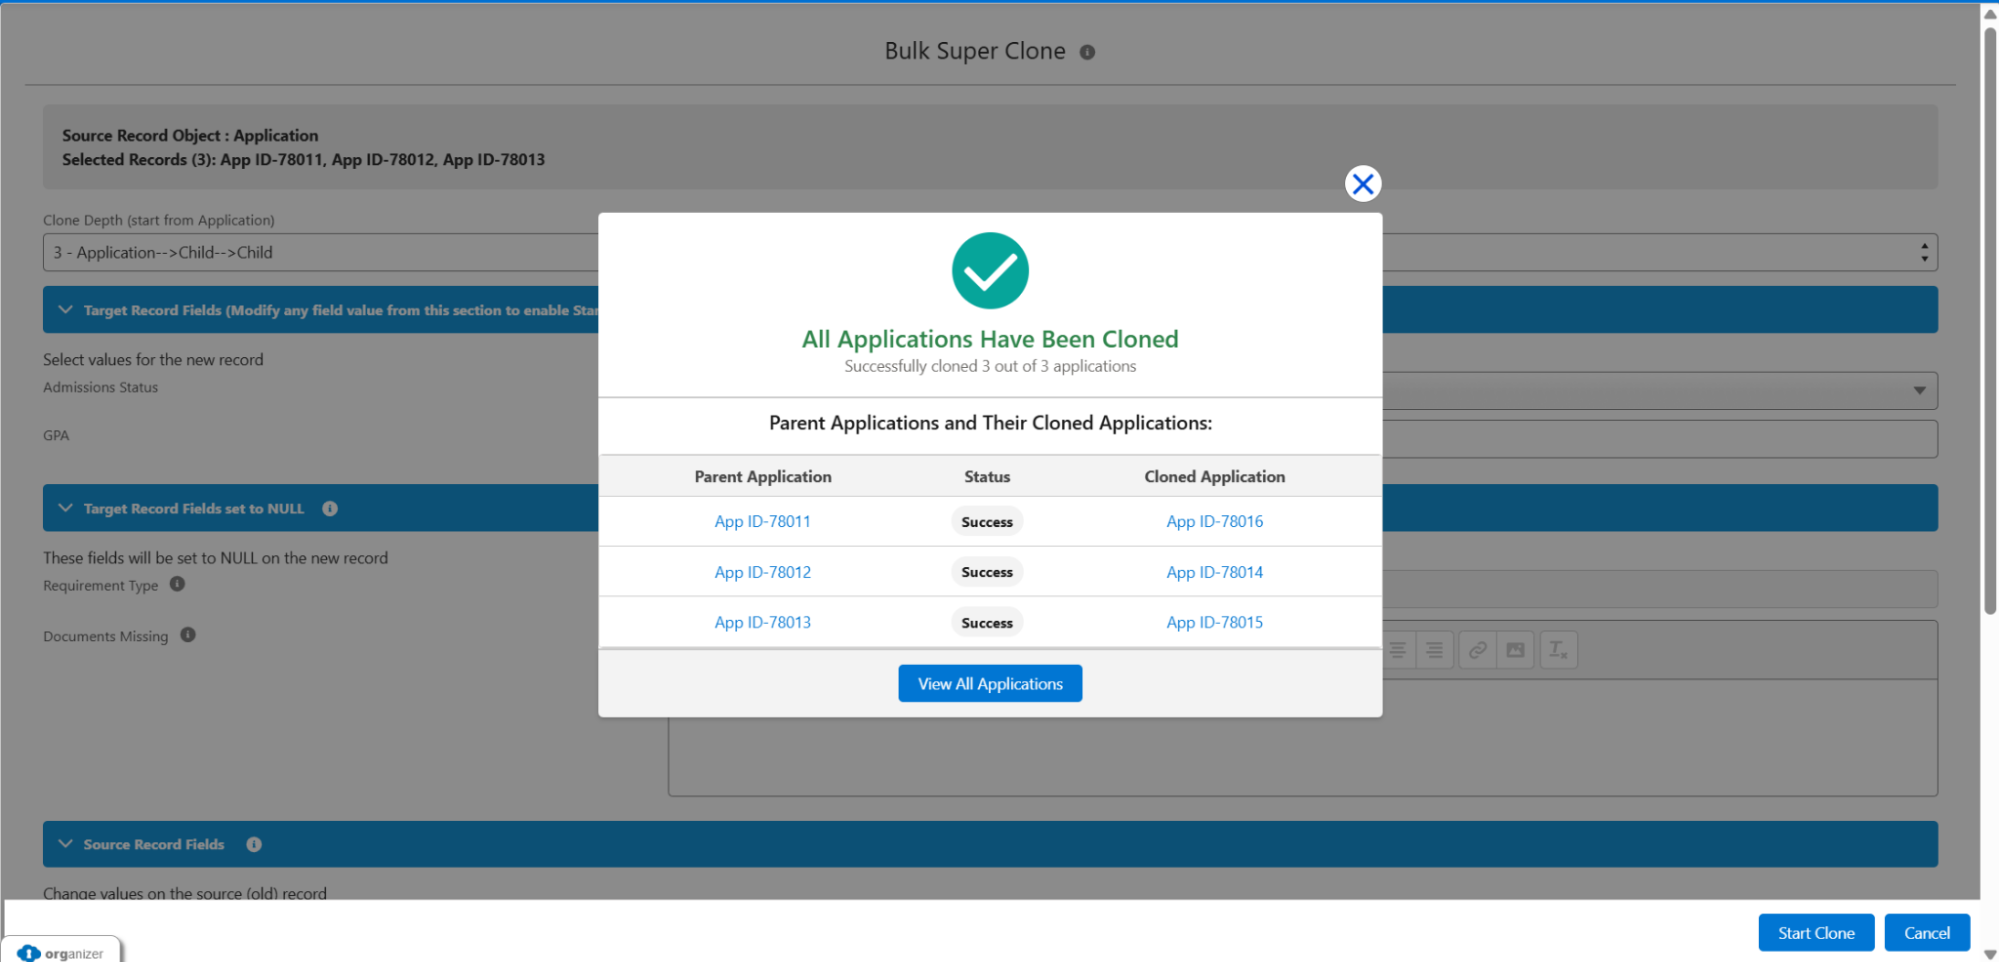
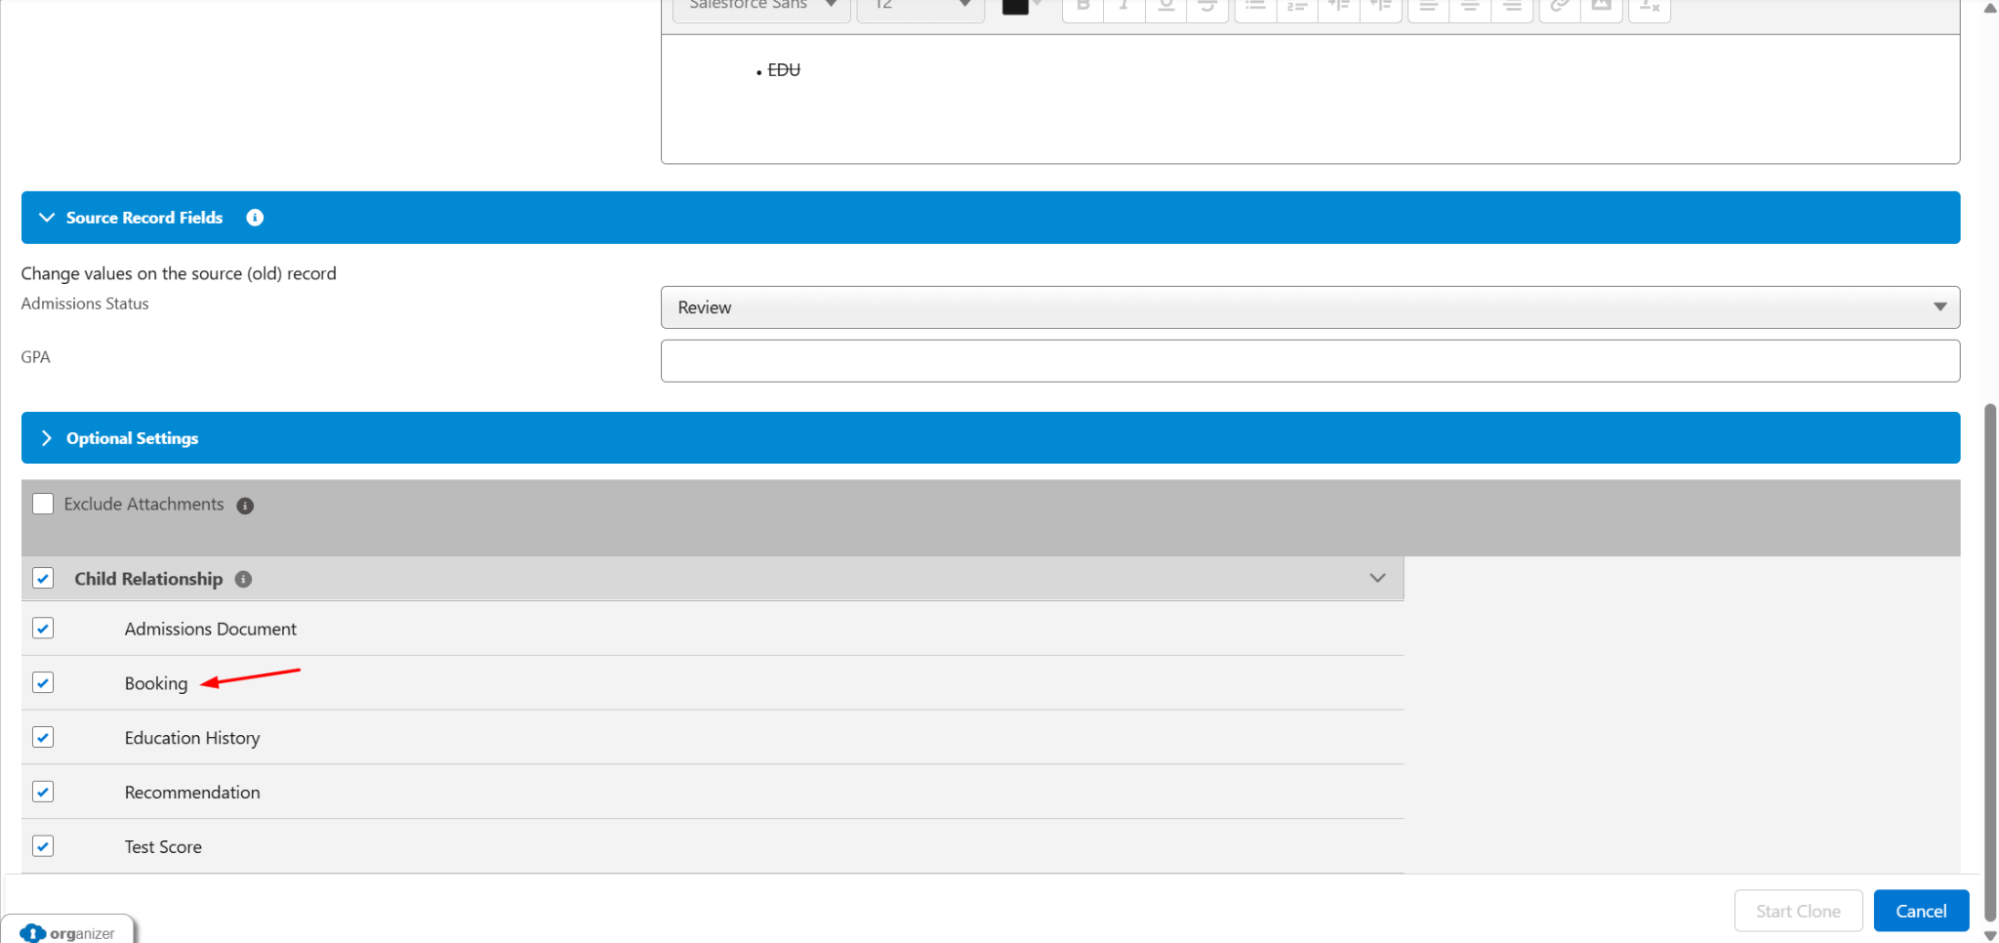
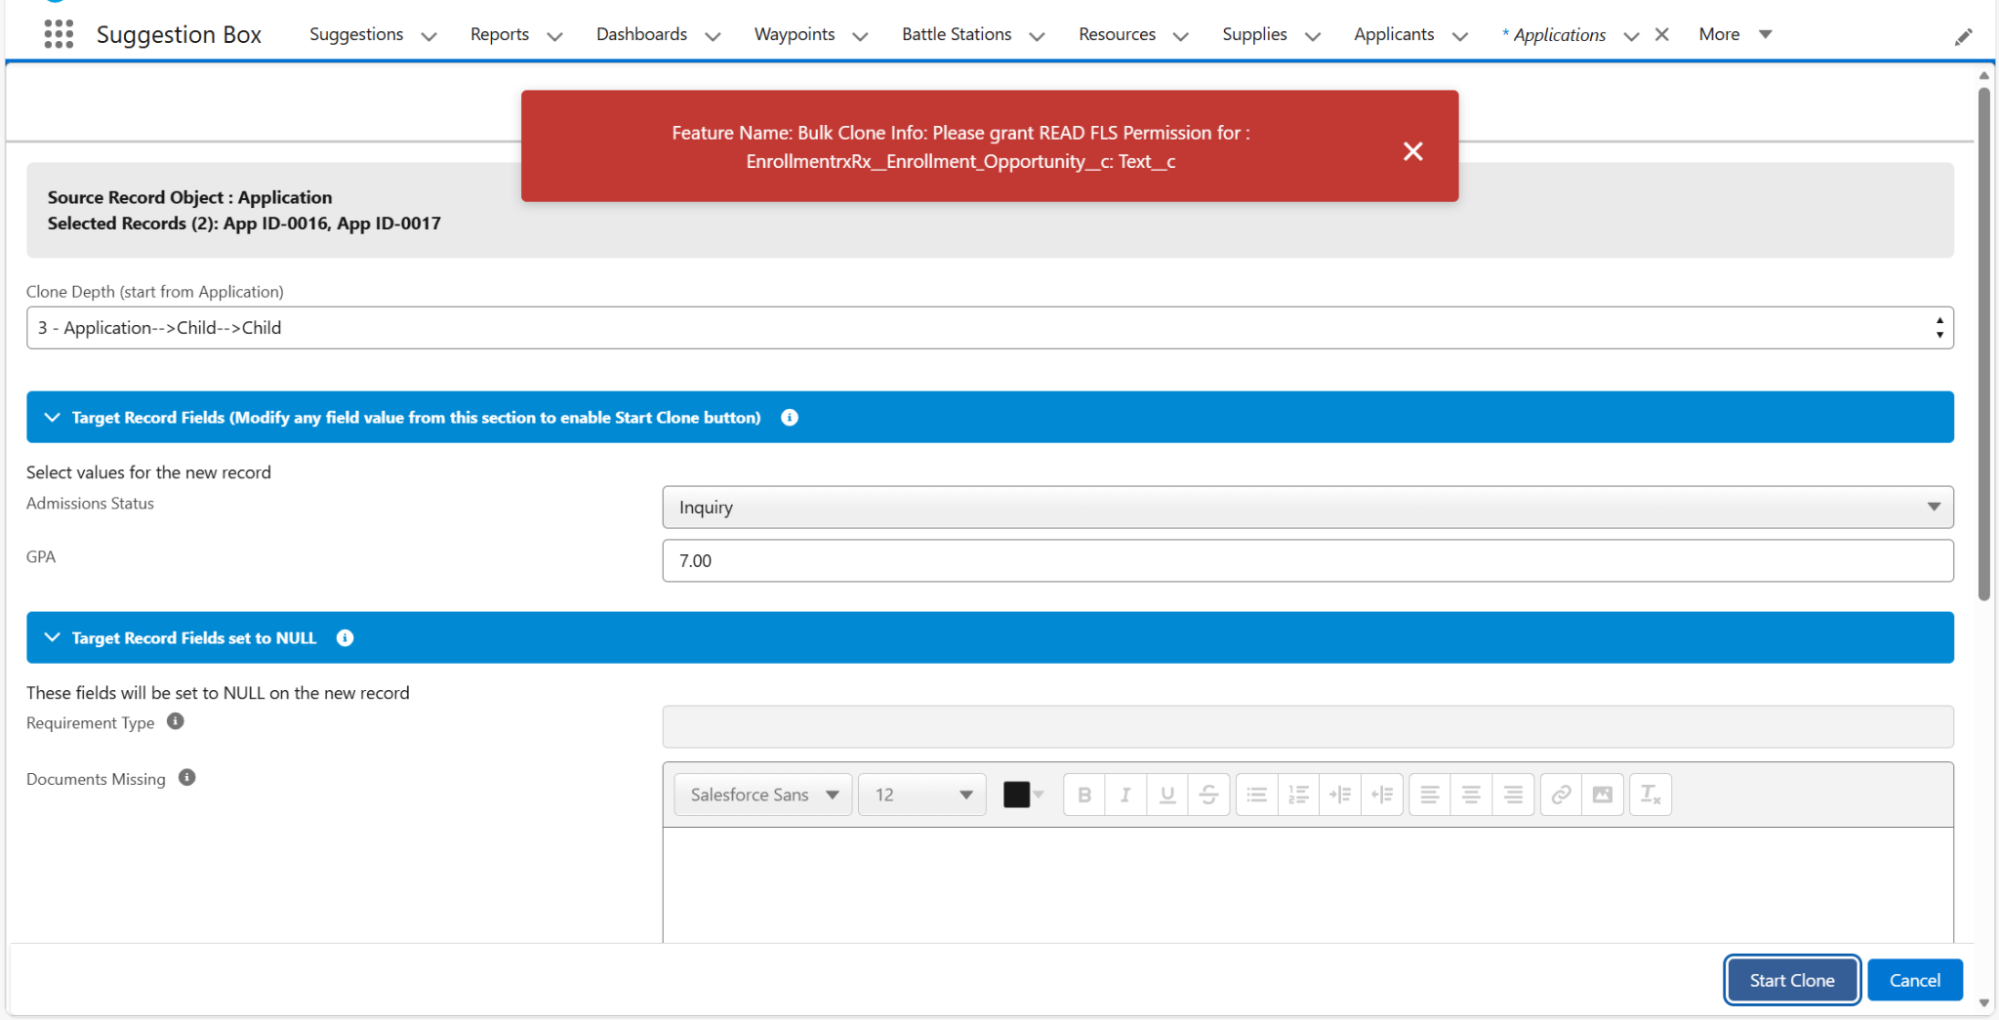
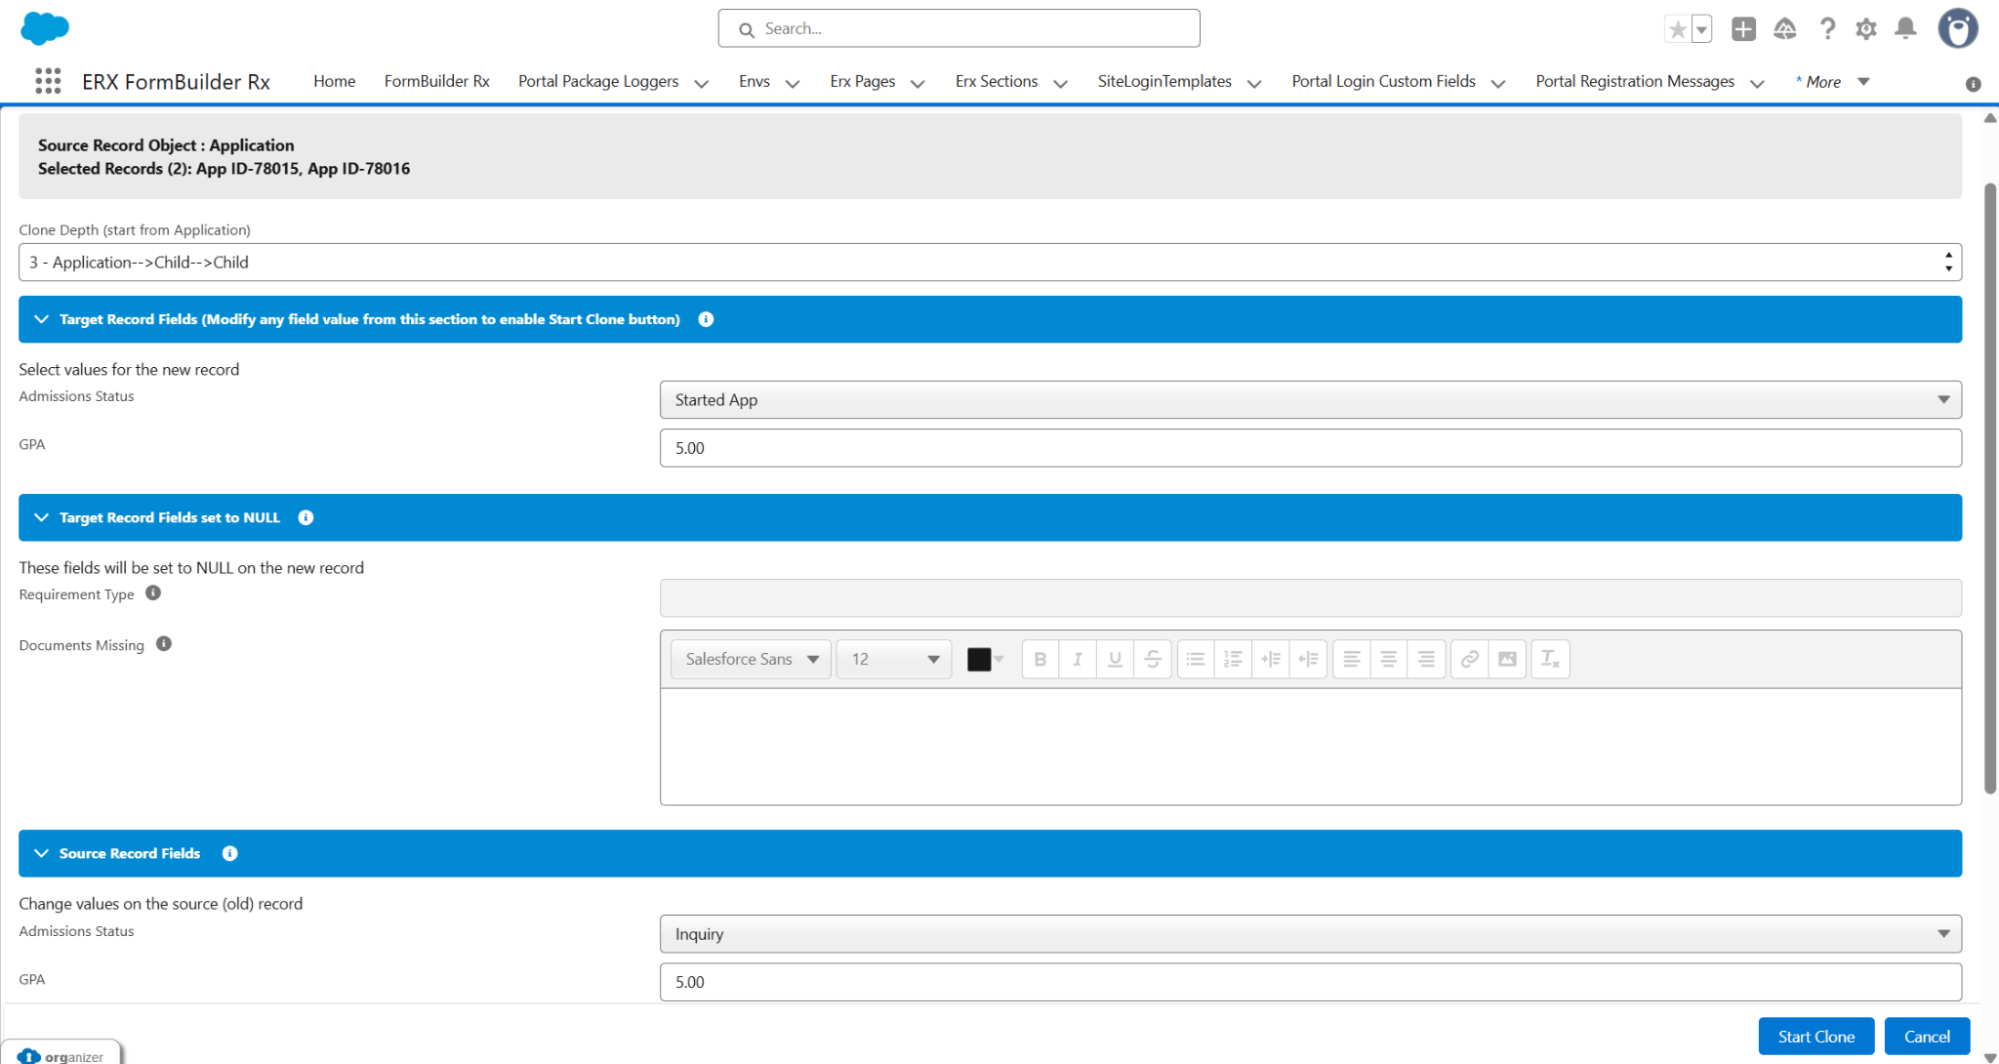
The user is redirected to the Bulk Super Clone Configuration Page, which displays the following details:
-
Source Record Object: Application
-
Selected Records (e.g., 3): App ID-0000, App ID-0001, App ID-0002
-
Clone Depth: Starts from Application
-
Four Sections (FieldSets): Target Records Fields, Target Record Field set to Null, Source Record Field, and Optional Setting
-
Start Clone and Cancel buttons on the bottom left of the page.
-
-
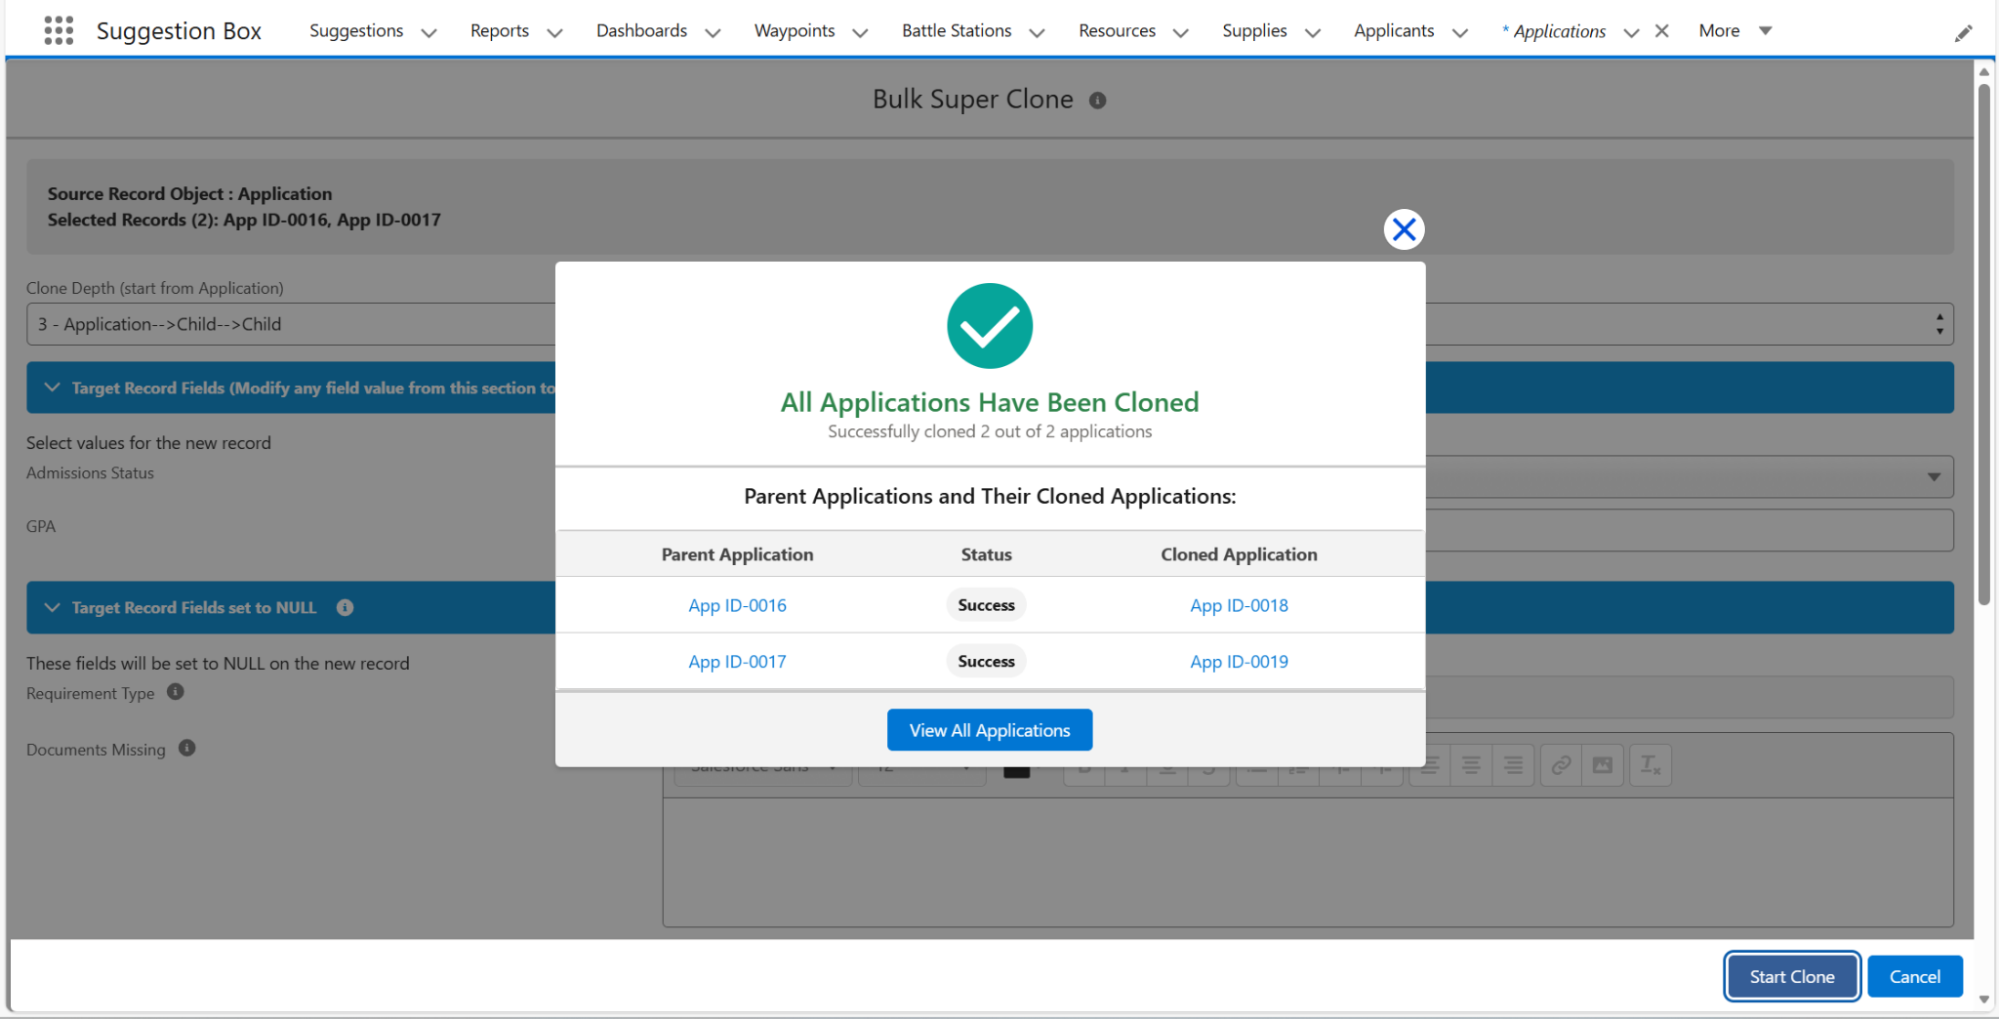
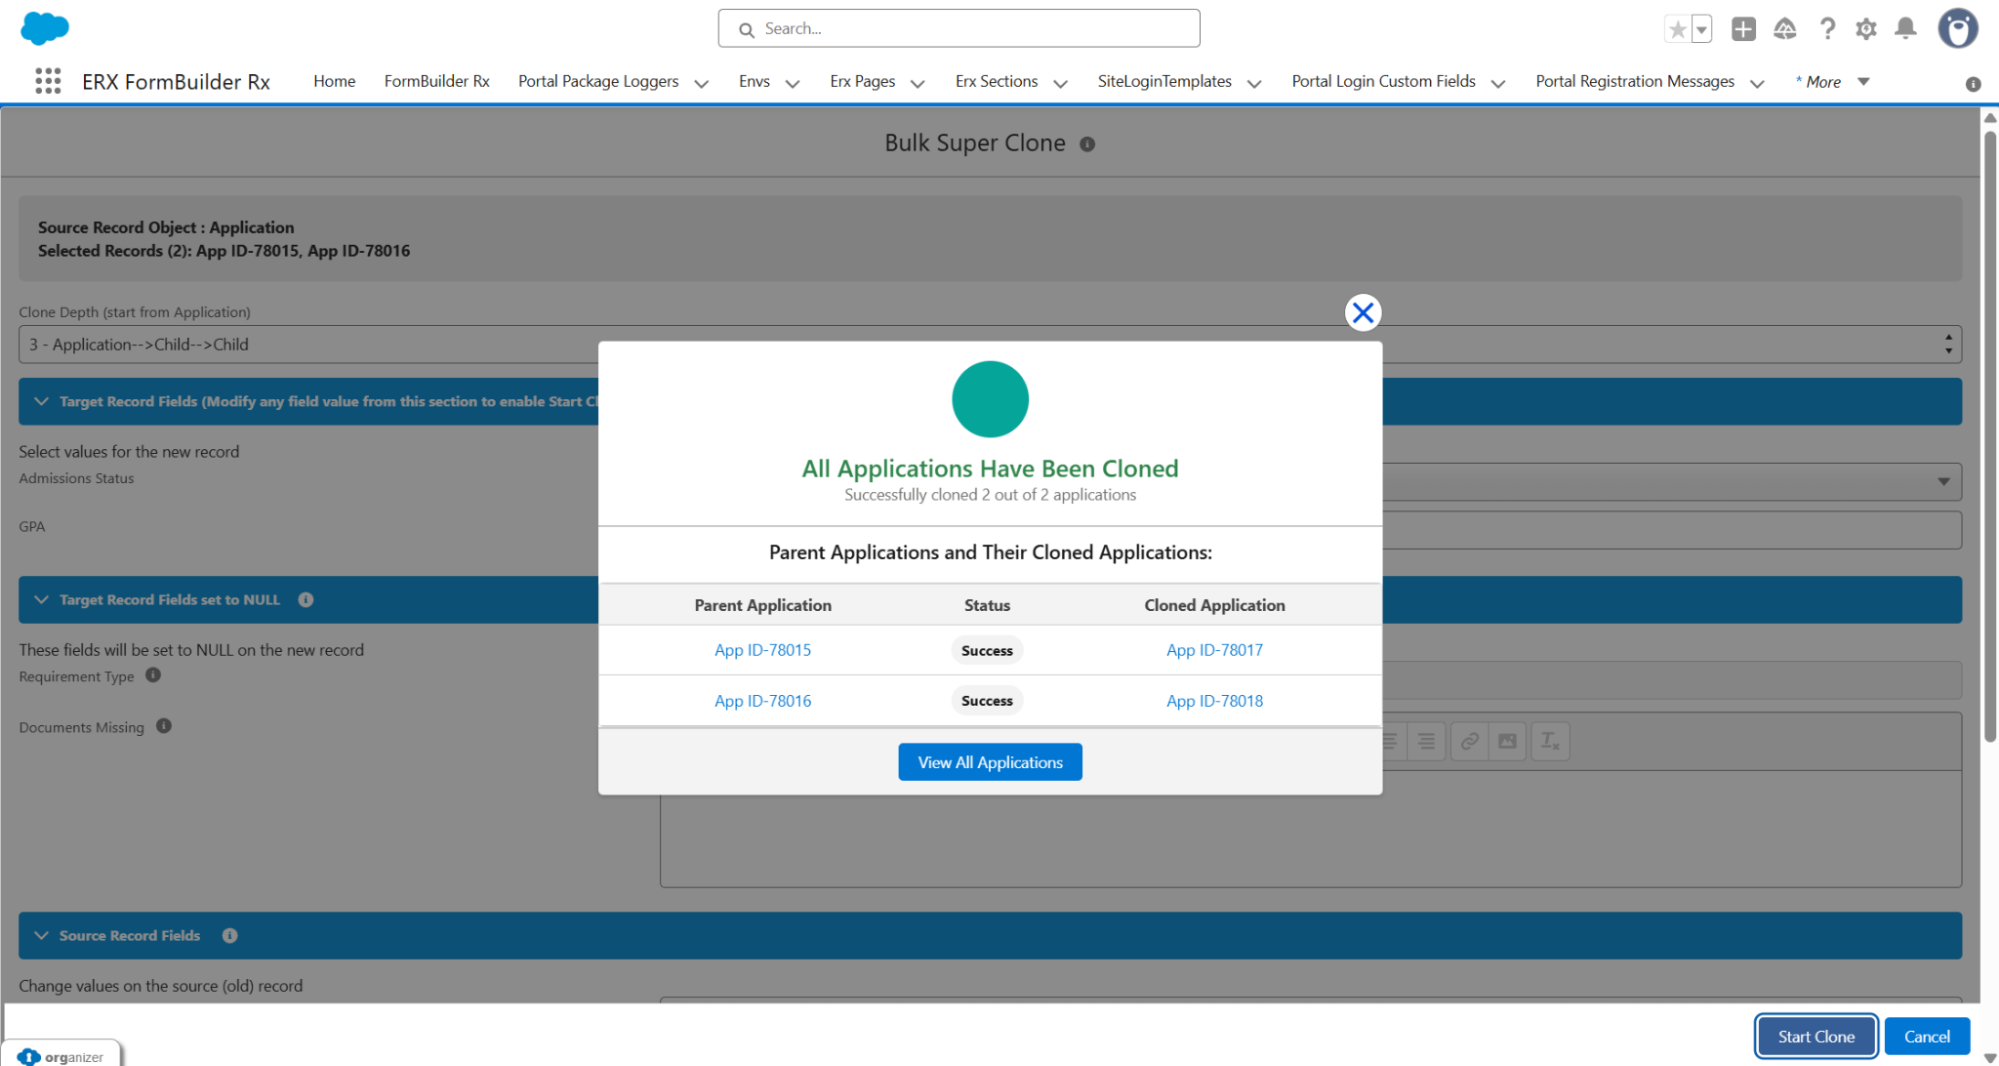
If any value is changed in the ‘Target Record Fields’ section, and the user clicks Start Clone, the cloning process will begin. A progress message will be shown on the screen, for example: “Cloning in progress... Applications Cloned: 0 / 3 (0%)”.
-
Upon completion, an ‘All Applications Have Been Cloned’ pop-up will appear, detailing the parent applications and the newly cloned applications, along with their application IDs.
-
Clicking ‘View All Applications’ redirects the user to the Application List View page, where all cloned applications with the configured field values are visible.
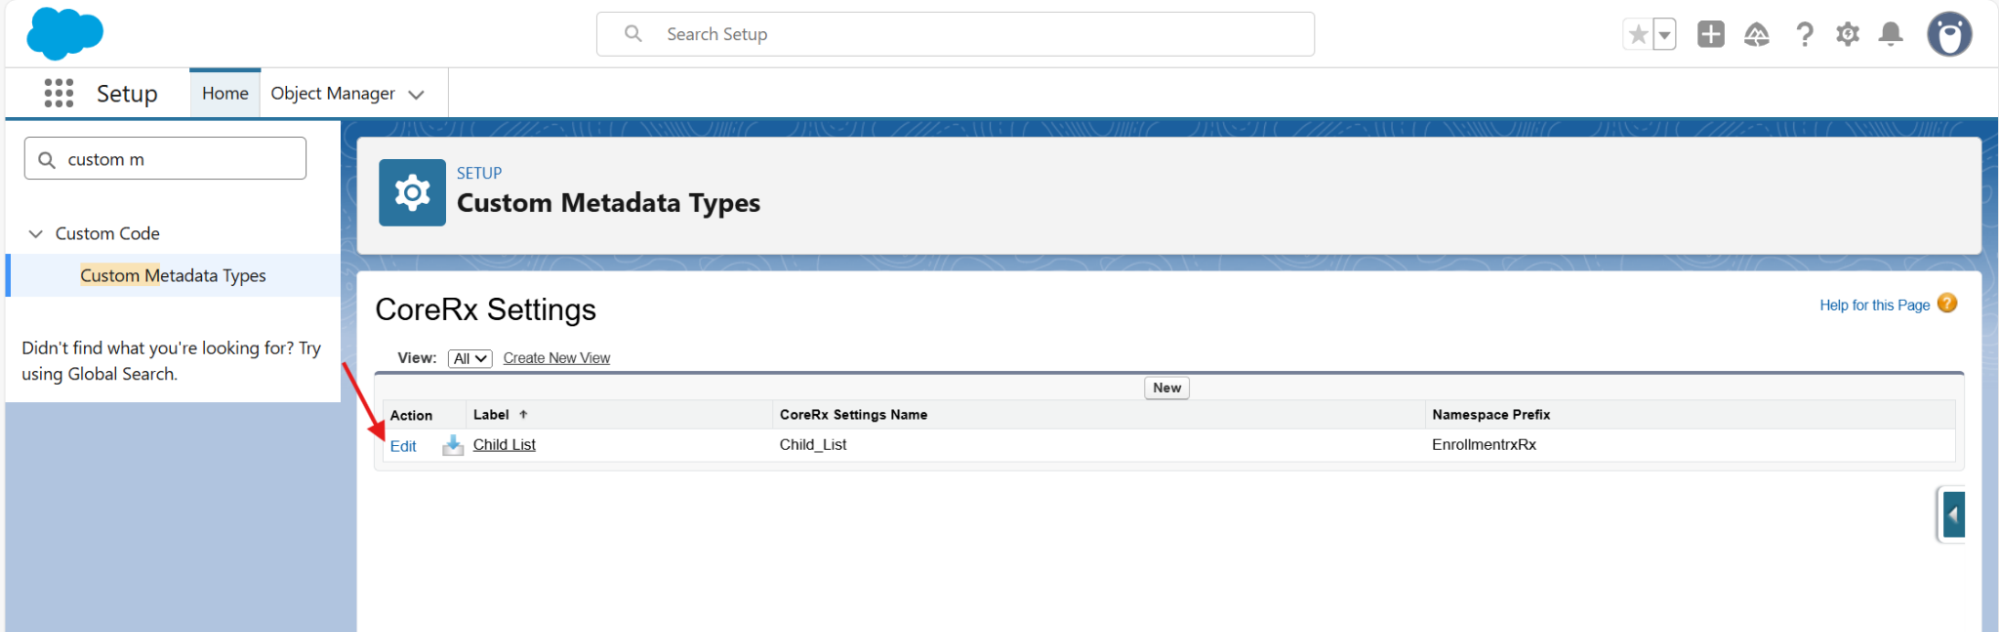
Custom Metadata Configuration for Child Object Cloning
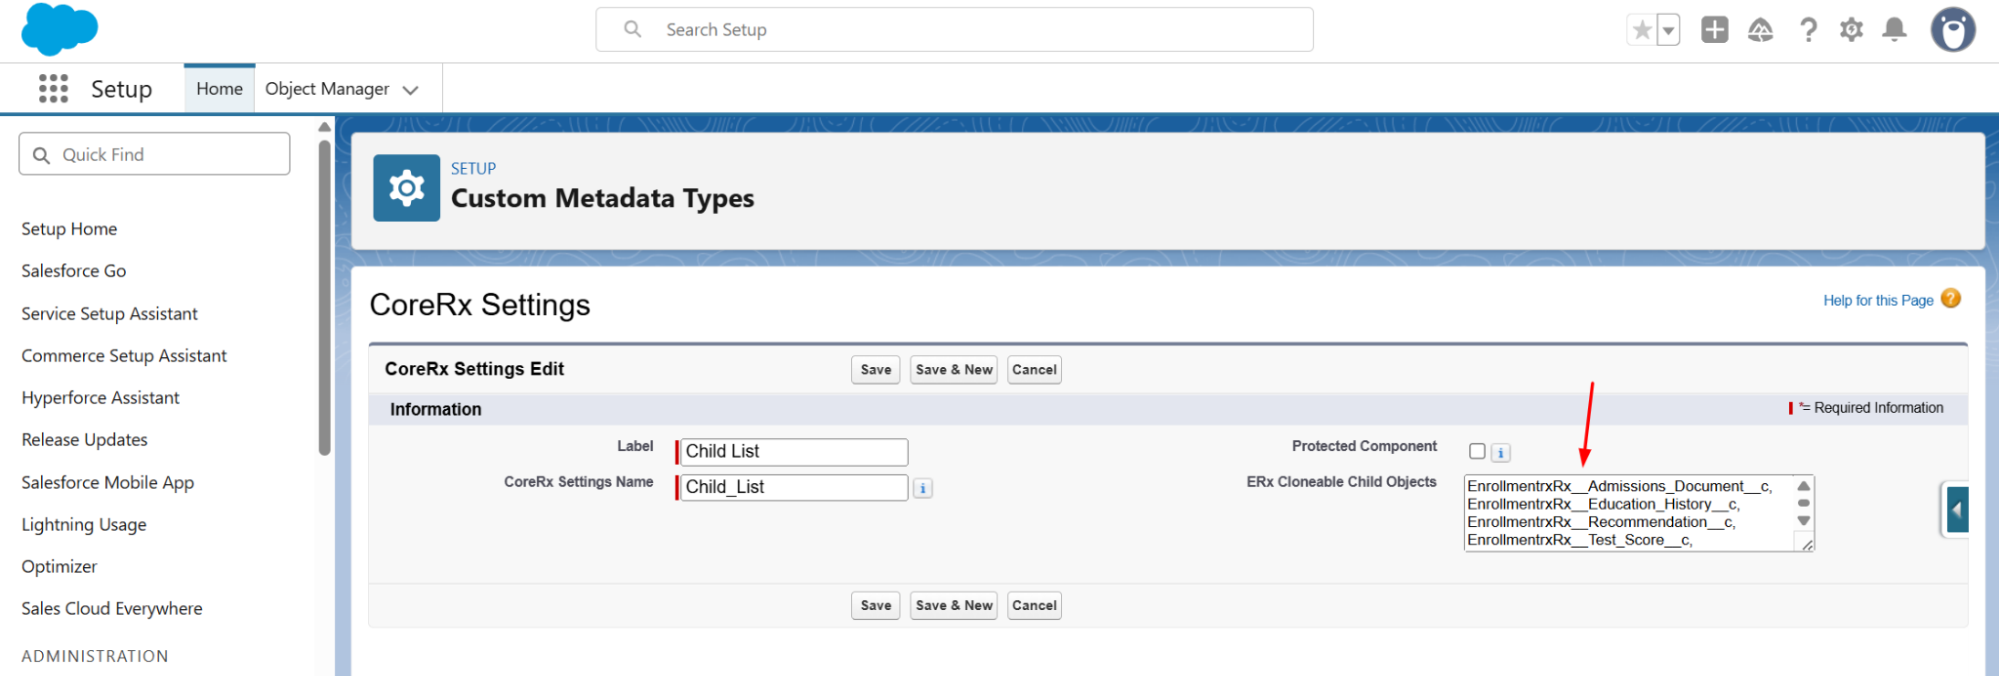
This release introduces a Custom Metadata Type called CoreRx Settings to manage the cloning of child objects associated with the Application record. This setting is available under Custom Metadata Types after upgrading to CoreRx v7.1.
To view and manage the clonable child objects:
-
In the Salesforce Quick Find box, search for Custom Metadata Type.
-
Verify that CoreRx Settings is displayed, and click the Manage Records button.
-
A Child List record is available. The field ERx Cloneable Child Objects displays the configured objects for child record cloning.
-
Default configured objects:
-
EnrollmentrxRx__Admissions_Document__c
-
EnrollmentrxRx__Education_History__c
-
EnrollmentrxRx__Recommendation__c
-
EnrollmentrxRx__Test_Score__c
-
-
-
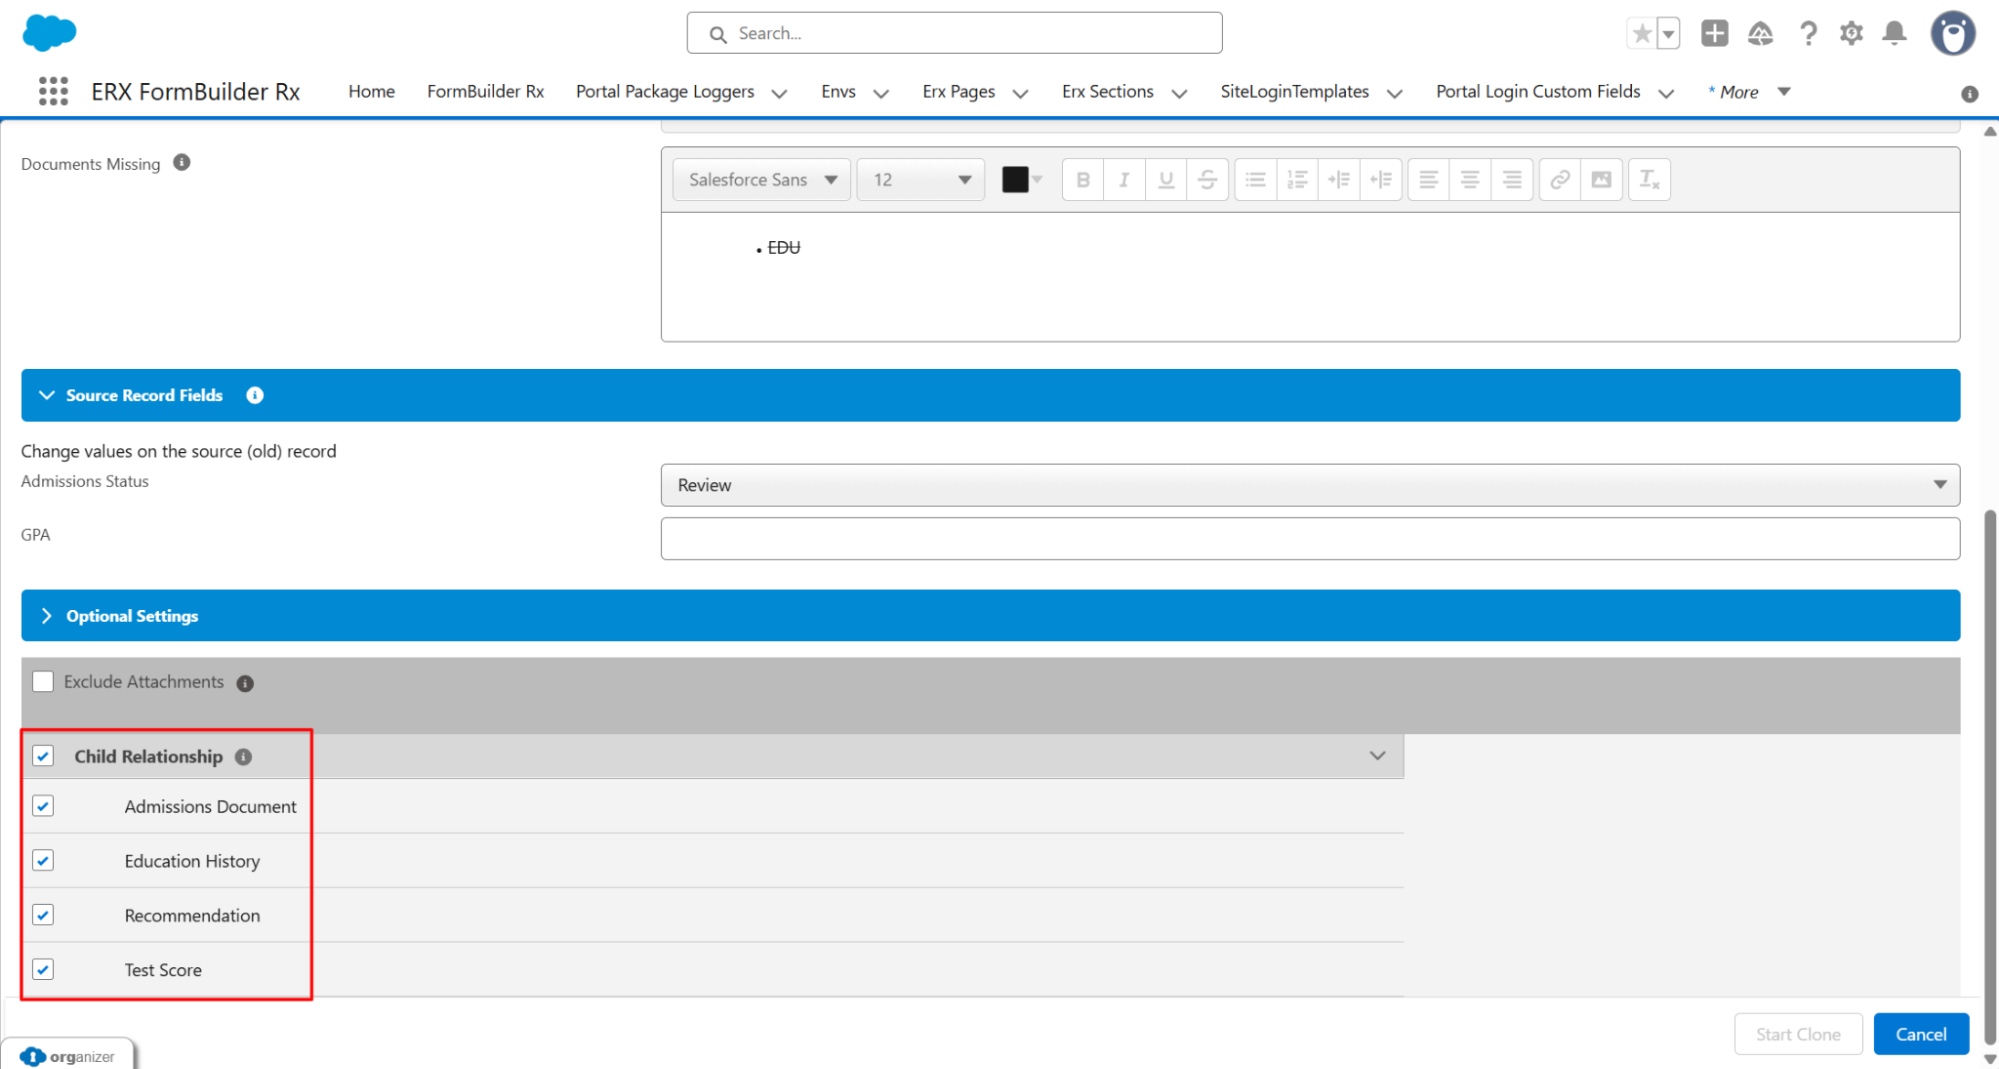
During bulk cloning, child relationship records are included based on the objects configured in the CoreRx Settings (Custom Metadata Type).
-
To include additional related objects, add their object API names to the ERx Cloneable Child Objects field, for example:
EnrollmentrxRx__Booking__c.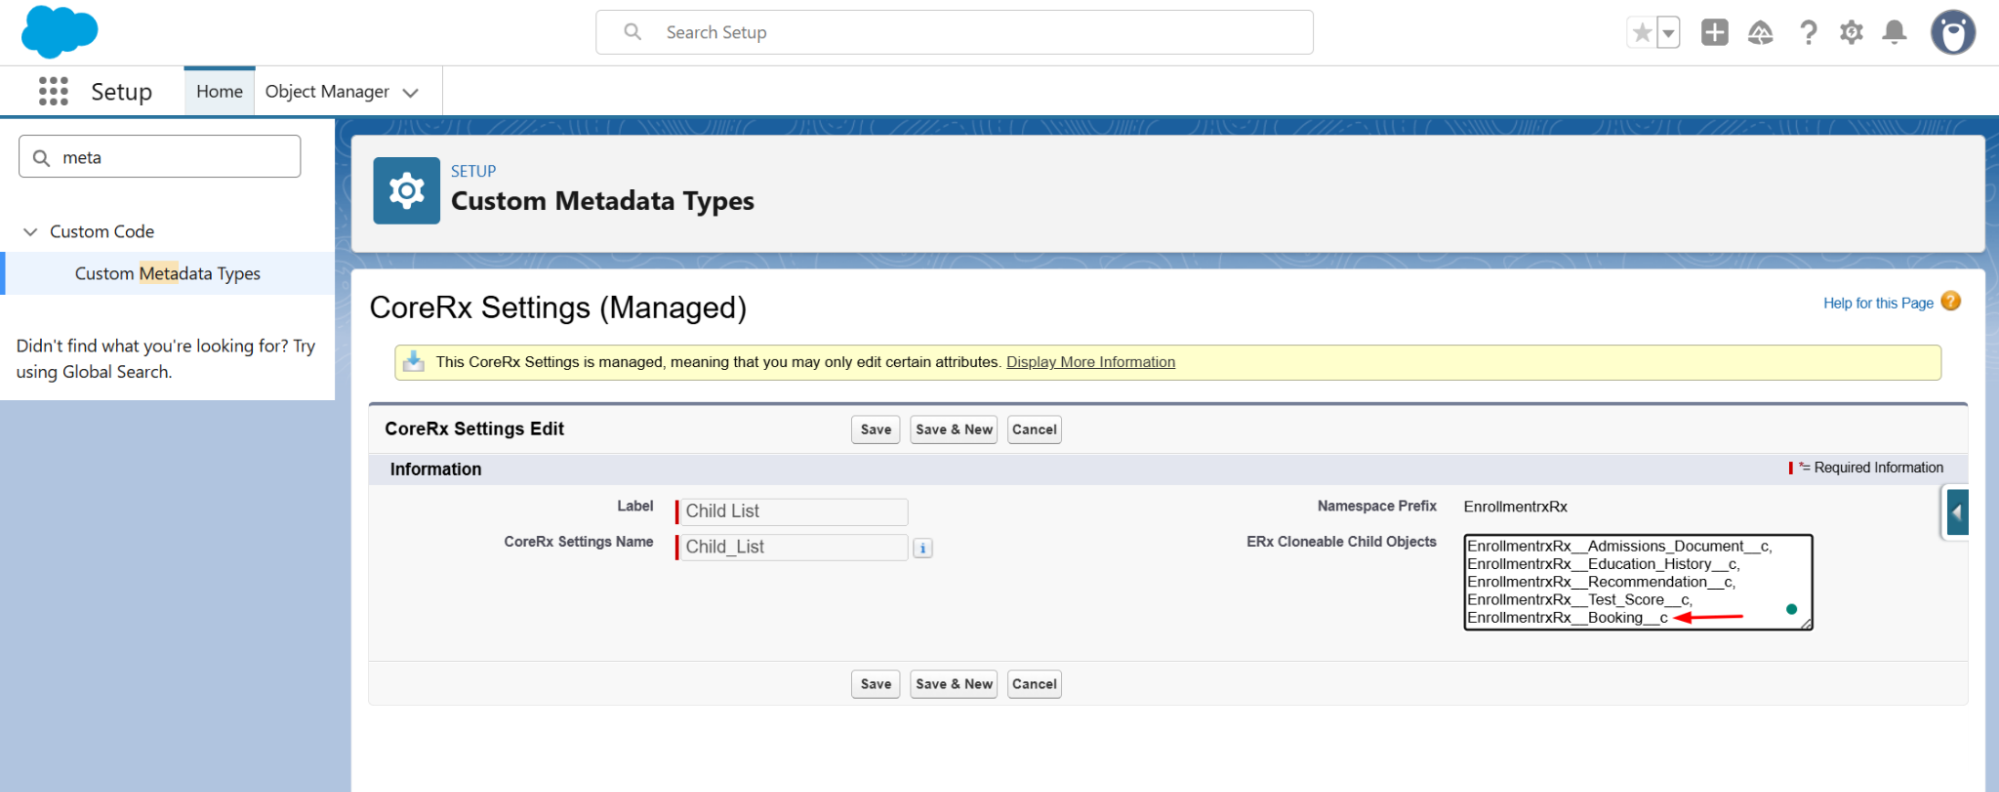
- During bulk cloning, child relationship records are displayed based on the
custom objects configured in the CoreRx Settings (Custom Metadata Type).
Granting Non-Admin Edit Access to Custom Metadata
To grant non-System Admin users the ability to edit Custom Metadata Types, follow these steps:
Prerequisite: A user with a non-System Admin profile (e.g., Standard User) must be assigned the CoreRx Full Access permission set.
-
Go to Setup and search for the user.
-
Select the user to whom you want to provide access.
-
Open the Permission Set Assignments section.
-
Scroll down and click on System Permissions.
-
Click the Edit button and enable the “Customize Application” checkbox.
-
Click Save.
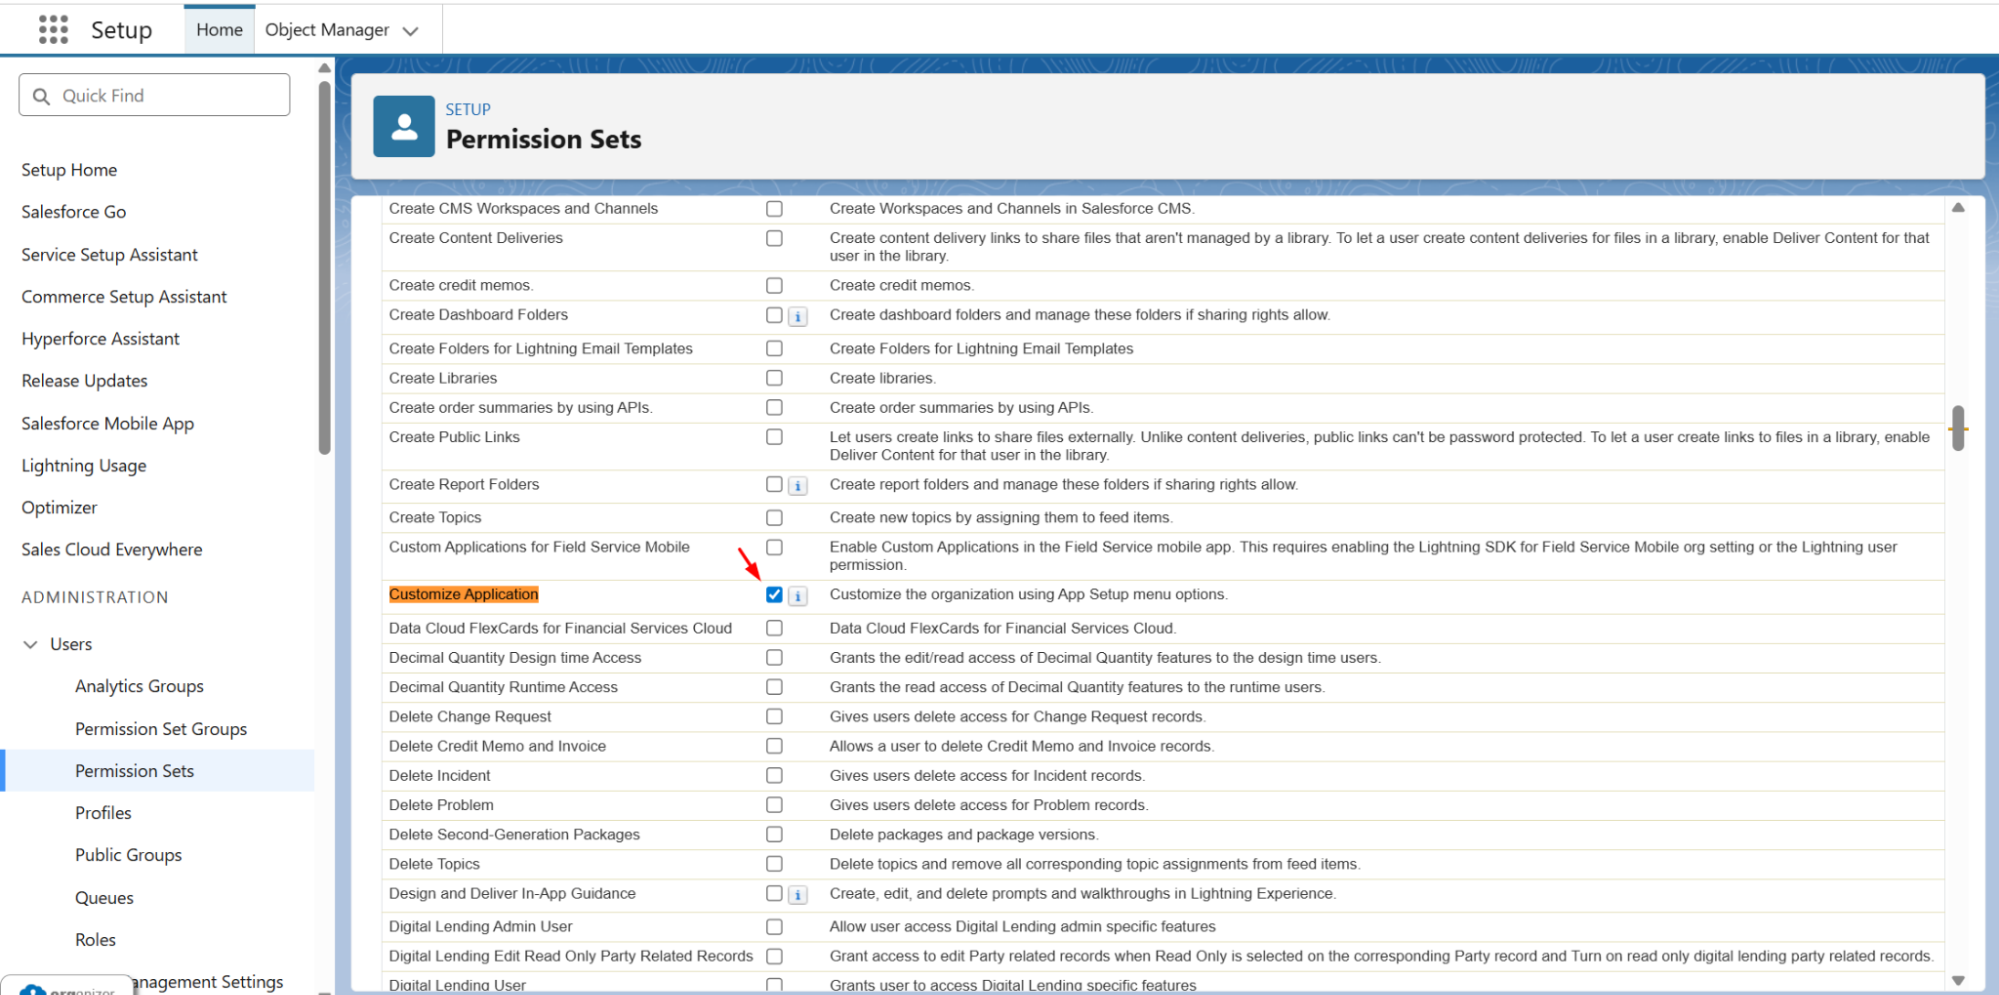
-
The user can now log in, go to Setup, search for Custom Metadata Types, and the edit icon will be visible under the Action column for CoreRx Settings 'Manage Records'.
Name Conflict Resolution Scenarios
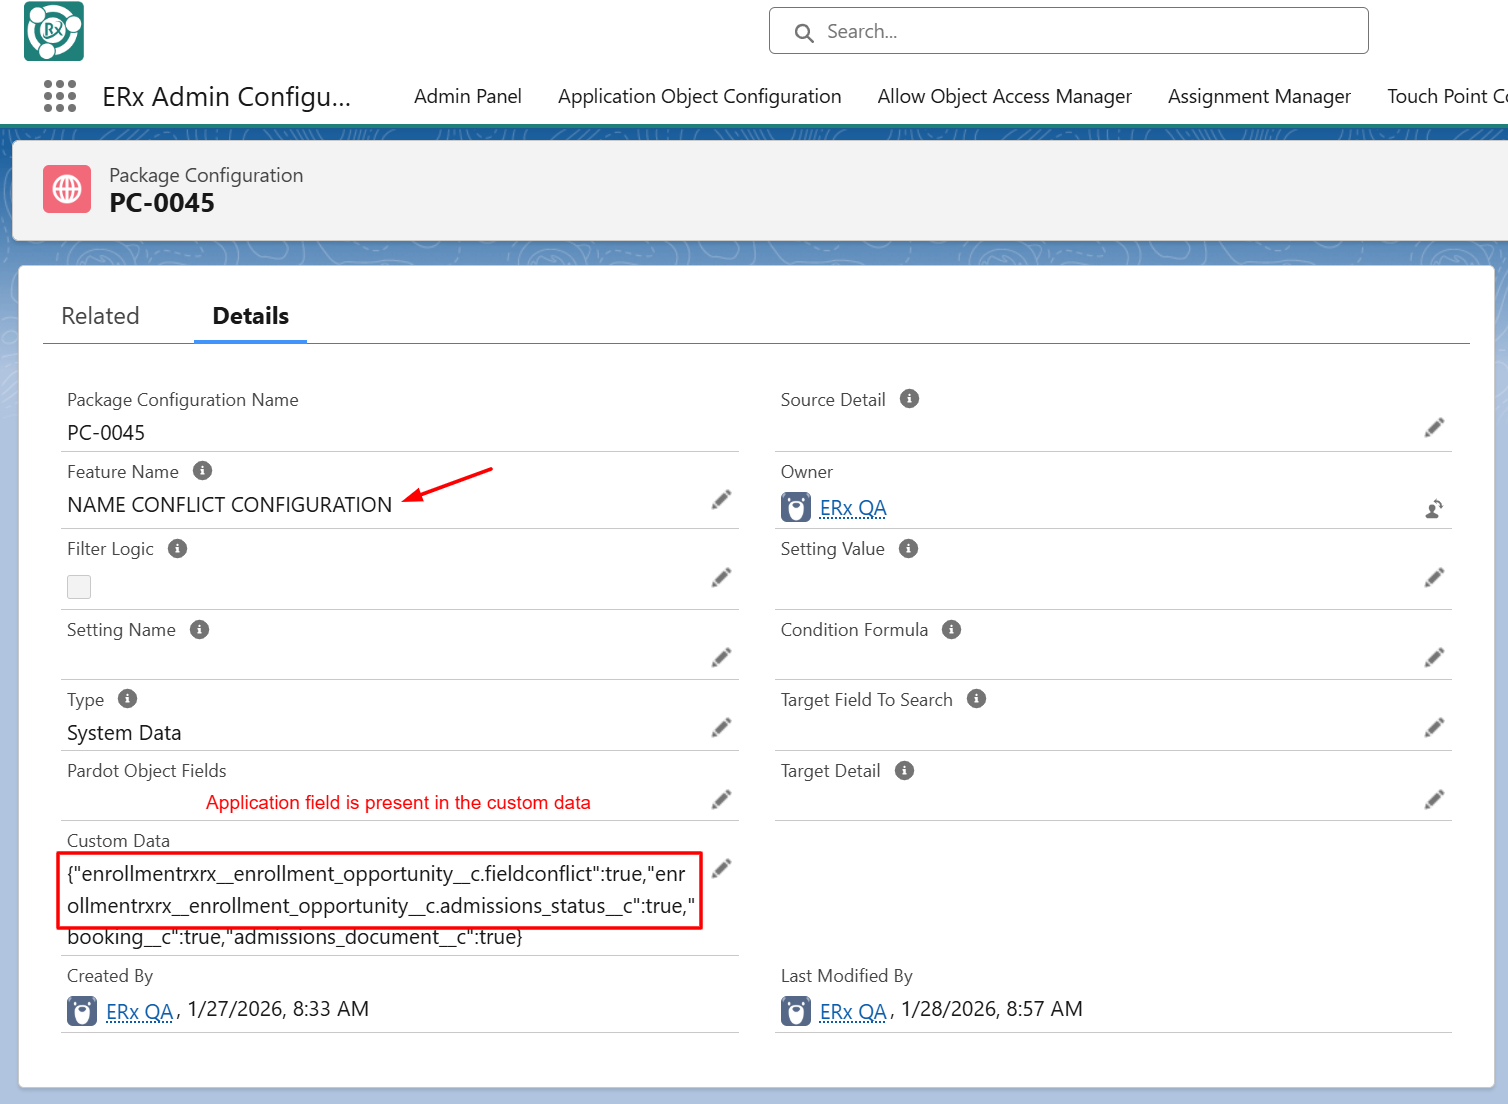
The behavior of Super/Bulk Clone during the cloning process changes based on whether fields are present in the 'NAME CONFLICT CONFIGURATION' record of the Package Configuration object.
Case 1: No Name Conflict for the Application Object Field
-
Condition: No application object field is present in the ‘NAME CONFLICT CONFIGURATION’ record.
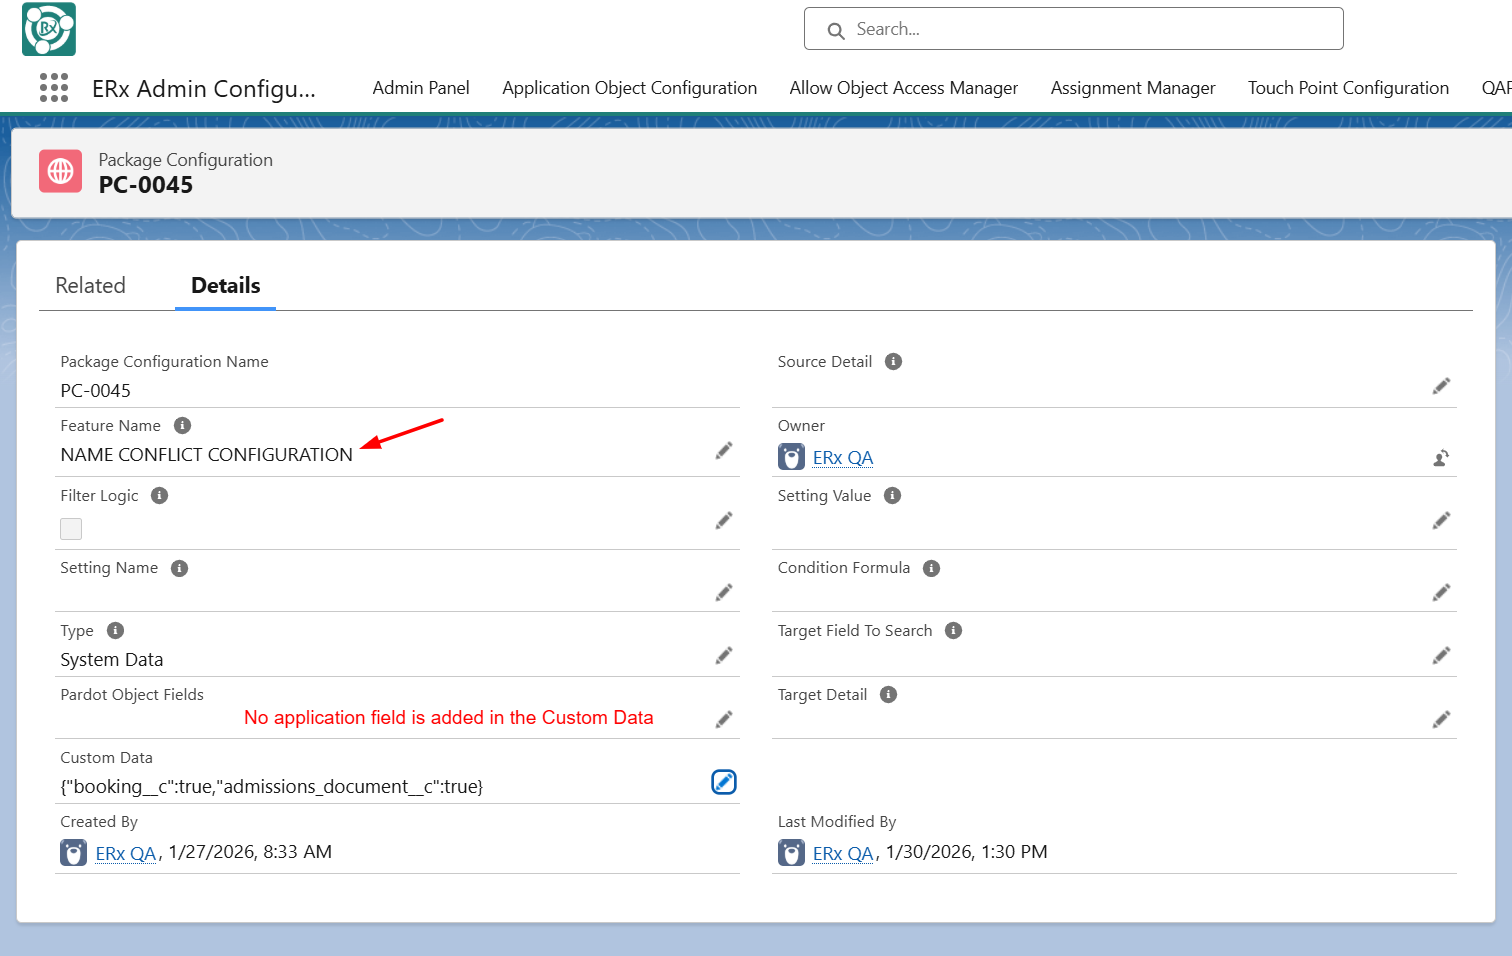
-
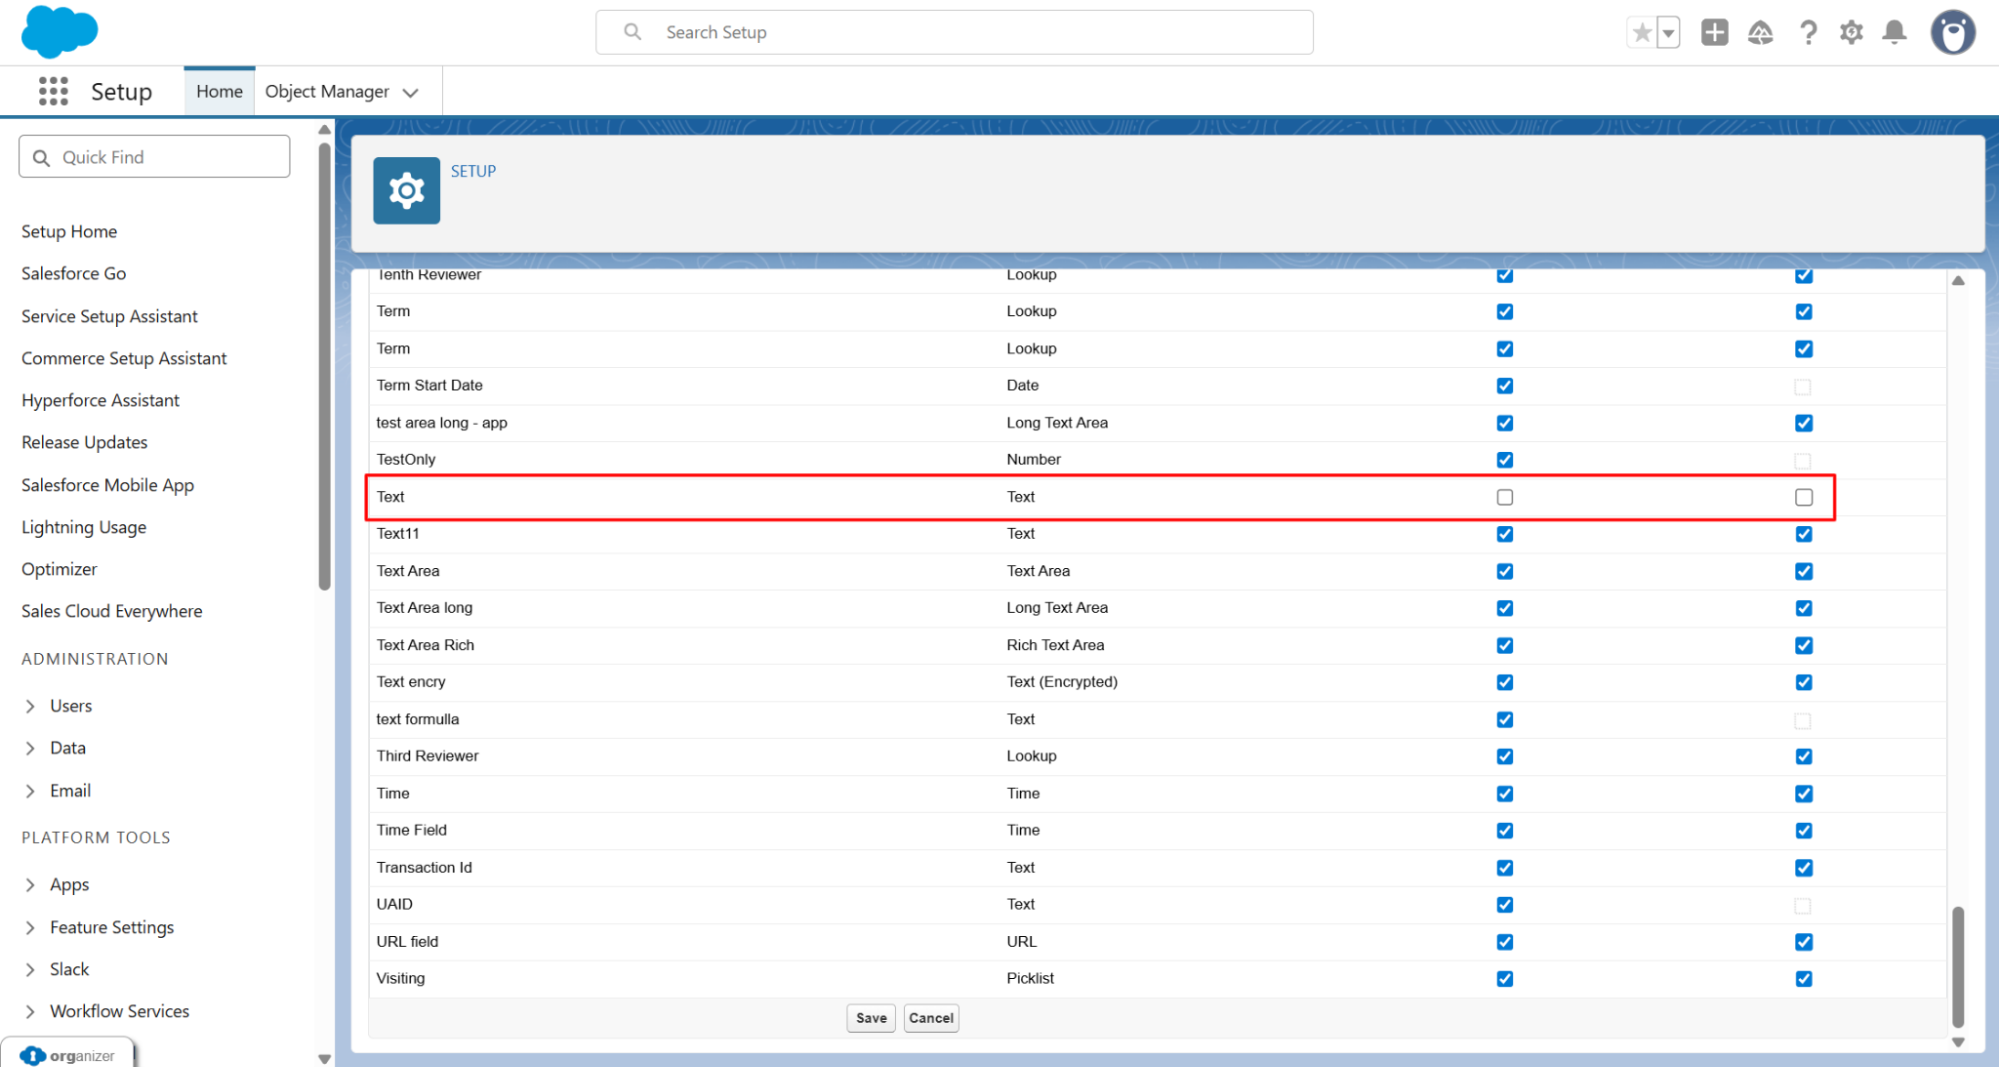
Super/Bulk Clone Behavior: The process checks the Field-Level Security (FLS) permissions for all fields of the Application object. If permissions are missing for any field, a permission error will be thrown during cloning, even if that field is not part of a FieldSet.
-
Resolution: To resolve this, provide FLS for all fields on the Application object.
Case 2: Name Conflict for the Application Object Field
-
Condition: At least one application object field is present in the ‘NAME CONFLICT CONFIGURATION’ record.
-
Super/Bulk Clone Behavior: The process will only check FLS permissions for the fields explicitly included in the relevant FieldSets. If permissions are provided for these FieldSet fields, the application will be cloned successfully without a permission error.
Quick Access Panel (QAP) Visibility in Salesforce Classic
-
Issue Description: Following the Salesforce Winter ’26 update, the QAP (Quick Access Panel) section stopped appearing on Classic Page Layouts when viewed in Lightning Experience. This regression impacted users who depend on Classic layouts rendered within Lightning for operational workflows.
-
Resolution: This release includes a fix that restores the QAP section behavior to match its functionality prior to the Winter ’26 update.