Creating a Campus (Event) Campaign
Follow these steps to create a new campus (event) campaign.
- Navigate to the ERX Events Rx app in your Salesforce org, click the Events Rx Admin Panel tab, and click on the Events Calendar icon.
- Click the New Campaign button in the upper right of the Calendar page.

Tip:You can also create Campus Campaigns from the standard Salesforce Campaigns tab. - Select the Campus Campaign record type.
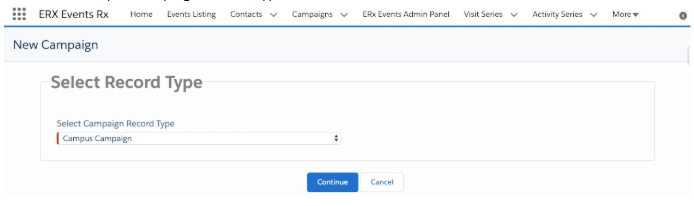
- Click the “Continue” button to open the ERX New Campus Campaign page.
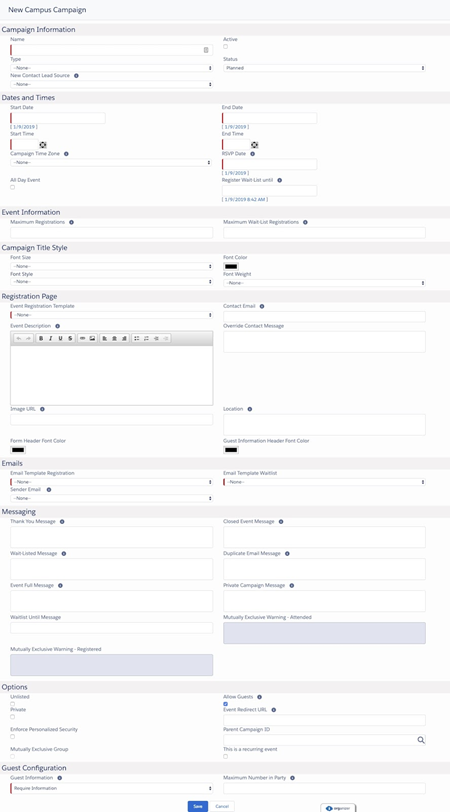
The fields on this page are organized into sections, shown and described below:
- Campaign Information
- Dates and Times
- Event Information
- Campaign Title Style
- Registration Page
- Emails
- Messaging
- Options
- Guest Configuration
Campaign Information
| Campaign Name | Salesforce Standard Name field. This holds the title that will be displayed on the event registration web page |
| Type | This the Salesforce’s standard Type field. Edit this picklist to meet your needs. By default, this is the field displayed on the Event Listing page as a filter. You can use a different field by editing the Events Rx Custom Setting. |
| New Contact Lead Source | Set a value to be populated into the Lead Source field on new contacts created through registration for this Event. |
| Active | Salesforce Standard Active field. Only active events can be visible/accessible to candidates. |
| Status | Salesforce Standard Status field for tracking status of the campaign, such as Planned, In-Progress, or Aborted. Used for list views and reporting, but has no effect in ERx Events functionality. |
Dates and Times
| Start Date |
The Start Date of event. Displayed on the registration page. |
| End Date |
The End Date of the event. Displayed on the registration page. The event will be displayed on the Event Listing page until the end of this day. |
| Start Time |
The Start time of the event. Composed with the End Time to display on the registration page. |
| End Time |
The End time of the event. Composed with the Start Time to display on the registration page. |
| RSVP Date |
The RSVP Date should be less than or equal to the start date of the event. Once this date has passed, the event is closed for registration. If the RSVP date is equal to the start date of the event, then registration will be allowed until the end time of the event. |
| Register Wait-List Until |
Set the end date/time for putting registrants on the wait-list. |
| Campaign Time Zone |
Composed with Start and End times to display on the registration page. You may edit the values in this list, but each value must begin with a string formatted like this: "(GMT-00:00)" |
| All Day Event |
Check this box if the campaign is an All Day Event. |
| Register Wait-List Until |
The date to stop accepting wait-list registrations. After this date, no additional individuals will be placed on the wait-list through the event registration page. |
Event Information
| Maximum Registrations |
Enter the maximum number of people that can register for this event. |
| Maximum Wait-List Registrations |
Enter the maximum number of people who can be put on the wait-list if the maximum registrations limit is reached. |
Campaign Title Style
These fields control the style of the Campaign Name as displayed on the campaign’s registration page.
Registration Page
| Event Registration Template | This contains a list of templates available for the event registration page. Select a template to control the look of the page. |
| Registration Page Description |
Full description of the event for display on the event registration page. This is a rich text field, so you can style the text. For more style control in Winter '21 and earlier, you can style the text in a word processing program and then paste it into this field. New in Summer '21, rich text controls have been added for text color, font highlight color, font and font size. These options are available for Campaigns and Visit Series. |
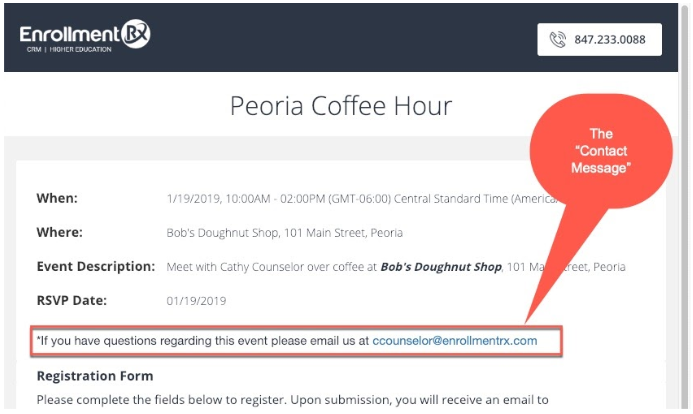
| Contact Email |
The email address of the contact person, which gets merged into the default
Contact Message in the upper right of the event registration page: |
| Override Contact Message | If you would prefer a Contact Message other than the default, you may enter it here and it will take the place of the default message, shown above. |
| Image URL | URL of the (optional) image to be inserted at the top of the event registration page. |
| Location | Location of the event to be displayed on the event registration page. |
| Form Header Font Color | (color picker) |
| Guest Information Header Font Color | (color picker) |
| Short Description | For display in the List of events on the Event Listing page. |
| Cancel Button Redirect URL | When the user clicks “Cancel” on the registration page for this event, you can redirect them to any URL you wish. If you leave this blank, then they will be returned to the Event Listing page. This is for use when you are driving users to the registration page from an external website and you want to return the user to that site if they click “Cancel” while on the registration page. |
| FormBuilder Pages | (picklist) Choose the name of the FormBuilder page you would like to use as the Registration page for the Campaign. Note that a single FormBuilder page can be used for many campaigns. It is easy to clone one of these pages and customize it for a particular campaign. |
Emails
| Email Template Registration | Select an email template from among those stored in the email template folder called “ERx Event Registration Custom Email.” This email will be sent to the registrant when two conditions are fulfilled: (1) the Campaign Member Status is “Registered” and (2) the Campaign Member’s “Send Email” checkbox is checked. |
| Email Template Wait-List |
select the email template from among those stored in the email template folder called “ERx Event Registration Custom Email.” This email will be sent to the registrant when two conditions are met: (1) the Campaign Member Status is “Wait-List” and (2) the Campaign Member’s “Send Email” checkbox is checked. |
| Sender Email | This picklist shows all the Organization-Wide Email Addresses () configured in your org. (This field does not appear unless you have at least one Organization-Wide Address configured.) Choose an address from this picklist and it will become the “From” address on the registration and wait-list emails. |
If no Organization-Wide email address is configured for a campaign, then the “From” address of the emails will be the Events Listing Site Guest User’s address.
You can designate a default Organization-Wide Address by putting its name in the Events Rx Custom Setting’s Contact Email field.
Email Template Reminder: Select the email template from among those stored in the () folder called “ERx Event Registration Custom Email.” At the time of registration, this email will be scheduled to be sent to the registrant on the day configured in the next field at the time configured in the custom setting “Events Rx” in the field “Reminder Email Schedule Time”. If left blank, no reminder email will be sent.
Send Reminder Days Before: Enter the number of days before the start date of the event that the Reminder Email should be sent. If left blank, no reminder email will be sent.
Should Send Email (obsolete) & Email Setting (obsolete): These two fields are obsolete and should be removed from the page layout if present.
Messaging
The use of each message is explained in the hover help text accessed by hovering your mouse over the “i” icon above each field.
These fields are used to override the default values stored in the ERx Events Custom Setting. If left blank, these fields will be populated with the default values.
Options
| Unlisted | Prevents the event from being displayed on the Event Listing page. Only candidates that have the registration URL can find the registration page. |
| Private | Only existing Campaign Members can register. You will invite them via an email containing a link to the registration page in which you have embedded the candidate’s Contact ID. Anyone clicking the listing on the Event Registration page will be shown the Private Campaign Message. |
| Event Redirect URL | If you wish to redirect the registrant to an external website when they click on the Event Listing, enter the URL here. |
| This is a recurring event | Check this box if the event repeats in regular intervals. When you check this, the Event Recurrence panel will open where you can specify settings for a recurring campaign. |
| Repeats | Select the calendar unit of the recurrence: Daily, Weekly, Monthly or Yearly. |
| Repeat Every | Set a recurring number for the selected calendar units (days, weeks, months or years). |
| Repeats On | If Weekly is selected, choose any combination of days of the week (provided the start and end dates are the same); if Monthly, choose either same date or same day of the same week. |
| Starts On | The date of the first campaign in the series (the parent campaign). By default this is set to the Event’s Start Date. |
| Ends | Here, you specify either the number of occurrences after which the event should end or set the end date. |
| Allow Guests | Check this box to allow Online Attendees to register guests. Then, fill in the two Guest Configuration fields. |
Guest Configuration
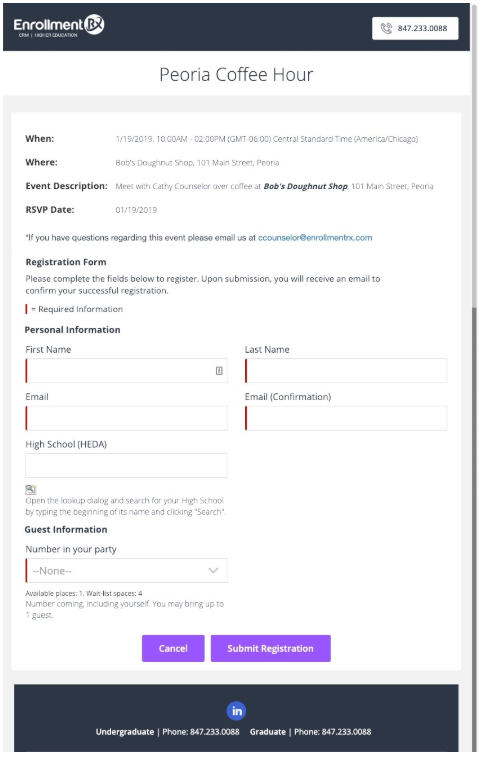
Guest Information
“Do not require information” means that the registrant can bring unnamed guests. In this
case, you must put onto the registration
page the field ERx_Events__Unnamed_Guest__c, usually with the label “How many in your party?”. This creates a dropdown in which the registrant chooses the number in their party (including themselves). The names of the additional guests are not recorded, and no records are created for them; we record only the number in the party on the registrant’s CampaignMember record.
“Require Information” means that the registrant can bring guests, but must supply at least the First and Last Name of each. Campaign Member records and Contact records are created for these guests.
Create EDA Relationship Records
Click here for instructions on creating EDA relationship records.
Maximum Number in Party
Specify the maximum number in a registering party, including both the registrant and their guest(s). This controls how many guests the registrant may register to bring.
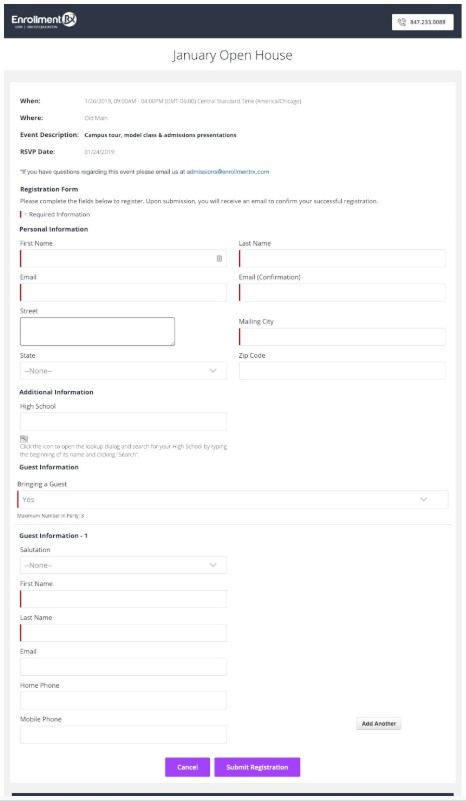
Here is an example of an event (campaign) registration form as presented to end users where “Guest Configuration” is set to “Do not require information”:
And here is an example of an event (campaign) registration form where “Guest Configuration” is set to “Require information”: