Setting Up the External User Calendar
Note:
If you're looking for information on configuring your internal staff calendar, visit this page.
Overview
The main objective for external constituents is to book an appointment with a member of your staff. There are five main steps for setting up the external user calendar. There are five main steps.
- Create a Digital Site with a Build Your Own (Aura) template
- Create a FormBuilder Rx Environment for the Digital Site in Step 1
- Create a new page with type "Appointment Registration"
- Configure the Appointment Registration page in Digital Experience
- Assign a Permission Set and create Sharing Rules
These steps are outlined in more detail below.
Step 1: Create a Digital Site with a Build Your Own (Aura) template
Note:
You can skip this section if you're using an existing Lightning Digital Site with
a Build Your Own Aura Template
Steps
- Go to Setup and search for "All Sites." Click on it when
it appears in the left column.

- Click the New button

- Select "Build Your Own (Aura)"

- Enter a Name and URL suffix, then click Create

- Wait for a few minutes for Salesforce to complete the setup

- When setup is completed you should see the below screen

Step 2: Create a FormBuilder Rx Environment for the Digital Site in Step 1
Note:
You can skip this section if you're using an existing Digital Site with an
existing FormBuilder Rx Environment. The existing Environment should be of the
Community type

Instructions
- Go to the FormBuilder Rx tab and click the Create New
Environment button

- Select the Digital Site you created in Step 1 and click Save

Step 3: Create a new page with type "Appointment Registration"
Instructions
- Navigate to FormBuilder Rx and select a Community
- Click on the Page Builder tab, click the
Create New Page button, and select "Appointment
Registration Page" in the drop-down under Select Page Type
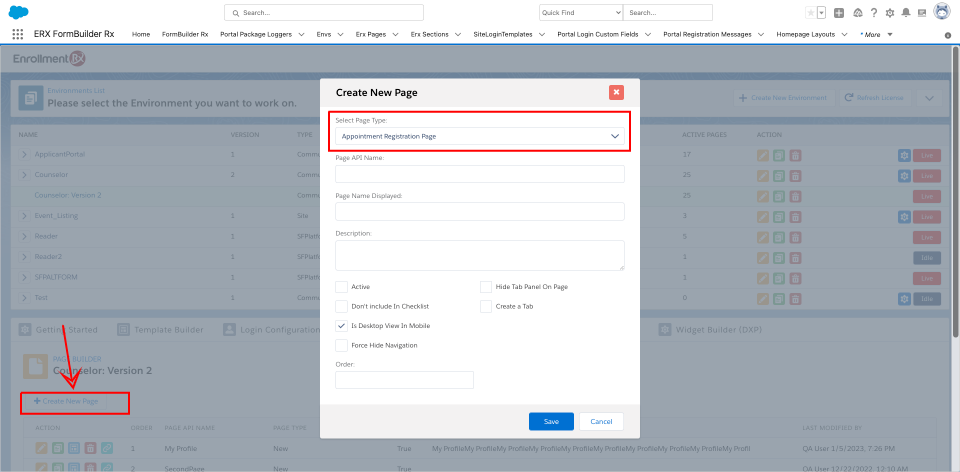
- Enter the details as below and click Save

- Once the new page is created, navigate to the "Configure" icon next to the page
listing as shown below

- This will take you to a configuration page to review sections and fields. You'll
see the Appointment data set with a red background

- You'll need to perform a one-time step to remove the red background. To do this,
click on the plus (+) sign to create a new data set, click the
Refresh Objects button and then click
Cancel

- Reload the tab and click the "Configuration" icon again next to the page. You
should now see the Appointment data set without the red background

Step 4: Configure the Appointment Registration page in Digital Experience
Note:
You should choose the workspaces of the Community configured for Appointment
Registration in the previous step.
There are two main configurations:
- Digital Site - Administration Configuration
- Digital Site - Builder Configuration
Digital Site - Administration Configuration
- Click on Administration
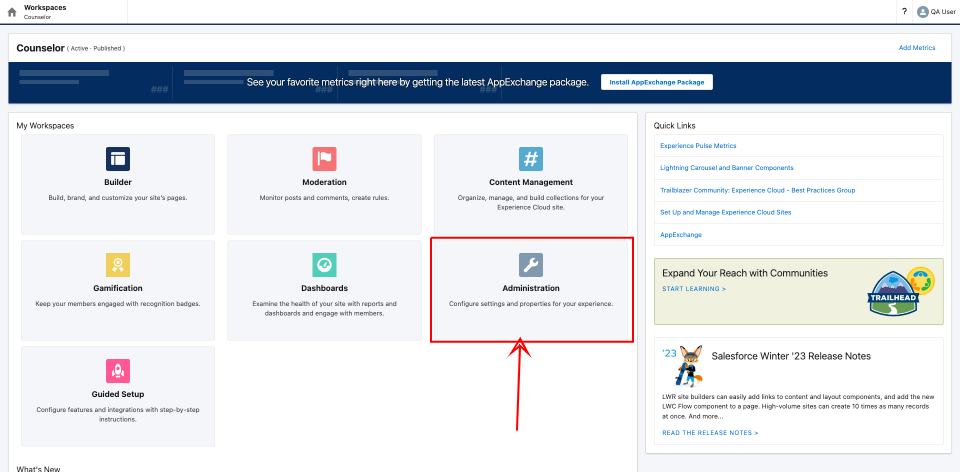
- Select the Preferences tab and then deselect "Show Nickname" and
Save

Digital Site - Builder Configuration
Note:
Please visit this page for
instructions on Experience Builder setup for external user appointment
registration.
Step 5: Assign a Permission Set and Create Sharing Rules
External Guest User for the Digital Site
There are four main permissions needed.
- Guest Sharing Rule on the objects below:
- Env

- SiteLogin Template
- Account
- Appointment Availability
- Appointment Slot
- Selected Appointment
- User (only for the Events Appointment Staff User)

- Env
- Assign the below Permission Sets to the Site Guest User.
- ERxEvent Appointment Scheduler Guest User Access
- ERx_DXP Appointment Scheduler Guest User Access
- ERx_DXP User Access

- Provide CRUD and FLS to the Contact Object for the Site Guest User Profile

- Provide Modify All permissions using Allow Object Access on the FormBuilder
Admin Panel for the selected Appointment object.

External Community User for the Digital Site
There are two main permissions needed.
- Assign the below Permission Sets to the Community User
- ERxEvent Appointment Scheduler Staff User Access
- ERx_DXP Appointment Scheduler Staff User Access
- DXP_FB_User_Access
- FB_Community
- Provide Crud and FLS to the Contact Object on the Site Guest Profile
- Object Name = Contact