Upgrade and Sandbox Testing Instructions
Level of Expertise Required
Very basic Salesforce System Administrator skills
Estimated Time Required for Upgrade
| 10 minutes | Install upgrade |
| 10 minutes | update profiles of non-System Administrator admins (if needed, see instructions below) |
| 10 minutes | Prepare sandbox for testing |
| 30 minutes | Test portal and sites |
Sandbox and Production URLs
Summer 2020
Version: 5.0.24
Installation Links
Sandbox: https://test.salesforce.com/packaging/installPackage.apexp?p0=04t1R000001MSn5
Production: https://login.salesforce.com/packaging/installPackage.apexp?p0=04t1R000001MSn5
Preparing a New or Refreshed Sandbox for Testing
After you create or refresh a sandbox, you will need to tweak each FormBuilder Environment to make it reference the Sandbox’s domain, rather than the production org’s domain. Follow these steps:
1. Set all of your Environments to Idle status:
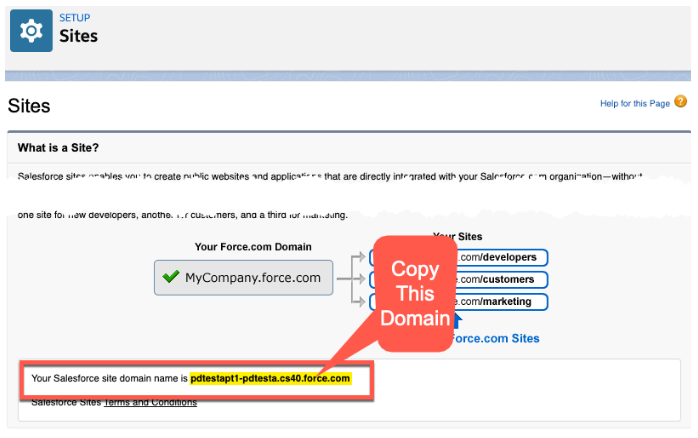
2. Substitute the Sandbox’s domain for the production org’s domain in each of the Environment’s settings.
- Find the correct domain of your sandbox by going to and copy the sandbox’s Salesforce site domain:
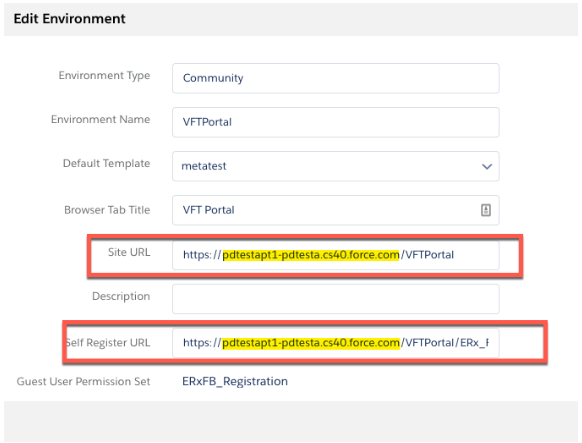
- For Each FormBuilder Environment, click the Edit button (the yellow pencil icon) and locate the Site URL. If the Environment is a Community, you'll also need to copy the Self Register URL, as shown here:
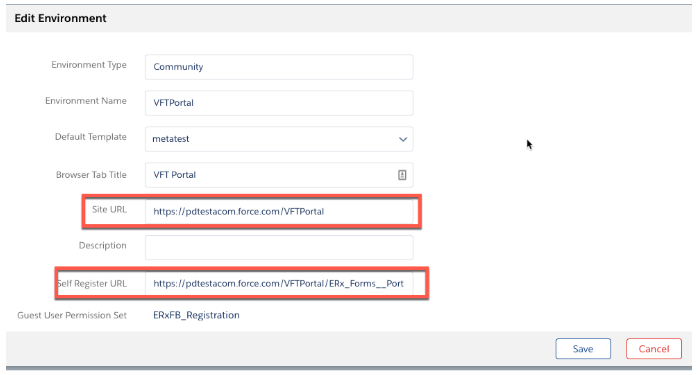
- Paste the new sandbox domain in place of the old production domain in each of these URLs—it goes between the double slashes (“//”) and the first single slash (“/”) like this:
- Click Save
Steps Needed for Continued Function of FormBuilder Rx After Upgrade to Summer '20
A. Check/Update your Templates
Introduction
In Summer 20, we have greatly improved page load speed by splitting the loading of pages into three separate streams:
- Template
- Body
- Navigation
Each of these three now loads into the user’s browser independent of the other two, and, as a result, the three may finish loading in any order. In particular, the template may finish loading before the body of the page, and this can break javascripts in templates if they fire before the body is finished loading.
In addition, we have had to restructure FormBuilder’s packaged CSS, and this may affect behavior of custom CSS and HTML in your templates.
No changes will occur if you have used ERx Templates (the “Light” or “Dark” templates supplied as part of FormBuilder Rx). These will automatically adapt to the new changes described above. However, if you have custom CSS, HTML or Javascript in your templates, then the appearance of your pages may be disrupted.
Action Needed
In a sandbox, (it is crucial you do this in a sandbox before upgrading production) after upgrading to Summer 20, check all FormBuilder pages to make sure they look right and have not changed.
If they have changed then have your webmaster consult our Guide for Modifying Templates.
If you do not have the resources to modify your templates, then submit a support ticket to Enrollment Rx and one of our web developers will fix your templates.
B. Give Community Users access to the ERX Core object 'Package Configuration'
In order to support the new Object Agnostic functionality of ERX Core (whereby any object that looks up to the Application or Contact can serve as a Requirement Item Object or “RIO”), FormBuilder needs access to Core’s setup information contained in Core’s object “Package Configuration.”
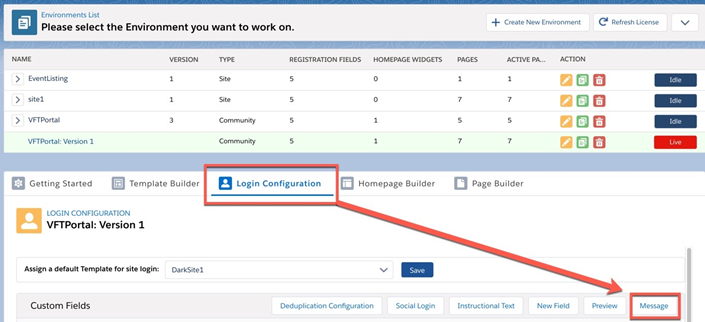
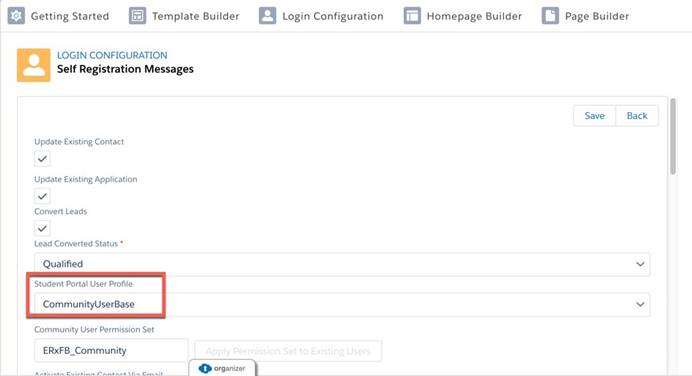
1. Edit the profile of your community users. You can find the name of this profile in the FormBuilder tab, under the sub-tab “Login Configuration”, behind the button “Message”, where it is labeled “Student Portal User Profile”, as shown in these two screenshots:
2. Having found the name of the profile, go to and edit the profile
- Grant Object Permissions “Read” and “View All” on the “Package Configurations” object like this:

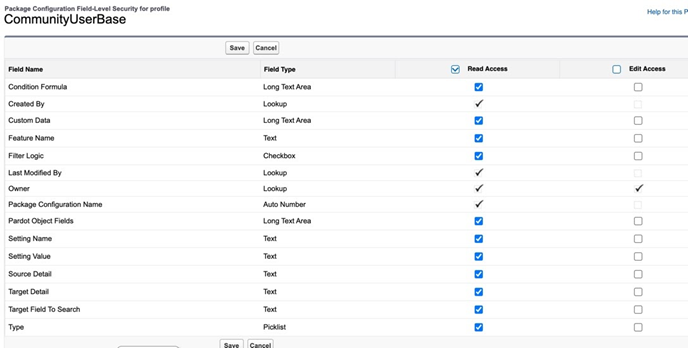
- Edit Field Level Security for “Package Configuration” and grant “Read Access” on all fields
B. Take advantage of New Homepage Render Speed
While not, strictly speaking, necessary for continued operation, this step is necessary to take advantage of new improvements in rendering of the homepage. Rendering of the homepage involves time consuming evaluation of the render criteria for each widget. But, now, starting with the Summer 2020 release, you can associate widgets with layouts, so that, when a layout renders, only the widgets associated with that layout are evaluated for rendering.
By default, in the Summer 2020 release, for backward compatibility, we automatically associate each widget with all layouts. To speed up homepage rendering you should disassociate each widget from the layouts where it is not needed. Follow the instructions here.
What to Test
After you install into your sandbox, you should test your Community and Sites pages that have been built with FormBuilder.
For Communities (Application Portals):
- Register as a new portal user
- Complete an application from start to finish
- Log out
- Log in as a full Salesforce user and check the Contact, Application, and all its child records to make sure they were updated with the information you entered on the portal
For Sites:
- Complete a Site form
- Check the record(s) created on the back end
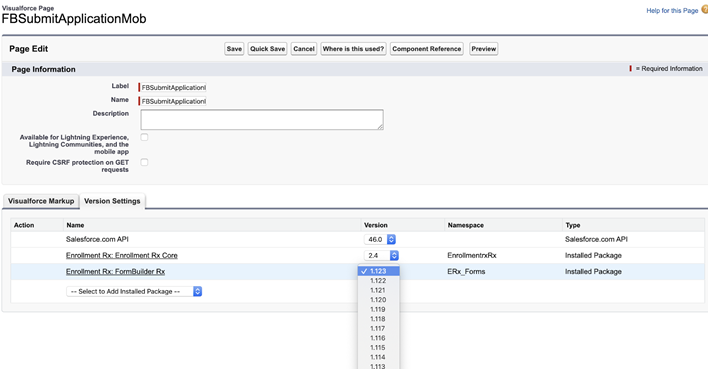
If you have a custom Visualforce page that ceases to work:
- Edit the Visualforce page by going to
- Click the “Version Settings” tab
- Change the Version of the Package to 5.0, like this: