Creating and Editing Widget Contents
Clicking on a widget opens its Configuration dialog:
| Label | Description |
|---|---|
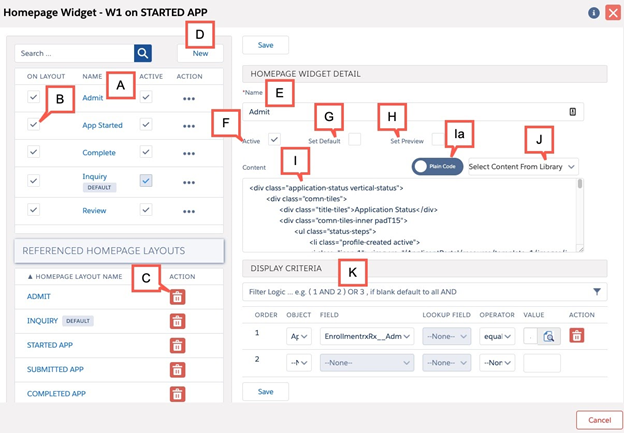
| A | Widget Contents already created for this widget number are listed on the left. Click on one to select and edit it. |
| B | Check ON LAYOUT to associate the widget content with the current layout;
uncheck ON LAYOUT to disassociate widget content from rendering on the current
layout. Note: These are convenient ways to leverage the functionality whereby
homepage render speed is improved by limiting the widgets that are queried
when a given layout is rendered. The fewer widget contents associated with
each layout, the faster homepage rendering. |
| C | REFERENCED HOMEPAGE LAYOUTS list: Click the garbage can icon to disassociate the selected widget content from other layouts (see Note in B). |
| D | Click the “New” button to create a Widget Content for this Widget (all Widget Contents are specific to a particular Widget Number, in this case Widget “W1”). |
| E | Name each widget content. You should adopt a “smart” naming convention, if you have many widgets, to organize them for easy identification and modification in future. |
| F | Set “Active” to control whether or not this widget content is in any way active. Unchecking this box disables the widget content entirely, on every layout. But it does not erase the widget content’s connections to layouts. If you reactivate the widget content, those connections will be intact. |
| G | “Set Default” means this widget content will be displayed in this Widget (W1 in this case), (provided it is ON LAYOUT”) if no other W1 Widget Content’s Display Criteria are met. Checking this box hides the Display Criteria for this Widget Content. |
| H | “Set Preview” means that on the Layout Builder page, this Content will be displayed. |
| I | Widget Content
|
| J | The “Select Content From Library” dropdown allows you to insert any of the widget types detailed in The Widget Library |
| K | “Display Criteria” determines when this widget content will display. To configure, follow the instructions above for Homepage Layout Display Criteria |