Put a Page into an iframe
Overview
You can put a Page Builder page into an iframe in a widget on a community homepage. You can also put a page from a Site into an iframe on an external website.
Putting a Community Page into a Homepage Widget (using an iframe)
In a community environment, follow these instructions to put a page into an iframe on the Homepage Layout. There are three high-level steps to this process:
- Create a blank template to be used within the widget
- so that the page inside the widget does not have a header and footer
- Create a widget containing a line of iframe code
- to pull the page into the widget
- to call the blank template with a parameter, and
- to set the dimensions of the iframe
- Edit the page to remove it from the navigation checklist, and hide tabs and
navigation on the page
- so that the page in your widget shows none of the tabs produced by the “Create a Tab” feature
- So that the page has no navigation checklist panel that by default appears by default on the left side of every page and
- so that the page does not appear as an item in the navigation checklist panel
These steps are outlined in more detail in the following sections.
Step 1. Create a blank template to be used with the page in the iframe.
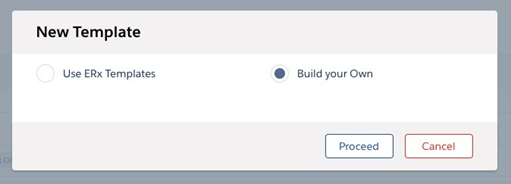
- In the FormBuilder subtab “Template Builder," create a new template, selecting
“Build Your Own” like this:
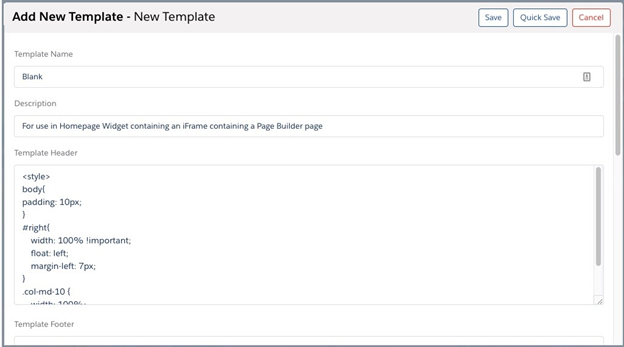
- Put only this code in the header:
 <style> Body{ padding: 10px; } #right{ width: 100% !important; float:
                left; margin-left: 7px; } .col-md-10 { width: 100%; } </style>
- Scroll to the bottom and check the “Active” box in the section called “DISPLAY
CRITERIA MAIN” section and set the criteria to display this template when the
parameter that you put into the iframe URL has the value you specified in the
iframe. In our example we used the parameter “type=0”, so we configure the
template to display when parameter “type” equals value “0”, like this:

Step 2. Create a widget containing iframe code.
Put this code into a new widget: <iframe
src="/[ENV_DOMAIN_NAME]/[PATH_TO_PAGE]&type=0" height="470px" width="400px"
style="border: 0px;" />
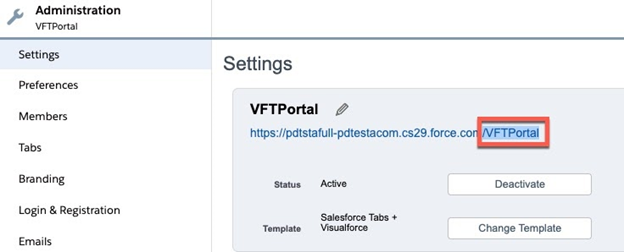
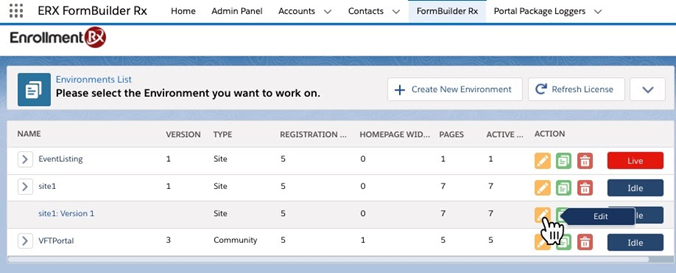
- In the “src”, replace [ENV_DOMAIN_NAME] with the name of your Community found
under and highlighted in this screenshot:
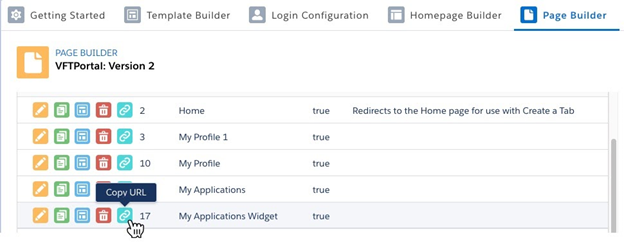
- Replace [PATH_TO_PAGE] with the path to the page. You can get this path and put
it on your clipboard by clicking on the Copy URL button on the page, like
this:
- Your Widget will look something like this:

- Note that you specify the height and width of your iframe. You will need to experiment to find the right values, but a rule of thumb is width=“400px” for a widget occupying a single column in a three-column layout.
- Note that you must append a parameter to the URL, in this example “&type=0” (but you may use any parameter you like); the parameter will call the appropriate template into the iframe. Usually, you will want to use a blank template, as described next.
Step 3. Remove the page from the navigation checklist and hide tabs panel and navigation.
- Edit the page (click the pencil icon beside the page’s name) and
- Check “Don’t include in checklist
- Check “Hide tab Panel On Page

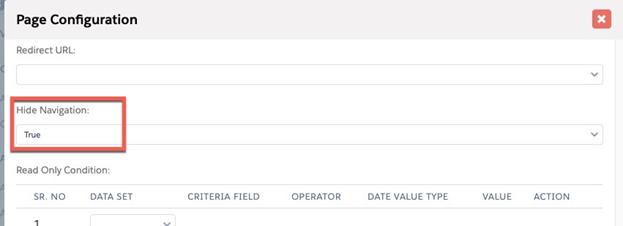
- Configure the page (click the “Configure” button beside the page name, shown
here:


- Under Page Configuration, set “Hide Navigation” to true:
Putting a FormBuilder Site Page into an external website (using an iframe)
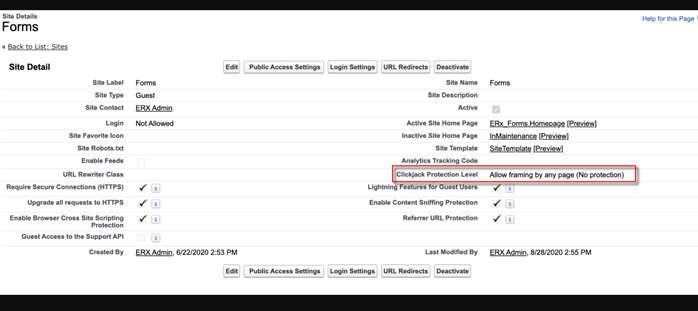
1. Set the Clickjack Protection Level of your FormBuilder Site
2. Put the following iframe code onto the external site:
<iframe src="[SITE URL]/apex/ERx_Forms__PageMaker?pageid=[PAGE API NAME}" frameborder="0"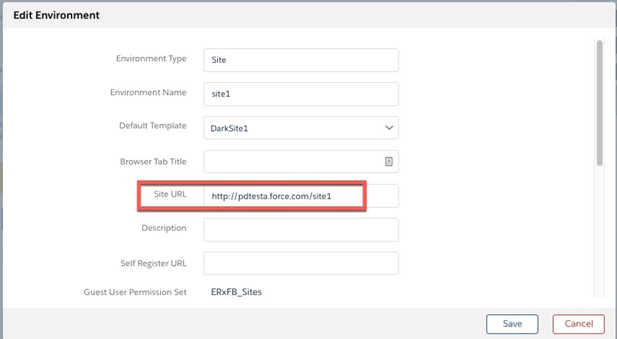
marginheight="0" marginwidth="0" width="100%" height="700px" scrolling="auto" />- Find your Site URL by clicking the pencil icon beside your Site
Environment like this:
- And then copying the Site URL from the dialog that opens:
- And then copying the Site URL from the dialog that opens:
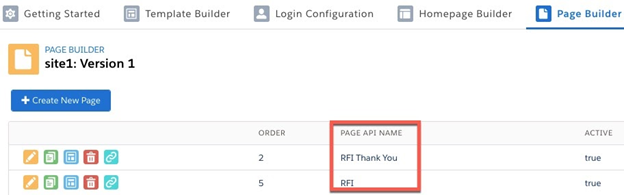
- Find your page’s API name in the PAGE API NAME column of Page
Builder: