Virtual Field Data Set
Overview
Virtual Fields are designed to give you a way to create a field for a one-off purpose, while avoiding creating a field in your Salesforce data model. Virtual Fields are meant to be used to control other fields. Generally speaking, they are meant to be auto-populated. The value of a Virtual Field is not saved when the user leaves the page (thus the need to auto-populate it when the user returns to the page).
By default a data set called “Virtual Field” appears on every page. Here, you can create Virtual Fields of datatypes STRING, BOOLEAN, PICKLIST, MULTIPICKLIST, REFERENCE and PASSWORD (PASSWORD is only used on Community Registration Pages).
Creating Virtual Fields
- Click the pencil icon next to the Virtual Field data set to launch this
modal and edit it:
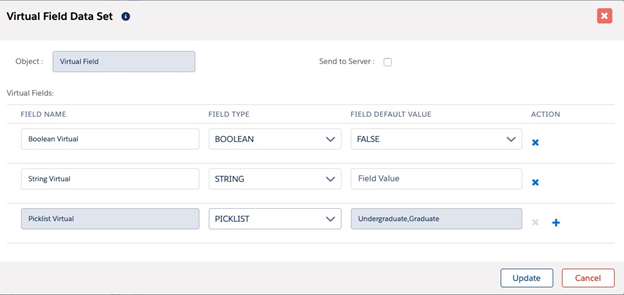
- Create a new field by clicking the “+” sign to the right of the bottom row
- When assigning a name to the new virtual field, do not use any spaces (underscores and dashes are okay). If the field is rendered on the page, you can update its label to include spaces through the field-level configuration.
- Specify the field type and—optionally—specify a default value
- Multiple values may be put into a virtual picklist by listing them separated by commas in the Field Default Value column (default picklist value is specified as usual for picklist fields after you drag the field onto the page and double click its name)
- Note that after a virtual field has been dragged onto the page it is no longer editable (or deletable) on this screen, so, for instance, you can’t change the picklist values while the virtual picklist is in use on the page. To edit these values, or to delete a virtual field, take the virtual field off the page.
About the Send to Server Checkbox
The Send to Server checkbox (pictured above) is unchecked/set to "false" by default. Please see the following table for statuses and their descriptions/examples.
| Status | Description/Example |
|---|---|
| True (checked) | When a user creates a password to register on a custom registration page, values for the password and confirm password fields are sent to the server. |
| False (unchecked, default) | If left unchecked, the values in the password and confirm password fields would not be sent to server, and the user would not be able to register. |
| False without a validation rule for the virtual fields | As above, the values in the password and confirm password fields would not be sent to server, and the user would not be able to register. |
| False with a validation rule for the virtual fields | The field values would be sent to server and the user would be able to register. |
Uses for Virtual Fields
- You have a complex set of rendering conditions that you need to re-use in rendering several fields and sections, but you hate the prospect of creating (and maintaining!) these complex conditions in multiple places. Solution: Create a virtual STRING field and auto populate it with “TRUE” (or any value you want) when your complex conditions are fulfilled, then use a simple condition [Virtual Field = TRUE] in place of the complex conditions.
- You need to control the values available in a picklist or reference field displayed as a picklist but you don’t have another picklist that will do the job. Create a Virtual Picklist for this express purpose and make it control the other field.
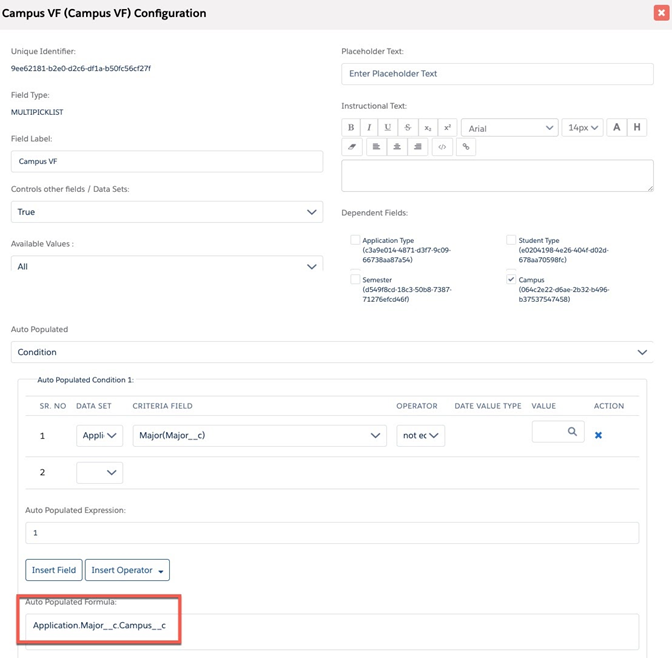
- You have a multi-select picklist field (e.g., “Campuses”) on an object (e.g.,
“Majors”) and when a user selects a Major you want to display a picklist
offering just those values in the chosen Major’s “Campuses” field. Create a virtual Mult-Select Picklist and auto populate it with the selected Major’s “Campuses” field like this:
 Then filter the records available in a lookup to Campuses (a kind of Account) like this:
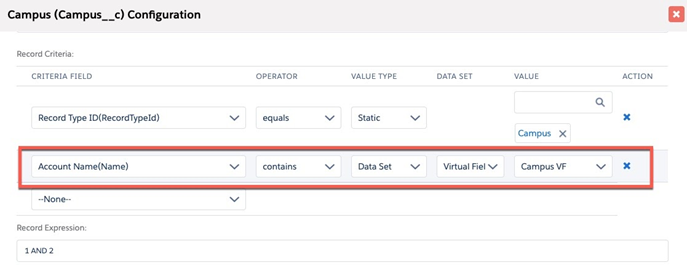
Note that when a virtual multi-select picklist is on the right hand side of a Record Criteria, the “Contains” operator actually means Is Contained In.