Step-by-Step Instructions for Creating Automatic Approval Processes
Setup Wizard
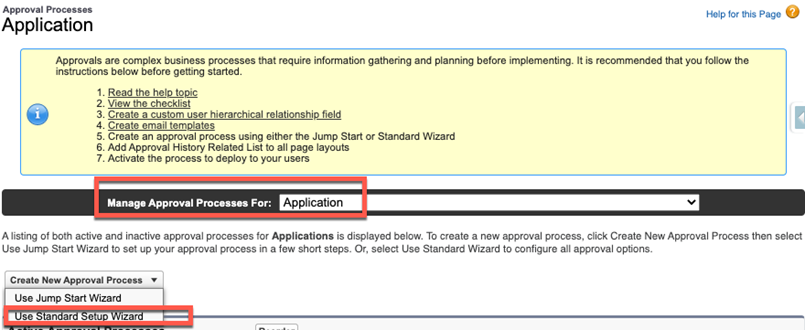
- Go to and set the dropdown called “Manage Approval Processes For” to
“Application” and click and hold the “Create New Approval Process” button and choose
“Use Standard Setup Wizard” like this:
- Step 1 of the Wizard: Enter Name and Description. Give your process a
short, descriptive name. Short, descriptive names are crucial to the readability of
the dashboard and of the “Approval History” related list on the Application. You
would also be well advised to fill in the “Description” field for reference by those
who must maintain the approval process in the future. After filling in the name and
description, click the “Next” button.
Note:Because only step names display in the “Approval History” related list on the application, you must include the name of the process—or a shortened version of it—in the name of each of the process’ steps. So think long and hard about the names of your processes to make them as concise (short and descriptive) as possible.
- Step 2 of the Wizard: Specify Entry Criteria. The Entry Criteria for
your Automatic Approval Processes can be constructed from any field(s) on the
application—typically an Admissions Status value like “Application Complete” or
“Review” is used, among others.
Note:All of the fields used in entry criteria must also be entered into the tab called “Approval Process Entry Criteria Fields”. Entering the fields into this tab causes Reader to monitor these fields and, when one of them is changed, to submit the application to be evaluated against the entry criteria of the automatic approval processes. If the application meets the entry criteria of one of the processes, it will enter it; if not, nothing happens.
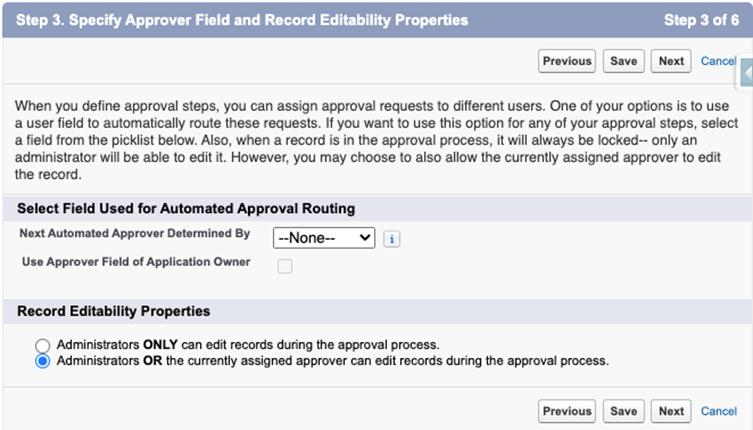
- Step 3 of the Wizard: Specify Approver Field and Record Editability
Properties. Configure this screen like this:
- Step 4 of the Wizard: Select Notification Template.
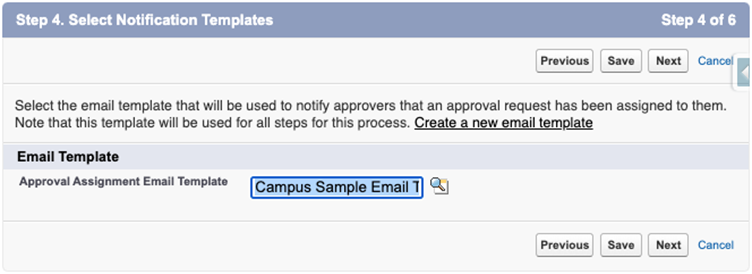
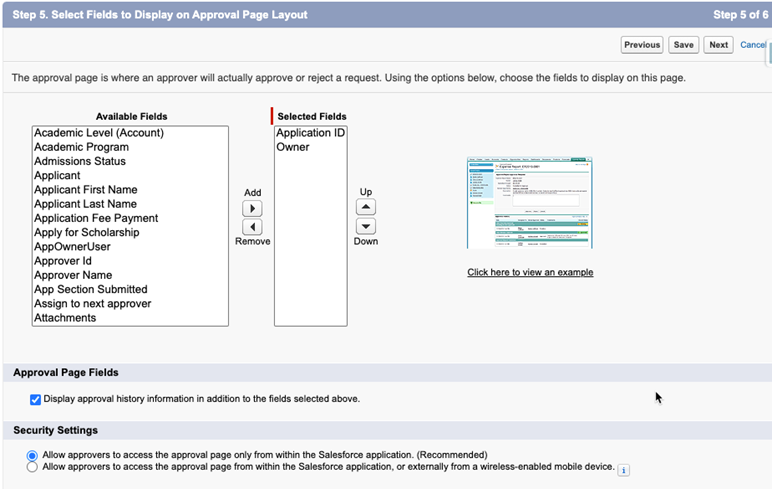
Use the email template you created per the section above on The Notification Email Template. This is an essential step. Reader Rx will not work unless you have a properly constructed custom classic email template. - Step 5 of the Wizard: Select Fields to Display on Approval Page
Layout. These settings are not relevant to Reader Rx and will have no
effect. Nevertheless, we recommend you configure them to look like this, which is
the configuration with which we have done all our testing:
- Step 6 of the Wizard: Specify Initial Submitters. We recommend you set
this to “All Internal Users”, like this:
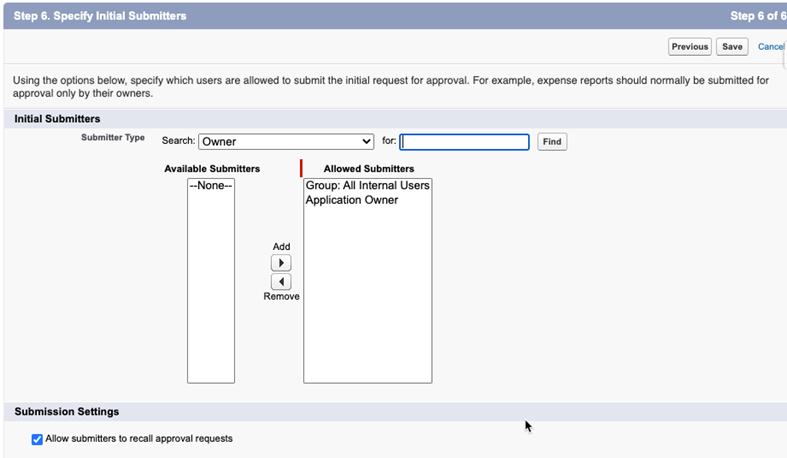
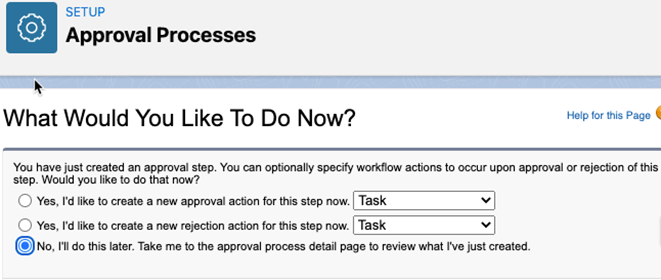
Checking the “Allow submitters to recall approval requests” creates a convenient way for a submitter to recall an application that was submitted in error. If this is checked, then on the related list “Approval History” on the Application page layout, the submitter can use the “recall” action to remove the application from the approval process. - When prompted with the What Would You Like To Do Now? dialog, choose “No,
I’ll do this later.”
Creating Steps of the Automatic Approval Process
- Click the “New Approval Step” button to enter the step creation wizard.
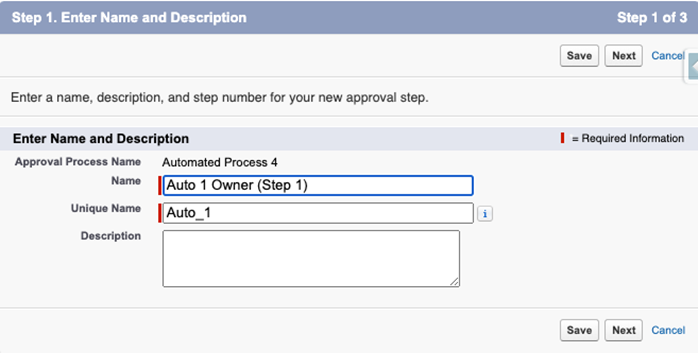
- Step 1 of the step wizard: Enter Name and Description. and give your step a
name that:
- Begins with a shortened form of the Approval Process Name
- In the middle has a brief description of what applications the step is for or who is being assigned to review in this step
- Ends with the number of the step in parentheses
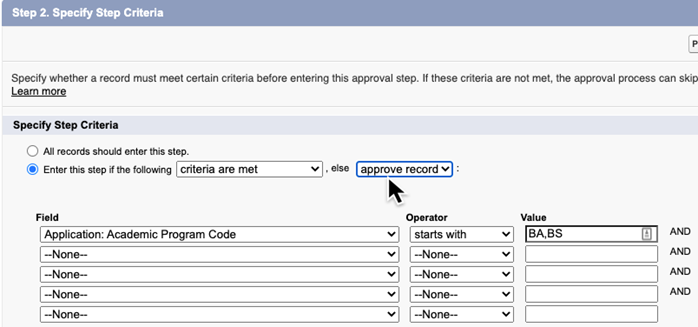
Click the “Next” button. - Step 2 of the step wizard: Specify Step Criteria. This is the heart of
the approval process. Each step can have its own entry criteria,
depending on variables such as program, degree level, applicant type, campus,
school, department, etc.
Note:You can only choose “go to next step” if a next step exists, so for each step you will need to set the “Enter this step if the following..., else approve record” like this:Generally speaking, you will want each step of an automatic approval process to be skipped if the application does not satisfy the entry criteria. In that case you will want the application to go to the next step and be evaluated against its entry criteria, and so forth for all the steps of the process.
and then, after you define the next step, you must come back to the previous step and change “approve record” to “go to next step” like this: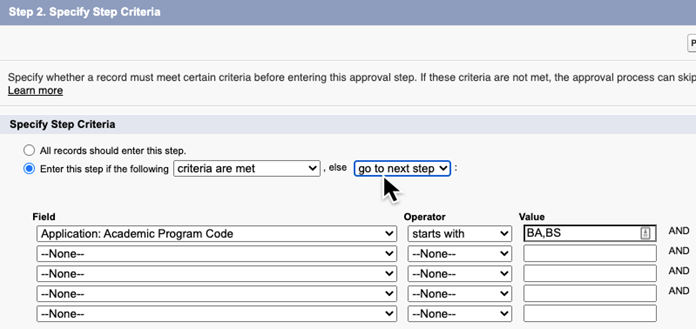
Click the “Next” button. - Step 3. Select Assigned Approver. Here you have many options:
- Let the submitter choose the approver manually — you may use this option for step 2 and higher, but NOT for step 1 of an automated process. For the first step, you must choose one of the options below.
- Automatically assign to queue — any member of the queue can review and, when they click “Submit”, move the application to the next step in the process.
- Automatically assign to approver(s) User — assign to an individual that you designate.
- Automatically assign to approver(s) User, and click “Add row” to designate multiple Users and then choose either:
- Approve or reject* based on the FIRST response, or
- Require UNANIMOUS approval from all selected users
- Automatically assign to approver(s) Queue with Require UNANIMOUS approval from all selected approvers (i.e. from all members of the queue).
- Automatically assign to approver(s) Related User — assign to any user linked (via a lookup relationship) to the Application record, such as the Owner, Creator, or, best of all, any custom lookup to the User object that you populate using Process Builder or Flow. For example, you could create a lookup called Program Director and populate it with the director of the program to which the user is applying. This dynamic capability can save you a lot of work by eliminating the need to create separate steps for each program.
Important:In Reader Rx, we never use the “reject” option mentioned in Salesforce documentation about approval processes. As far as Salesforce Approval Processes are concerned, we always “approve” records — this happens whenever a reviewer clicks the “Submit” button while reviewing an application. So, never choose a “reject” when configuring Approval Processes for Reader Rx; always choose “approve” if offered a choice.